Primary Business Key
This checkbox indicates that the column is part of the primary business key when set. Multiple columns can form the primary business key. This indicator is set and cleared by QAD Data Warehouse Designer during the dimension update procedure generation process. This checkbox should not normally be altered.
Changing a Column name
If the Column name or Data type is changed for a column then the metadata will differ from the table as recorded in the database. Use the Tools/Validate table create status menu option or the right mouse menu to compare the metadata to the table in the database. A right mouse menu option of 'Alter table' is available when positioned on the table name after the validate has completed. This option will alter the database table to match the metadata definition.
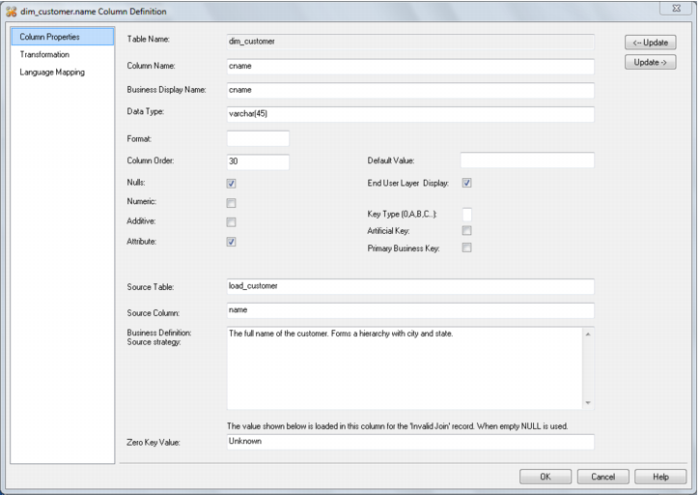
For example: Analysis Services does not like 'name' as a column name. For dim_customer it will therefore be necessary to change the column name from 'name' to 'cname'.
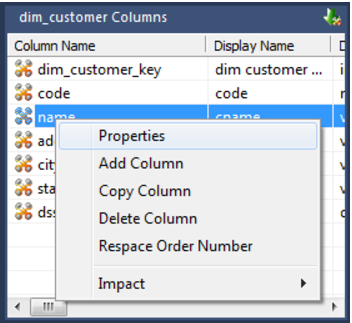
1 Click on the dim_customer object in the left pane to display the dim_customer columns in the middle pane.
2 When positioned on the column 'name' in the middle pane, right click and select 'Properties' from the drop down menu.
3 Change the column name from 'name' to 'cname' as shown below. Click OK to leave the properties page.
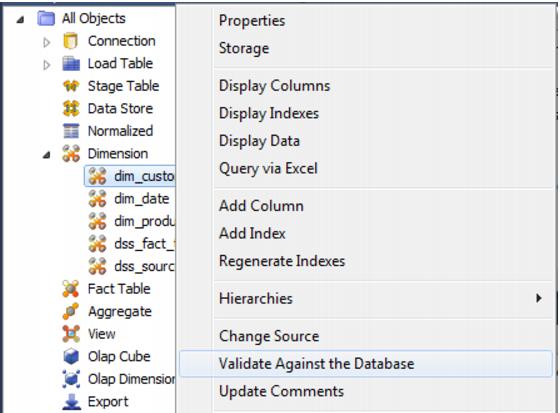
4 Right click on the dim_customer object in the left pane and choose
Validate against Database.
5 The results in the middle pane will show that the metadata has been changed to 'cname' while the column name in the database is still 'name'.
6 Right click on dim_customer in the middle pane and select
Alter table from the drop down list.
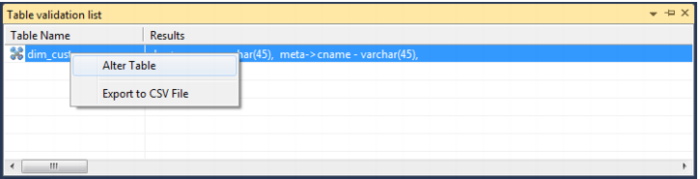
7 A warning dialog will appear, displaying the table and column name to be altered. Select Alter Table.
8 A dialog will appear confirming that dim_customer has been altered. Click OK.
Dimension Column Transformations
Each dimension table column can have a transformation associated with it. The transformation will be included in the generated procedure and will be executed as part of the procedure update. The transformation must therefore be a valid SQL construct that can be included in a 'Select' statement. For example we could have a transformation of 'load_order_line.qty * 0.125' to calculate a tax column of 12.5%. Click the 'Transformation' tab to enter a transformation.
Note: Transformations are only put into effect when the procedure is re-generated.
Dimension Hierarchies
The various hierarchies associated with a dimension can be recorded in the QAD Data Warehouse Designer metadata. These hierarchies are often not used in any form, except to provide documentary completeness. They can however be used in conjunction with the QAD hierarchy maintenance utility to allow the maintenance of hierarchy elements externally to a production source system.
When used in conjunction with the hierarchy maintenance utility these dimension hierarchies add a powerful method of enriching the analysis capabilities of the data warehouse. For example we may have a source system that has a dimension called sales_person. This dimension has no information apart from employee_code, name and title. We could add additional columns of sales_manager, territory, state and region to this dimension. A hierarchy could then be formed from the salesperson name, sales_manager, territory, state and region. The hierarchy maintenance utility allows the maintenance of this hierarchy externally to the data warehouse. This external hierarchy can then become a source system to enrich the data in the warehouse.
Two areas will be covered. The first the creation of hierarchies using QAD Data Warehouse Designer, and secondly the process required to setup and use externally maintained hierarchies as source systems to the data warehouse.
Adding a Dimension Hierarchy
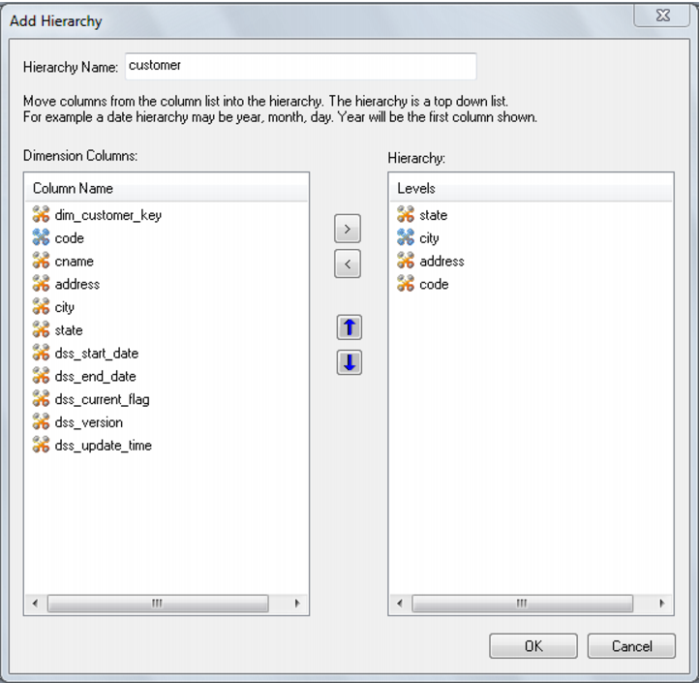
Any number of hierarchies can be created against a dimension. There is no restriction on the form of the hierarchy. To add a new hierarchy, position on the dimension table in the left had pane and using the right mouse menu select 'Hierarchies' / 'Add Hierarchy'. The following dialog will appear.
Enter a meaningful name for the hierarchy.
The hierarchy is built with the highest level at the top; for example a customer dimension may have state at the highest level, then city, then address and finally code at the lowest level.
To enter the hierarchy elements, select them, in the required order, from the left pane and choose Add. This will add them to the right hand column. Once all the hierarchy elements have been added, choose OK.
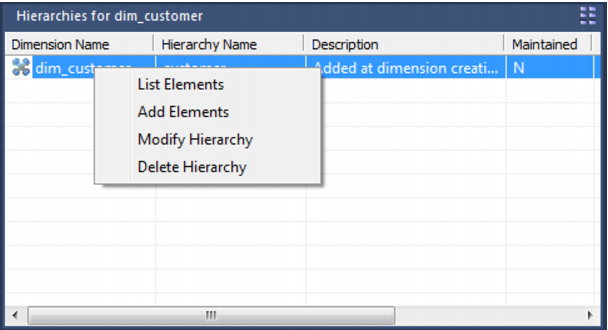
A hierarchy and its elements can be edited by listing the hierarchies associated with a dimension and using the right mouse menu options available in the middle pane.
Using a Maintained Hierarchy
Once a hierarchy has been added to a dimension it can be maintained externally by the hierarchy maintenance utility if the 'Maintained' attribute is set. The process for maintaining this hierarchy externally and using it as a source system to the data warehouse is as follows.
1 Grant the user that is to undertake the maintenance select access to the following tables: ws_dim_tab, ws_dim_col, ws_hie_header, ws_hie_link, ws_meta_tables.
2 Grant the user that is to undertake the maintenance select access to the dimension that has the hierarchy.
3 Using the hierarchy maintenance utility (see online documentation) log on to the maintenance area and create and populate/edit the maintenance table.
4 In QAD Data Warehouse Designer, create a connection to the hierarchy maintenance schema/database.
5 Browse the hierarchy connection.
6 Using drag and drop create a load table from the hierarchy maintenance table.
7 Edit the columns in the dimension that are to be sourced from the maintenance table and change their source table and column to that of the load table and columns created in step 6.
8 Generate a new update procedure for the Dimension and either do a lookup of the maintenance table or a join based on the business key.
9 Run the update procedure.
Snowflake
Snowflake schemas normalize dimensions to eliminate redundancy. That is, the dimension data has been grouped into multiple tables instead of one large table. For example, a product dimension table in a star schema might be normalized into a products table, a product_category table, and a product_manufacturer table in a snowflake schema. While this saves space, it increases the number of dimension tables and requires more foreign key joins. The result is more complex queries and reduced query performance.
Creating a Snowflake
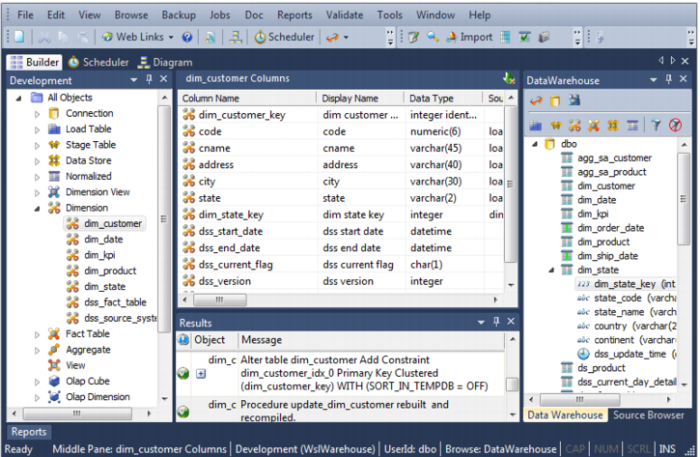
A snowflake dimensional structure is supported by QAD Data Warehouse Designer. A snowflake can be created for normalized or partially normalized dimension tables. It is created by including the surrogate key of the parent dimension in the child dimension. In the example below, the dim_state table represents the parent dimension. The column dim_state_key is added to the child dimension dim_customer. Any fact tables that include the dim_customer dimension will inherently have a link to the dim_state dimension.
The process for creating a snowflake is as follows:
1 Build both dimensions (see previous sections).
2 Expand dimensions in the left pane.
3 Click on the child dimension table in the left pane to display its columns in the middle pane.
4 Browse the data warehouse connection in the right pane.
5 Expand the parent dimension table in the right pane.
6 Drag the surrogate key of the parent dimension table from the right pane to the child dimension's column list in the middle pane.
7 Create/Recreate the child dimension.
8 Rebuild the child dimension's update procedure.
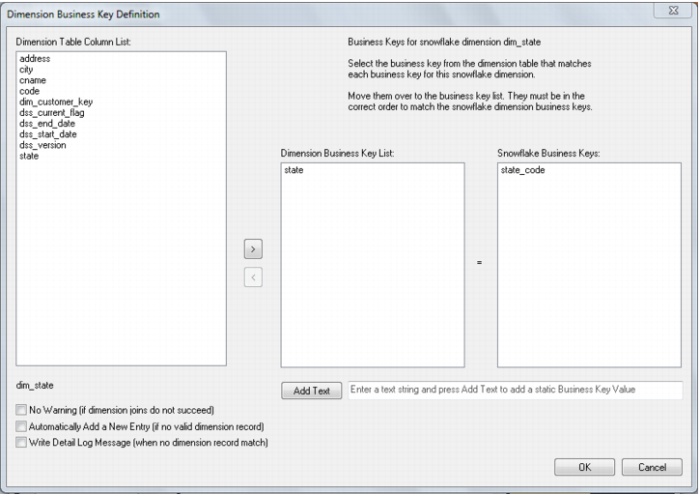
9 A dialog will now appear asking for the business key column(s) in the child dimension that match the business key for the parent dimension:
10 Add the business key column(s) and click OK.
The QAD Data Warehouse Designer screen should look like this:
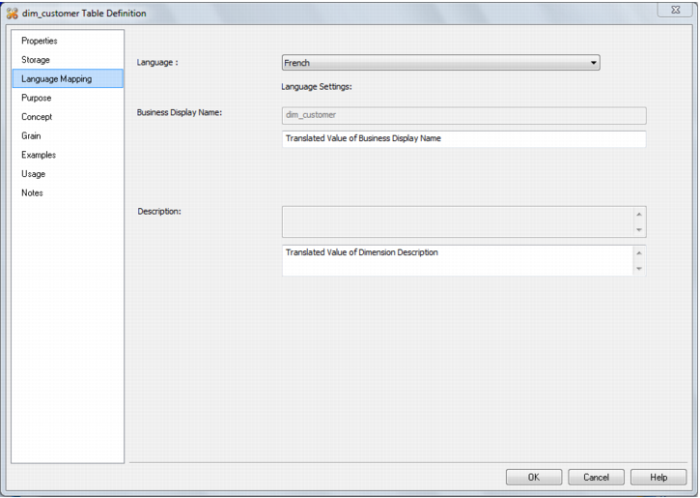
Dimension Language Mapping
The Dimension Properties screen has a tab called 'Language Mapping'.
Select the language from the drop down list and then enter the translations for the Business Display Name and the Description in the chosen language. The translations for these fields can then be pushed through into OLAP cubes.