Setting Up E-mail Integration
Users can send e-mail messages from their QAD CRM client using any messaging client installed on their computer. If integration is enabled, the system uses Microsoft Outlook as the default messaging client.
To set up e-mail reference synchronization in the system:
1 Choose Main Menu|Settings|Mail Server Integration|Settings and Switches.
2 Enable the option called Enable Email Integration under the Settings tab.
3 Click the Emails tab.
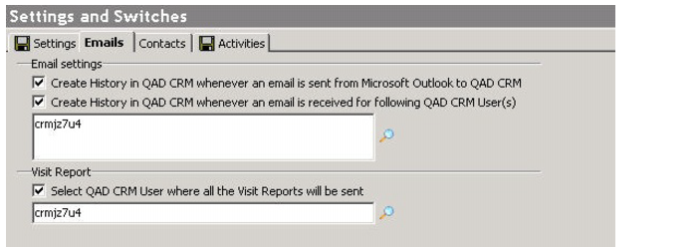
Settings and Switches - Emails
4 You can create a history record in the CRM system whenever an e-mail message is sent from Microsoft Outlook and moved or copied from the Sent folder to the folder named QADCRMHistory. To do so, select Create History whenever an email message is sent from Microsoft Outlook.
5 To create a history record in the system when an e-mail message is received in specified mailboxes:
a Select Create History when email is received for the specified mailboxes.
b Enter the mailbox names.
Use this option to create mailboxes for specific tasks. For example, you can create a Support mailbox to receive e-mail messages from customers requesting support.
6 To create history records from e-mail messages received in a specific mailbox:
a Select the Mailbox for Scanning Visit Reports check box.
b Enter the mailbox name.
Users, typically sales personnel, can compose an e-mail message detailing an activity and send it to this mailbox with this subject:
Visit Report — <contact e-mail address>
QAD AdminService scans such e-mail messages, extracts the contents, and creates a history record.
For more information about how to submit visit reports to QAD CRM, or synchronize e‑mail with QAD CRM from a mobile device, see the following sections in the QAD CRM User Guide:
• “Managing Customer Visit Reports”
• “Synchronizing E-mails”
7 Click Save.