Manage Data Import
You can manage data import records from the GDI option. Right-click in the browser area and add, edit, copy, or delete a data import record from the list displayed.
Generic Data Import
Details
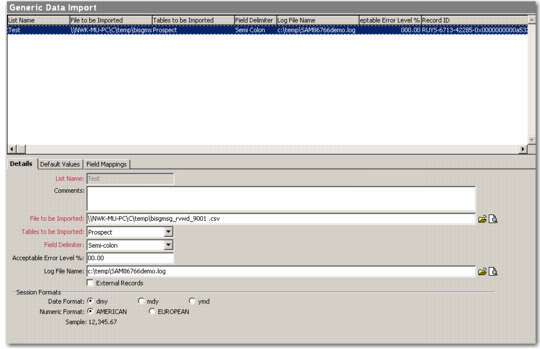
Use the Details tab to record specifications for importing data from a file into a table.
List Name
Enter a list name you want to give to the import record. Typically, this is the name of the source from where the data file was acquired. You should specify the same list name each time you import data from this source. The system uses this name for mapping fields and importing data.
Comments
Enter additional information about the file you will import.
File to be Imported
Enter the name and the full path to the data file you want to import. Click the Open Folder icon next to this text box to select the file from your computer or network. To open the data file and view its contents, click the View icon next to this text box.
Note: It is recommended that you view the contents of the import file to ensure that its data is in the required format.
Tables to be Imported
Select the system table where you want export the data. If the import file contains multiple tables, select Multiple.
Field Delimiter
Select the field delimiter used in the import file for separating field data. If the delimiter is not in the list, select Others. A text box displays. In this text box, type the delimiter.
Acceptable Error Level%
Enter the numeric error acceptance percentage that is permissible for the data import process. Set it high—like 80%—if you want to continue the import process even when it encounters some errors, and low—like 10%—when you want the process to stop if it encounters errors.
Log File Name
Enter the name and the full path of the log file that should contain the error logs, if any, of the import process. Click the Open Folder icon to select the file from your computer or network. When the log file is ready after the import process ends, you can view it by clicking the View icon.
External Records
Select this check box if the import data file contains data from an external source.
Date Format
Select the appropriate date format from the radio buttons.
Numeric Format
Select the numeric format. You can choose from the American and European formats. The sample of the selected numeric format displays.
Default Values
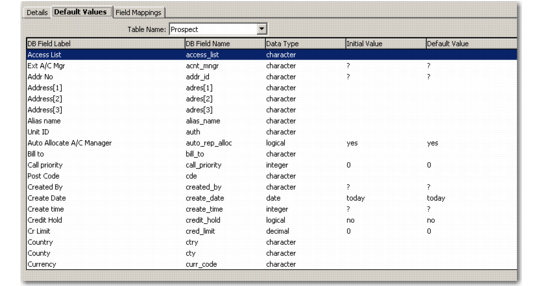
Default data value for a field is the data that is automatically entered in the field during data import. GDI gives you the flexibility to specify default data values for fields.
Using the Default Values tab you can manipulate the data values that will be entered into table fields while importing data. See the examples below to help understand this feature.
Example: While importing project data from a file you acquired from a vendor, you want to specify the name of the vendor in a field named Source Information. You can include the vendor name by setting the default value for Source Information before starting the import process.
Example: You receive a list of prospects and their addresses from an external source. You want to allocate account managers to them right away. Instead of going and adding this information to each prospect record in the data file, you add this information in the Default Values tab by setting the default value for the relevant field. During the import, this information gets updated directly in the database.
Default Values
To set the default data value for a table field, do the following:
1 Select the data import record from the GDI browser and click the Default Values tab.
2 Select the relevant system table from the Table Name dropdown. All the fields in the selected table are listed, including the field label, field name, data type, initial value, and default value.
3 Select the field record whose default data value you want to specify.
4 Right-click and select Set Default Value. The Default Value field of the selected record becomes editable.
5 Enter the default value in the Default Value column for the selected field record and press Enter.
6 Click Save to save the record.
Note: If the field for which you specify a default value already has a value assigned to it in the import data file, the default data value will be overwritten by the value in the data file. For example, assuming you specify the default data value for the field prospectsource as ABC, and the data file has the value DUN BRD for the same field (or the field mapped to prospectsource). In such a case, the GDI process will assign the value DUN BRD to the prospectsource field.
Field Mappings
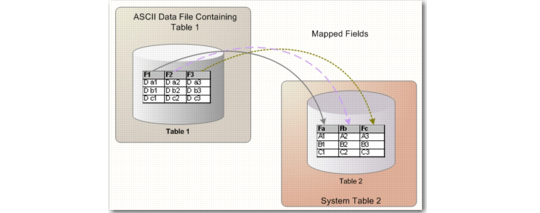
Field mapping is a powerful functionality that provides you the flexibility to map data according to your requirements. Field maps determine which field information from the data file table must go in the field in the system table.
Before you can map fields, you must specify the system table to import information from the data file table. The GDI function automatically maps fields in the data file table to its corresponding system table.
Field Mapping Process
However, at times you may want to change these maps. For example, while specifying details for importing a data file to the system table, the GDI process may map the field P_name to the table field Sort Name. You can correct this by mapping P_name to Profile Name.
Field Mappings
To change the mapping of a data field to the field in a system table, do the following:
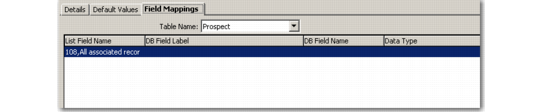
1 Select the data import record from the List screen and click the Field Mapping tab. The list of mapped fields in the data file table and the table displays. The system automatically creates these maps if the label of the field matches the column header.
2 Select the relevant table from the Table Name drop-down. All the fields in the selected table are listed under the DB Field Label Column. The corresponding data fields are listed under the List Field Name column.
3 Select the field record for which you want to change the mapping.
4 Right-click and select Map this Field. The DB Field Label value changes into a dropdown listing the system table fields.
5 Select the relevant field from the dropdown and press Enter.
6 Click Save to save the record.
7 To change more field maps, repeat steps 3-5 and save the changes.
Make sure you save the data import record before starting the import process using GDI.