Enabling the Integration
To enable the integration and specify the direction of data flow for synchronization:
1 Log on to QAD CRM as user AdminServiceUser to define the exchange configuration for a CRM user who runs predefined jobs, such as Activity Reminder.
To do this, choose Settings|Organization|Users, select a CRM user ID, and click the Exchange Server Settings tab to specify values for the following fields:
• Windows user name
• Windows password
• Domain
• Email
Click Autodiscover to allow CRM to complete the exchange configuration.
2 From the application menu, choose Settings|System|AdminService|Settings.
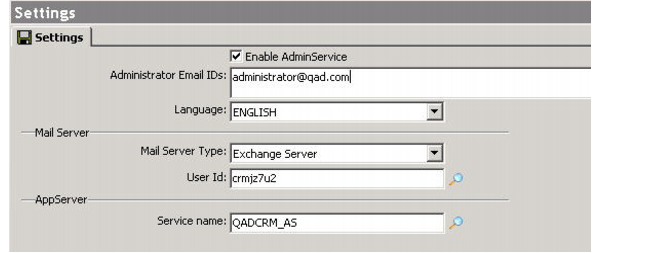
Properties - Settings Tab
3 Choose Main Menu|Settings|Mail Server Integration|Settings and Switches. On the Settings tab, ensure that you select the Enable AdminService option, which is required for CRM and Microsoft Exchange integration.
Administrator Email ID
Specify the e-mail address of the administrator who monitors and receives e-mail notifications from the CRM system.
Language.
Choose the language that you plan to use with CRM.
Mail Server Type
It is recommended that you set this to be Exchange Server, although CRM does provide an SMTP configuration option that enables certain e-mail automation functions for customers who do not use Microsoft Exchange Server.
User ID
With the recommended Mail Server Type set to Exchange Server, you must specify a CRM user ID that has been configured with exchange integration. The Exchange e-mail account of this user ID will be used to perform predefined tasks such as Activity Reminder.
Service Name
Specify the correct Progress AppServer that has been configured for this CRM system.
Maintaining Exchange Server Settings
The Exchange Server integrated with QAD CRM enables the following data to be shared between CRM and Microsoft Outlook:
• Activities (of type appointment, meeting, telephone, letter, and task)
• Contacts
• E-mail
For each of these integration areas, the system administrator can set system-wide policies that dictate what type of data updates are enabled.
For Activity Synchronization, the user must be authorized by the system administrator to synchronize activities. The system administrator can manage the list of Authorized Activity Synchronization users on the Activity tab in Settings|Mail Server Integration|Settings And Switches.
To maintain Exchange Server settings, the CRM system administrator must enable the Exchange Server integration first. Then the CRM users can maintain their own Exchange Server settings.
For the system administrator, go to Settings|Mail System Integration|Settings and Switches and complete the following fields, which are required for the integration configuration.
Important: Most of the following fields are case-sensitive. Ensure that you enter the values in the appropriate case.
Enable Integration with Exchange Server
Check this field to enable the integration.
Windows User Name.
Enter your Windows logon ID.
Windows Password.
Enter your Windows login password. Whenever the Windows login password is changed, you need to update this field.
Domain
Enter the domain that you log on to. This field is not required if your Exchange Server is hosted externally.
Email.
Enter your full e-mail address.
Autodiscover.
If your Exchange Server has Autodiscover enabled, this can be used to automatically populate the Exchange Server location URL and the mailbox details.
Mailbox.
If the mailbox names are not automatically populated by Autodiscover, manually enter your mailbox names.
Exchange Server Location
If not automatically populated by Autodiscover, manually enter the URL that identifies the location of your Exchange Server.
Test Account Settings
When all mandatory fields are entered, click this to send test e-mail to the specified mailbox to ensure that the integration is successful. The test e-mail is sent in the following format:
Subject: QAD CRM test message
Body: This is an email message sent automatically by QAD CRM while testing the Microsoft Exchange settings for your account.
Upon a successful integration, a message appears on the screen to indicate that the integration is successful.
Important: If any of the information associated with the mandatory fields is changed, such as the Windows logon password and domain, you must manually update the corresponding fields to ensure that the integration configuration is valid.
Last Synchronization date and time.
The last synchronization date and time for the objects identified. These values are initially blank for each user; they are updated during the synchronization. These fields are helpful in determining when an integration problem might have occurred—when the integration was stopped or disabled.