Query Builder Wizard
The system provides the Query Builder wizard to assist you in designing queries. You can build a query when you save a new query record or while editing an existing query record.
To build a query from an existing record, select a query in the Query Builder browser. Right-click and choose Compose Query. The Query Builder wizard displays.
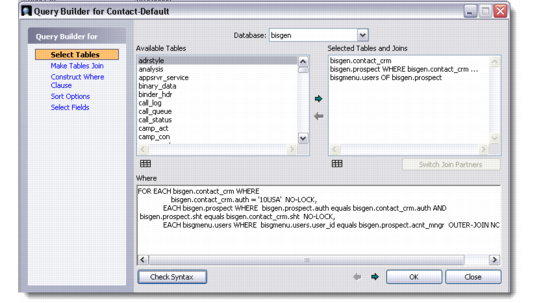
Query Builder Wizard - Select Tables
Select Tables
This option lets you choose the tables that you want to use for defining a new query. It lists all the tables available for a chosen database.
Database
Select the appropriate database from the Database drop-down list.
Note: QAD CRM uses three databases. The tables displayed depend on the database you choose.
Available Tables/Selected Tables and Joins
Select the appropriate tables from the Available Tables list. Use the arrow keys to move the selected tables to the Selected Tables and Joins list. You can view the field list of the selected tables by clicking the checkered button below each table.
Switch Join Partners
This button is enabled when the table you select can connect with more than one table. Clicking this button opens a dialog box that displays the possible options and lets you choose which related table you want to join.
Where
This text box describes how the selected tables function.
Check Syntax
Click this button to check the validity of your query.
Make Tables Join
You can use this option to join tables when you are defining complex queries.
Join
This drop-down list shows the joining conditions between the various tables you selected in the previous option Select Tables. Choose a condition; all the fields related to the selected tables display in the two list boxes.
Operator and And/Or
Click the appropriate button to specify the joining conditions between the fields of the two selected tables.
Inner Join/Outer Join
Select the appropriate radio button depending on the type of joining criteria you want to specify.
Note: In Progress, inner join is a term used to specify that in a query combining two tables, the result returns records from the first table that meets the specified criteria, combined with the corresponding records from the second table that meets the specified criteria. The result does not include any records that have failed to meet any part of the criteria. Inner join is the default for all queries. However, outer join combines and returns data from the specified tables in two ways. First, the records selected for the table (or join) on the left side combine with each record selected using the OF or WHERE options from the table on the right (record). Second, the records selected for the table (or join) on the left side combine with the Unknown value (?) for the fields from the table on the right (record) for which no records are selected using the OF or WHERE options. The join is ordered according to the given sort criteria starting with the left-most table in the query.
For example, using the SPORTS database, an inner join between customer and order does not include any customers that do not have any orders. In an outer join between customer and order includes those customers that do not have any orders and do have orders.
Join Criteria
This box displays the criteria you defined for joining fields from two selected tables. You can validate the syntax of the joining by clicking the Check Syntax button.
To join fields from two different tables, do the following:
1 Scroll through the left list and select a field by double-clicking it.
2 Click Operator or And/Or to apply a joining condition.
3 Scroll through the right list and select the second field from here by double-clicking it.
You can join as many tables as required for your query.
Construct Where Clause
Use this option only if you want to add some specific, hard-coded values to some of the fields you have selected for your query. Construct Where Clause is not a mandatory option.
Sort Options
Sort options let you sort data while executing a query.
Table
Select the table for which you want to define sort options.
Available Fields
Select the required fields from the Available Fields list.
Selected Fields
Use the arrow keys to move them to the Selected Fields list.
Click the appropriate radio button—ascending or descending—to sort the selected fields. You can select up to five fields for sorting.
Select Fields
This option lets you expose only selected fields in the custom report that is to be generated using the query you are building. For example, a table can have 100 fields, but you can set the number of fields that will be visible in the report to 20. Only those fields that you select here show up in the report writer when the actual report is being created.
Select the check box adjoining each field that you want to display in the report.
Save your settings in the Query Builder wizard for the new query record created. This record now displays in the Query Builder browser.
After creating a query, you can use it to generate custom or user-defined reports using the Report Writer.