Generating and Copying QAD CRM WebClient Files
After you install QAD CRM, you can find the QAD CRM WebClient project file qadcrm.wcp in QADCRMInstallDir\webclient\frontend. You can tailor some settings in this file based on your system configuration.
1 Run the QAD CRM Deployment Utility and click the Generate QAD CRM Webclient Files button.
2 From the File menu, select Open to locate and open the file qadcrm.wcp in the QADCRMInstallDir\webclient\frontend directory.
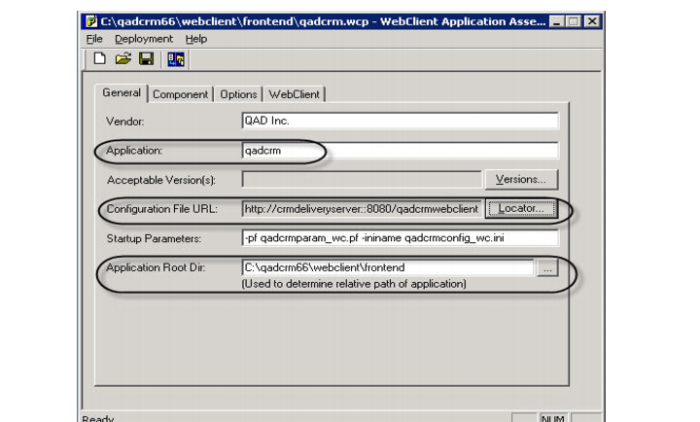
3 In the WebClient project file window, enter values in the fields based on your deployment configurations.
Application. Enter the application name to generate the prowcapc file that is referenced in the bootstrap.htm and webclient.htm file that you modified earlier. Note that the prowcapc file name is case sensitive.
Configuration File URL
Enter the configuration file URL according to your CRM setup on the (Tomcat) delivery server. See the configuration file URL information in
Modifying the bootstrap.htm File.
Application Root Dir
Enter QADCRMInstallDir\webclient\frontend.
Acceptable Version(s)
Click the Versions button and in the window that appears, clear the Acceptable to run option for the current version; then select 6.7b2 and click the Remove button. Click OK to return to the General tab; you should now have no value for the Acceptable Version(s) field.
Platform
For Progress OpenEdge 11.4, this option is available under the General tab. Make sure that you select the 32-bit option and keep the 64-bit option unselected.
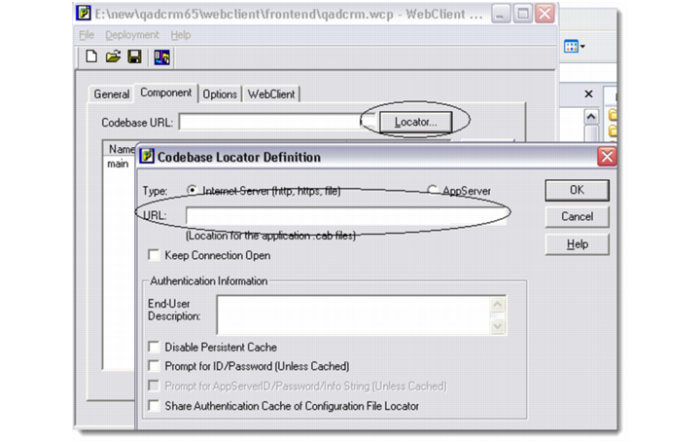
4 Under the Component tab, click the Locator button and modify the URL of your codebase as per your configuration. Click OK to Save your changes. See the URL information in
Modifying the bootstrap.htm File.
5 Under the Options tab, make sure that the Intellistream System Tasks field is checked, and the System Tasks Version field is set to 6.7b2.
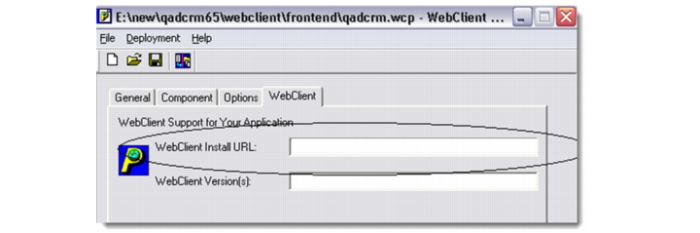
6 Under the WebClient tab, modify the WebClient Install URL as per your configuration. See the window.location URL information in
Modifying the bootstrap.htm File.
Ensure that the correct Progress Webclient version is entered in the WebClient Version(s) field; for example, 11.3.1 or 10.2B07.
7 Click the Save button on the toolbar to save the project.
8 From the Deployment menu, select Generate.
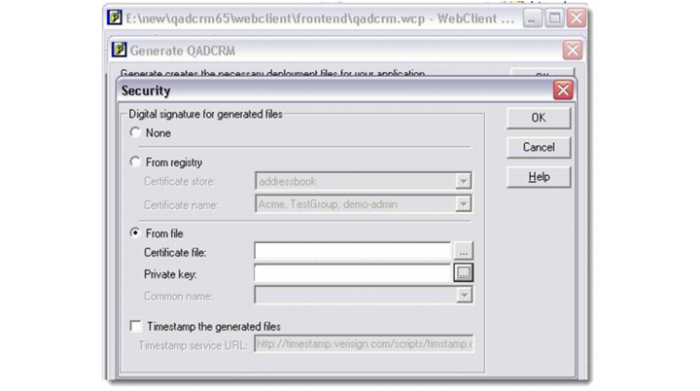
9 In the Generate QADCRM window, click the Security button and select the digital signature files; then click OK. Relevant files for a particular environment are available in QADCRMInstallDir\bin. In this folder, search for a *.spc file name for the Certificate file, and a *.pvk file name for the Private key file.
If you are using Progress 11.3.1or a later version, there is a new field called
Path to Signtool.exe for signing
.cab files digitally. Follow the instruction in
Signing Tools for OE11.3.1 to make the
signtool.exe file available before you proceed with the next step.
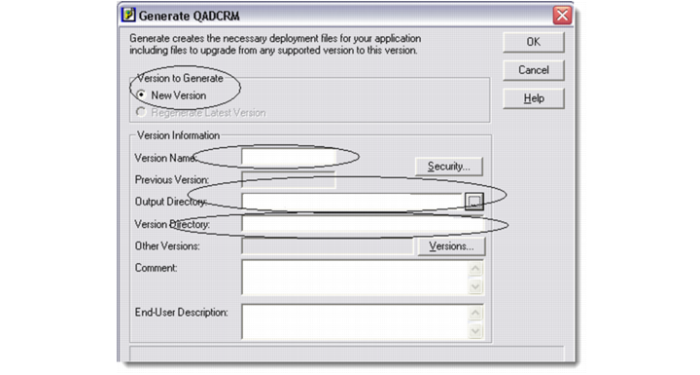
10 Select Deployment |Generate from the menu and make sure all the settings in the Generate QADCRM window are configured correctly.
New Version
You must select this option.
Version Name
Enter the current version name 6.7b2.
Output Directory
Specify the output directory based on your CRM installation directory; that is, QADCRMInstalldir\webclient\frontend.
Version Directory
This field is automatically populated once you specify the output directory.
11 Click OK to generate the cab files.
In the process of cab files generation, the system prompts you to enter a password for each component cab file to be created. In the password prompt, enter qadcrm and click OK.
In case of errors, the cab files generation process is aborted and errors are recorded in the log file. Refer to the log file for error details, if any; then rectify any problems and generate the files again.
12 When cab files generation is complete, WebClient files are created in the QADCRMInstallDir\webclient\frontend\CRMVersion directory.
13 You must copy the .cab files generated for QAD CRM earlier. Refer to QADCRMInstallDir \webclient\frontend\6.7b2\qadcrm.log for the files that need to be copied from the CRM Deployment Server to Delivery Server (where Tomcat is installed).