Converting 6.1.1 Databases to 6.3B1 (Non-Unicode)
1 Make a copy of QADCRMInstallDir\compile\qadsfamacompile.ini and rename it qadsfamaupgrade.ini.
2 Modify qadsfamaupgrade.ini using a text editor to include the conversion directory at the beginning of the PROPATH as in the following example:
PROPATH=.,conversion,progs,system,dataexch,triggers,integration\mfgpro,report,lib,xrc,si\xrc,mfgsrv,mfgsrv\us,mfgsrv\us\sq,mfgsrv\triggers,mfgsrv\qxo,mfgsrv\us\tx,c:\apps\dlc\gui,c:\apps\dlc,c:\apps\dlc\bin
3 Modify QADCRMInstallDir\compile\qadsfamaupgrade.pf to connect the QAD CRM 6.1.1 databases. You do not need to connect the QAD Enterprise Applications databases.
4 Modify the properties of QAD CRM Upgrade Utility shortcut for QAD CRM 6.3B1 to change the INI file name from qadsfamacompile.ini to qadsfamaupgrade.ini.
5 Double-click the CRM Upgrade Utility icon to run the utility.
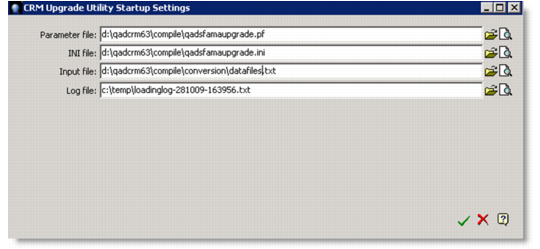
6 In the CRM Upgrade Utility Startup Settings window, specify the file paths; then click the OK icon (green check mark).
CRM Upgrade Utility Startup Settings
Parameter File
Enter QADCRMInstallDir\compile\qadsfamaupgrade.pf.
INI File
Enter QADCRMInstallDir\compile\qadsfamaupgrade.ini.
Input File
Enter QADCRMInstallDir\compile\conversion\datafiles.txt.
Log File
Leave the field as is.
7 The system prompts you to back up your existing databases before proceeding. Make sure you have backed up your databases and click Yes to continue.
8 A message informs you that data load is complete and prompts you to view the log file. Click No.
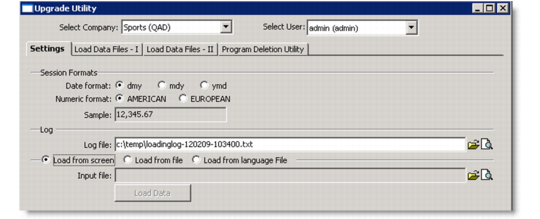
9 In the Upgrade Utility window, choose the proper company or business unit, select Load From File, and specify QADCRMInstallDir\compile\conversion\datafiles.txt as the input file; then click Load Data.
CRM Upgrade Utility
10 The system prompts you to back up your existing databases before proceeding. Make sure you have backed up your databases and click Yes to continue.
11 A message informs you that data load is complete and prompts you to view the log file. Click No.
12 Close the window.
13 Double-click the QAD CRM Upgrade Utility to run the utility again from the QAD CRM 6.3B1 environment.
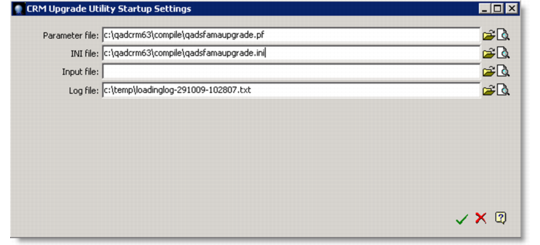
14 In the CRM Upgrade Utility Startup Settings window, specify the file paths; then click the OK icon (green check mark).
CRM Upgrade Utility Startup Settings
Parameter File
Enter QADCRMInstallDir\compile\qadsfamaupgrade.pf.
INI File
Enter QADCRMInstallDir\compile\qadsfamaupgrade.ini.
Input File
Leave the field as is.
Log File
Leave the field as is.
15 A message pops up prompting you to back up your existing databases before proceeding. Make sure you have backed up your existing databases and click Yes to continue.
16 A message is displayed informing you that data load is complete and prompting you to view the log file. Click No.
17 In the Upgrade Utility window, select Load From Screen and click the Load Data Files - I tab.
CRM Upgrade Utility
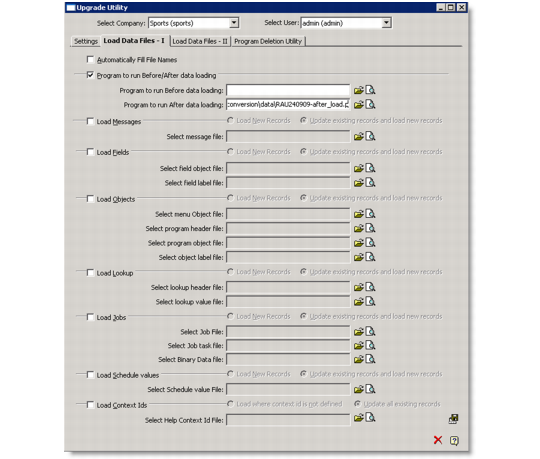
18 Under the Load Data Files - I tab, select Program to Run Before/After Data Loading and specify the following as the program to run after data loading:
QADCRMInstallDir\compile\conversion\data\RAU240909-after_load.p
CRM Upgrade Utility
19 Click the Save icon and close the window when done.