Converting 6.3B1 Databases From Non-Unicode to Unicode
Perform these steps only if you want to change the code page of your QAD CRM 6.3B1 databases from non-Unicode to Unicode:
1 Stop all the QAD CRM databases.
2 Open the command prompt window and execute the proenv command.
3 Use the following command to convert each of the QAD CRM databases—bisgen, bisgmenu, and dataexch—to support UTF-8:
proutil DBPath\bisgen.db -C convchar convert UTF-8
proutil DBPath\bisgmenu.db -C convchar convert UTF-8
proutil DBPath\dataexch.db -C convchar convert UTF-8
4 Open Progress Procedure Editor with all the required databases connected in single-user mode.
5 Run Data Administration. For each of the QAD CRM databases—bisgen, bisgmenu, and dataexch—perform the following steps:
a If not connected to the database, choose Database|Connect to connect it.
b Choose Admin|Load Data and Definitions|Data Definitions (.df file). Locate the file icu-uca.df under $DLC/prolang/utf and load it into the database.
c Ignore the following error and warning messages:
Error: Collation tables for database DBName have been changed. You must rebuild all the indexes in order to reconnect to this database. (2609)
Warning Message
6 Stop all the QAD CRM databases.
7 Execute the following command to rebuild indexes for the new ICU-UCA collation:
proutil DBPath/bisgen -C idxbuild all -cpinternal UTF-8
proutil DBPath/bisgmenu -C idxbuild all -cpinternal UTF-8
proutil DBPath/dataexch -C idxbuild all -cpinternal UTF-8
8 If your existing database code page is not iso8859-1, modify the codepage.txt file under QADCRMInstallDir\compile\conversion to include your source code page value.
9 Modify QADCRMInstallDir\compile\qadsfamaupgrade.pf to change the following parameter values from the source code page to UTF-8 related values:
• -cpinternal UTF-8
• -cpstream UTF-8
• -cpcoll ICU-UCA
• -cpcase Basic
10 Double-click the CRM Upgrade Utility icon to run the utility.
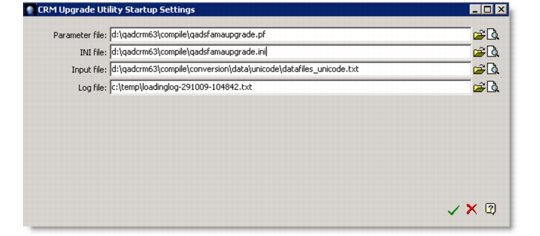
11 In the CRM Upgrade Utility Startup Settings window, specify the file paths; then click the OK icon (green check mark).
CRM Upgrade Utility Startup Settings
Parameter File
Enter QADCRMInstallDir\compile\qadsfamaupgrade.pf.
INI File
Enter QADCRMInstallDir\compile\qadsfamaupgrade.ini.
Input File
Enter QADCRMInstallDir\compile\conversion\data\unicode\datafiles_unicode.txt.
Log File
Leave the field as is.
12 The system prompts you to back up your existing databases before proceeding. Make sure you have backed up your databases and click Yes to continue.
13 A message informs you that data load is complete and prompts you to view the log file. Click No.
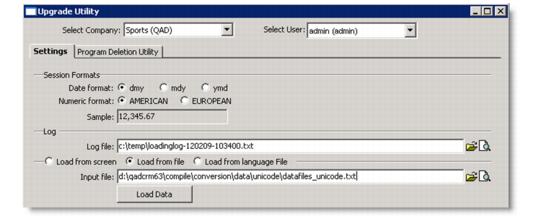
14 In the Upgrade Utility window, select Load From File and specify QADCRMInstallDir\compile\conversion\data\unicode\ datafiles_unicode.txt as the input file; then click Load Data.
CRM Upgrade Utility
15 The system prompts you to back up your existing databases before proceeding. Make sure you have backed up your databases and click Yes to continue.
16 A message informs you that data load is complete and prompts you to view the log file. Click No.
17 Close the window.