QAD Enterprise Asset Management 2017.1
>
User Guide
>
Inventory
>
Inventory
>
Inventory Part Transactions
Inventory Part Transactions
Issue Inventory
The Issue action in the Inventory module allows you to issue parts or subtract parts from the current quantity on hand and charge them out against an account structure, work order, equipment, or project. You can issue inventory from stores by verifying whether the item is in stock or requires restocking.
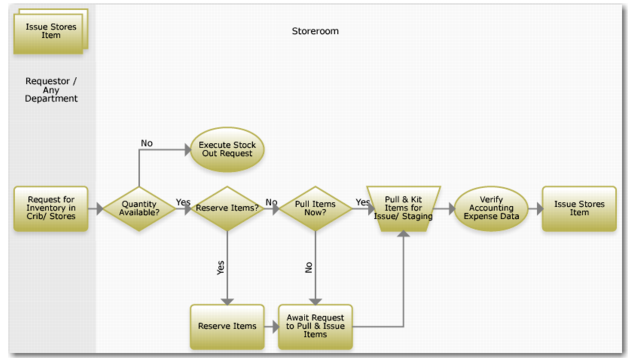
Issue Inventory Process Flow
Issue Stores Item Process Flow
1 Request inventory from the crib or storeroom.
2 If the item is not available, execute a stock-out request.
3 If the item is available in the quantity requested, reserve or pull it.
4 You can:
a Reserve the item for a future date. Request it when you are ready.
b Pull the item now.
5 Pull and kit items for issue and staging.
6 Verify expense accounting data.
7 Issue the item.
Issue Parts
Follow these steps to issue parts from inventory:
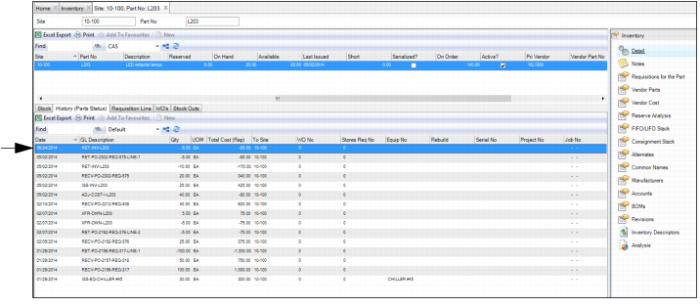
1 Open the Inventory browse and highlight the part record.
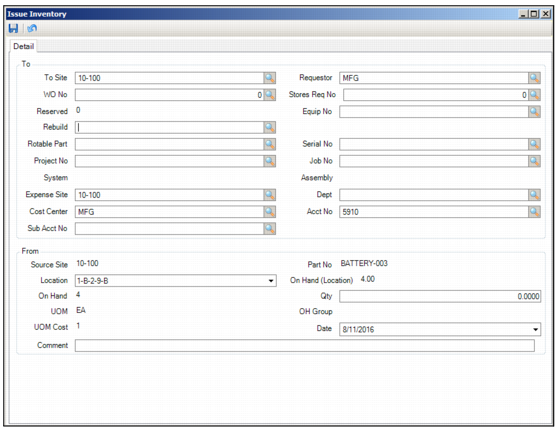
2 Select Issue from the Inventory action menu. The Issue Inventory window opens.
Issue Inventory Detail
3 Enter the required information in the following fields:
To
To Site
Use the lookup to select the site to which to issue this part.
Requestor
Use the lookup to select the employee number of the person requesting the part.
WO No
If the part must be issued and expensed to a work order, use the lookup to select the WO number.
Stores Requisition Number
Stores requisitions have unique numbers. Use the lookup to charge the part to a stores requisition.
Reserved
Displays the quantity that the system has reserved.
Equipment Number
Use the lookup to select the unique equipment number to which the part is charged.
Rebuild
If this issue transaction is expensed to a serialized part, identify the current rebuild location of the part.
Rotable Part
Displays the rotable part to which the part is charged.
Serial Number
The serial number of the part with which the work order is associated.
Project Number
If the part is associated with a project, use the lookup to select the project.
Job Number
Use the lookup to select the number by which a specific job is identified in a part transaction.
System
EAM allows you to issue a part against a system, which is a major component on a piece of equipment. Use the lookup to issue the part against a system.
Assembly
EAM allows you to issue a part against a piece of equipment and its system and assembly codes. The Assembly code is used to break the equipment’s system into smaller components. Use to issue the part to a system’s assembly.
Expense Site
Defaults to the current site. Use the lookup to charge the parts to another site.
Department, Cost Center, Account Number, Sub Account Number
Use the lookup to select the department, cost center, account number, and sub-account number against which to issue the part.
From
Source Site
The site from which a user receives a part.
Part No
The part number being issued.
Location
Use the drop-down list to select the part location from which to issue the part.
On Hand (Location)
The quantity of parts that are available in the selected location that can be issued.
On Hand
The total quantity of parts that are available to be issued.
Qty
Enter the quantity of parts that you want to issue.
UOM
The unit of measure with which to issue parts. For example, you buy parts in boxes, but you issue them individually or in units of each.
OH Group.
The part’s overhead (OH) group, if one is associated with the part. If necessary, use the lookup to select another OH group.
UOM Cost
This part’s cost per unit or issue cost.
Date
Today’s date.
Comment
Enter any comments in this field.
4 Click the disc icon to issue the part.
Return Parts to Inventory
The Return to Inventory action allows you to put an unused part back into inventory.
Follow these steps to return a part to inventory:
1 Open the Inventory browse and highlight the part record.
2 Select Return to Inventory from the Inventory Action menu. A lookup opens that displays where the part was issued.
3 Double-click to select the correct issue line.
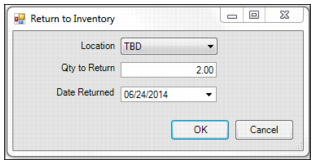
Return to Inventory
4 The Return to Inventory window opens. Enter the return information in the following fields:
Location
Use the drop-down list to select the part’s return location.
Qty to Return
Enter the quantity to return.
Date Returned
Use the calendar drop-down list to select the date to return the part.
Return to Inventory
5 Click OK to return the part to inventory.
6 To view a confirmation that the part has been returned to inventory, open the part record and select the Analysis submenu. The return to inventory transaction is displayed in the History (Parts Status) tab.
Return to Inventory
Relocate Parts to Other Locations and Sites
The Relocate action allows you to send a part to another site, or to move a part between storeroom locations in one site.
Follow these steps to relocate parts to other locations and/or other sites:
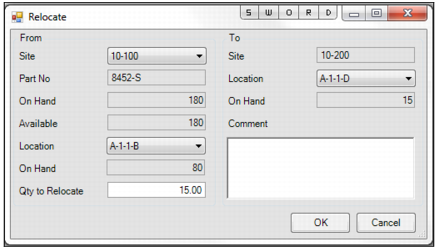
1 Open the Inventory browse. Highlight the part record and select Relocate from the Inventory Action menu. The Relocate window opens.
Relocate Parts
2 Enter the relocation information in the following fields:
From
Site
Use the drop-down list to select the site from which the part is being relocated.
Part No
Displays the part number.
On Hand
Displays the total number of parts on hand in all locations in the selected From Site.
Available
Displays the total number of parts in the selected From Site that are available to be relocated.
Location
Use the drop-down list to select the location from which the part is being relocated.
On Hand
Displays the quantity of parts in the selected From Location and From Site that can be relocated.
Qty to Relocate
Enter the number of parts to relocate.
To
Site
Displays the site to which the part is being relocated. This field cannot be changed.
Location
Use the drop-down list to select the location to which the part is being relocated.
On Hand
Displays the number of parts that are currently in the selected To Site and To Location.
Comment
Enter any comments in this field.
3 Once you have entered the relocation information, click OK to relocate the part.
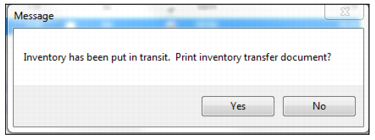
4 If you are relocating a part to another site, the system informs you that the part has been put in transit. If necessary, click Yes to print the inventory transfer document. To complete the relocation, receive the parts in the new site by performing the Receive from Relocation action.
Note: If you are relocating a part to another location in the same site, this message does not appear.
Part in Transit Message
Receive Parts from Relocation
If you are relocating parts from one site to another, to complete the relocation you must receive the parts in the new site by performing the Receive from Relocation action.
Follow these steps to receive the parts in the new site:
1 Open the Inventory browse and highlight the part record.
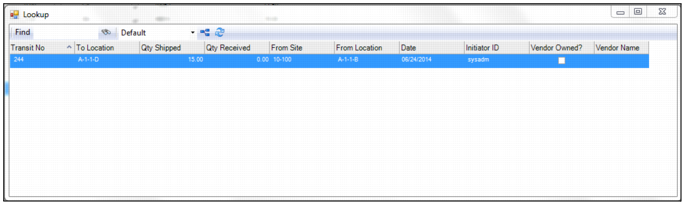
2 Select the Receive from Relocation action. A lookup opens displaying the parts that can be received.
List of Parts To Be Received
3 Double-click to select the parts to receive.
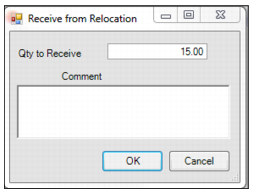
4 The Receive from Relocation window opens. In the Qty to Receive field, enter the quantity to receive. Enter any comments in the Comment field.
Note: The information that is entered in the Comment field can be viewed in the Inventory Transaction History browse in the Comment field.
Receive Parts from Relocation
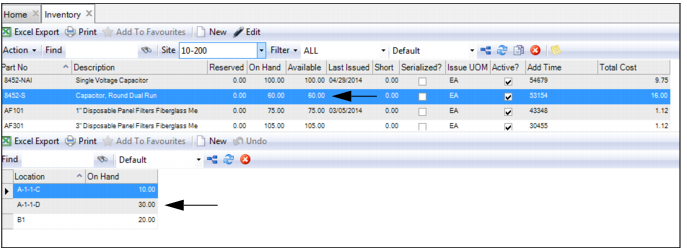
5 Click OK to receive the parts. The On Hand fields reflect that the parts have been received into the new site and location.
Confirming Parts Are Received
Receive Parts from Work Order
The Receive from Work Order action allows you to receive a fabricated part from a WO that was used to build that part.
Follow these steps to receive a part into inventory from a work order:
1 Open the Inventory browse and highlight the part record.
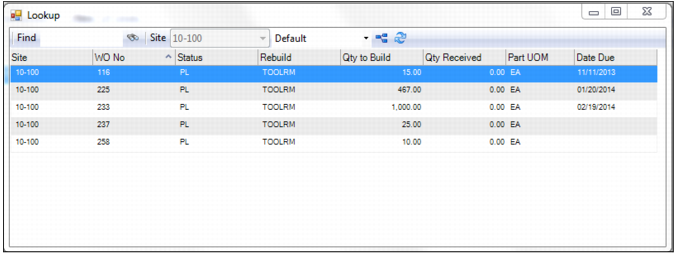
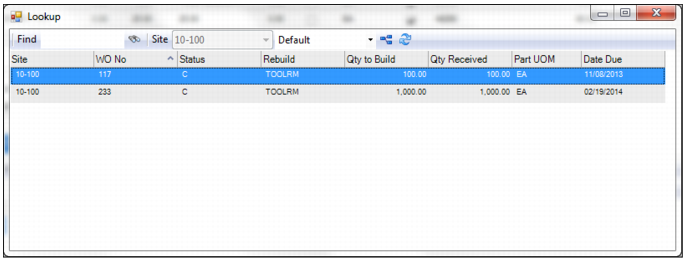
2 Select Receive from Work Order from the Inventory Action menu. A lookup opens displaying the work orders used to build the part.
Select the Receive-From Work Order
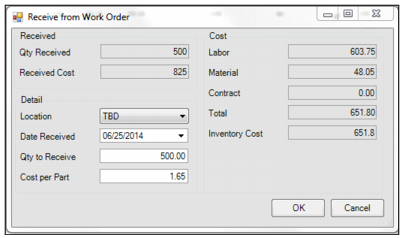
3 Double-click to select the work order from which you are receiving the parts. The Receive from Work Order window opens. Enter the required information in the following fields:
Received
Qty Received
Displays the number of parts that have been received from this work order.
Received Cost
Displays the total cost that has been received from this work order.
Detail
Location
Use the drop-down list to select the location into which to receive the parts.
Date Received
Use the calendar lookup to select the received date. This field defaults to today’s date.
Qty to Receive
Enter the number of parts to receive from the work order. This field defaults to the total number of parts that can be received.
Cost Per Part
Enter the cost per part that will be received.
Cost
Labor, Material, Contract, Total, and Inventory Cost
These fields display the labor, material, contract, total, and inventory costs on the work order.
Receive Parts from a Work Order
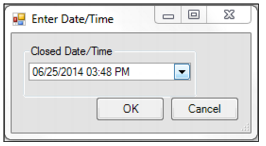
4 Click OK to receive the parts. If you receive all the parts on the work order, an Enter Data/Time window opens, which requires you to select the date and time to close the work order. Use the drop-down list to select the date and time and click OK. The parts have been received from the work order.
Receive Parts from a Work Order
Return Parts to a Work Order
The Return to Work Order action allows you to return a fabricated part to a work order that was used to build that part.
Follow these steps to return parts to a work order:
1 Open the Inventory browse and highlight the part record.
2 Select Return to Work Order from the Inventory Action menu. A lookup opens displaying the work orders that were used to build the part.
Select the Return-To Work Order
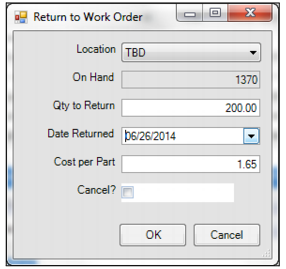
3 Double-click to select the work order to which you are returning parts. The Return to Work Order window opens. Enter the required information in the following fields:
Location
Use the lookup to select the return-to location.
On Hand
Displays the quantity available to be returned to the work order.
Qty to Return
Enter the quantity to return to the work order.
Date Returned
Use the calendar lookup to select the return date.
Cost Per Part
Enter the cost per part. This field defaults to the cost per part that was entered when the part was received from the work order.
Cancel?
Select this check box to zero out the Qty Received on the WO.
Return Parts to a Work Order Window
4 Click OK to return the parts.
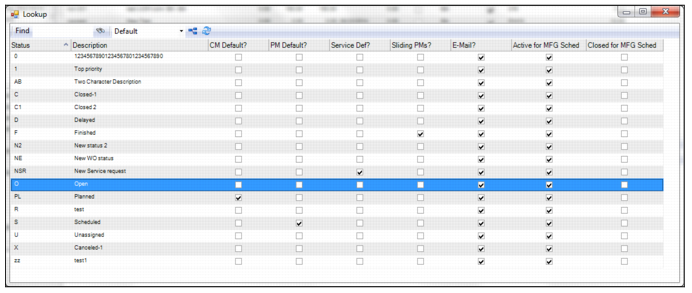
5 A lookup opens, which allows you to set the work order status once the parts are returned. Double-click to select the work order status.
Select the Work Order Status