Roles
Use roles to determine permissions for user types. Roles give users access to folders within the application, and allow them to perform actions in the modules. Users can add, edit, and delete records within the subfolders. Assign users one or more roles in each site they access.
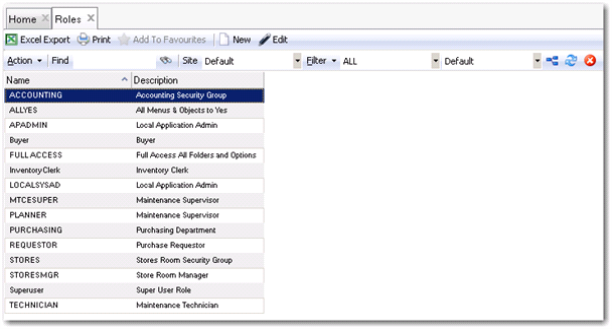
The system ships with predefined roles based on typical users. You can modify or delete these roles, copy and rename them in the same site, copy them to a new site, or add new roles. Use roles to grant access to the features a user needs; for example, a purchase requestor needs access to Requisitions, but not to Finance. Default system roles include:
Accounting
Accounting Security Group
All Yes
All menus and objects to Yes
APADMIN
Local Application Administrator
Buyer
Buyer
Inventory Clerk
Inventory Clerk
LOCALSYSAD
Local System Administrator
MTCESUPER
Maintenance Supervisor
PLANNER
Maintenance Supervisor
PURCHASING
Purchasing Department
REQUESTOR
Purchase Requestor
STORES
Store Room Security Group
STORES MGR
Store Room Manager
Superuser
Super User Role
TECHNICIAN
Maintenance Technician
Roles Browse
Access this browse from System Administration|Roles. Use it to organize and display records, to access supporting functions, to edit or create new records, or to export data to Excel.
System Administration Roles Browse
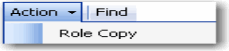
Roles Action Menu
Choices available on this menu vary depending on context. Access the Action menu from the toolbar or right-click menu.
Roles Action Menu
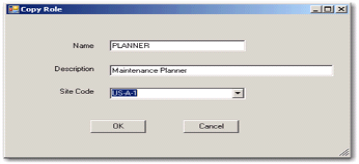
Role Copy
You can copy a role and give it a new name after you establish its attributes. You can alter the attributes of the new role. You can also copy a role to another site, retain the original attributes and name, or change them.
To copy a role, highlight the role to copy in the source site and select Role Copy from the Action menu. Enter the name and description of the role, and select a site from the Site Code drop down. Click OK.
System Administration Roles Copy
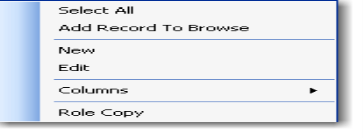
Roles Right-Click Menu
The right-click menu contains administrative functions and options from the Action menu.
Roles Right-Click Menu
New
Use New to open the roles record detail to create a record.
Edit
Use Edit to open the roles record detail to edit the selected record.
Columns
A list of columns available to the browse displays here. Select a column header to display it. Clear the column header to hide it.
Roles Record Detail
The record detail contains all information about this role. Assign a name to the role.
Adding a Roles Record
1 Click New to open a blank roles record.
2 Assign the role name and description.
3 Click Save.
4 Highlight the module and select the access levels on the General tab.
Editing a Roles Record
1 Double-click a record from the browse or click Edit to open the roles record detail.
2 Verify the role’s name.
3 Highlight the module and select the access level on the General tab.
4 Click Save.
Note: The default for a new role is no access in any module, indicated by an empty blue circle.
Note: If you are adding a role with access to almost everything, first provide full access. Then, change access to Partial or None for individual functions.
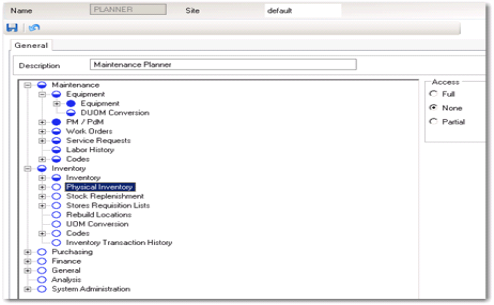
Access Levels
Full access grants a user permission to use all functionality in the module or submodule. A solid blue circle represents full access. None provides no access and prohibits a user from viewing or using a module or submodule. A white circle with a blue outline represents no access. Partial access grants a user permission to use or view submodules or features under a larger umbrella. A half-blue circle indicates partial or view access.
Example: You have full access to Maintenance|PM/PdM, but no access to Inventory|Rebuild Locations. The circle beside PM/PdM is solid blue. The circle beside Rebuild Locations is outlined blue. The circle beside Work Orders is half-blue because subordinate submodules include multiple access levels.
Access Levels
Full Access
Select the Full option in the Access box to grant a user type access to all features in a module or submodule.
No Access
Select the None option in the Access box to deny a user type access to all features in a module or submodule.
Partial Access
Select the partial option in the Access box to grant a user type limited access to features in a module or submodule. Select Partial to grant print/export, edit, add, delete, and—if applicable—copy privileges. If you indicate no access to some features and full access to others, then the higher-level circle indicator automatically displays as half-blue.
Options
Options include Print/Export, Add, Copy, Delete, Notes, and Edit. These settings enable you to perform only the selected functions on the highlighted module or submodule. All options are not available in all modules or submodules.
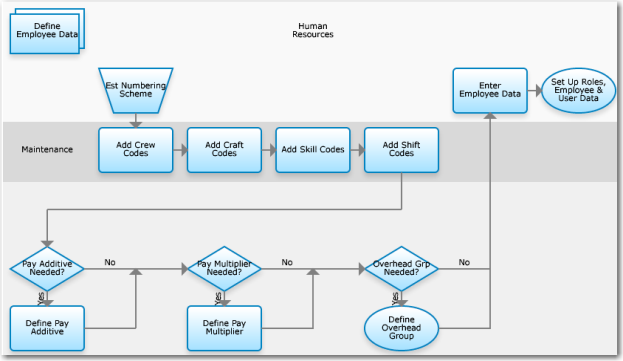
Set Up Employee Data Process Flow
Set Up Employee Data Process Flow
To set up employee data:
1 Establish numbering scheme.
2 Add crew codes.
3 Add craft codes.
4 Add skill codes.
5 Add shift codes.
6 Define pay additives.
7 Define pay multipliers.
8 Define overhead groups.
9 Enter employee data.
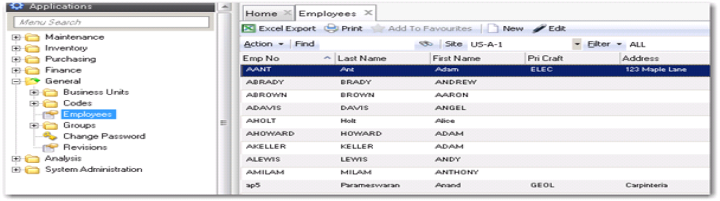
Employees Browse
Access this browse from General|Employee. Use it to organize and display records, to access supporting functions, and to edit or create new records. The site-specific Employee file in EAM is where you set up records on individuals. Each employee is given a unique employee number for identification. These employee records can be used to distribute labor, for reference information, and to designate employees who can be assigned to work orders. In addition, employees can be designated as buyers for one or more sites and linked to a PO Approval Group and/or a Blanket Order Approval Group for that site.
Employee Browse
Employee Action Menu
Choices available on this menu vary depending on context. Access the Action menu from the toolbar or right-click menu.
Post Labor
This action allows the highlighted employee’s time to be charged to a particular activity such as a work order or a project or directly to a department, cost center, and account number.
Reverse Labor
The Reverse action is used to remove previously posted labor charges.
Employee Right-Click Menu
The right-click menu contains administrative functions and options from the Action menu.
New
Use New to open the Employee record detail to create a record.
Edit
Use Edit to open the Employee record detail to edit the selected record.
Post Labor and Reverse Labor are options from the Action menu.
Employee Record Detail
The record detail contains all information about this employee. The employee number and current site display over all associated tabs.
Employee Record Detail
Creating an Employee Record
1 Click New to open a blank employee record.
2 Verify the current site.
3 Assign the employee number.
4 Enter information in relevant fields on the tabs.
5 Click Save.
Editing an Employee Record
1 Double-click a record from the browse or click Edit to open the employee record detail.
2 Verify the current site.
3 Verify the employee number.
4 Enter or update information in the relevant fields on the tabs.
5 Click Save.
Employee Tabs
Employee contains three tabs: Personal, Codes, and User Defined.
Employee Tab: Personal
Use this tab to enter personal data about the Employee plus accounting data.
Employee: Personal Tab
Personal
Last Name
The employee’s last or surname.
First Name
The employee’s first or given name.
Address
The employee’s home address.
Address 2
The employee’s second line of address.
City
The city in which the employee lives.
State
The state or province in the employee’s address.
Zip
The postal code used in the employee’s address.
Phone
The employee’s home phone number.
Second Phone
An employee’s second telephone number, such as a cell phone or work extension.
Fax
The employee’s home fax number.
Country
The country in the employee’s address.
Labor Credit
Dept
The department code used when charging an employee’s time. The department number in the employee’s record is used on the credit side of the labor posting transaction.
Cost Center
Used as the expense cost center by EAM during a labor posting, if no cost center is specified under the equipment.
Note: The system first checks the equipment cost center. If one is not listed under the equipment, the system looks for a default cost center under the employee.
Acct No
The account number used when charging an employee’s time. The account number in the employee’s record is used as the credit side of the transaction.
Sub Acct No
The sub-account number used when charging an employee’s time. The sub-account number in the employee’s record is used as the credit side of the transaction.
Note: There are two sets of default labor accounting codes in the Site System Maintenance module on the Labor tabbed page. The first column is labeled Debit, which is used for the expense accounting codes if none was used in the labor posting transaction. The second column is labeled Credit. If there are no codes in the employee record, these accounting codes are used.
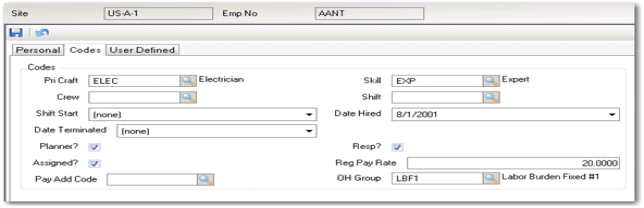
Employee Tab: Codes
The Codes tab identifies a number of groups to which an employee belongs, such as Craft, Skill, Crew, and Shift, and also contains pay information, such as Pay Rate and any pay adders.
Employee Tab: Codes
Pri Craft
Identifies the employee’s primary craft.
Note: This craft is drawn from a user-defined table of crafts. The employee’s craft is identified so that the system can search for employees with specific crafts during the work order scheduling process.
Skill
A user-defined table that allows further definition of an employee’s capabilities.
Note: You can denote the level of skill employees have within their craft. It becomes important to know an employee’s level of capability when scheduling a work order, since a more senior craftsperson may be needed for a more difficult task.
Crew
A user-defined table, containing crew codes and descriptions, used to identify the group to which an employee belongs.
Shift
This field contains a valid shift from the standard shifts defined for your system. There is also a lookup available for this field.
Date Hired
The date the employee was hired.
Date Terminated
The date the employee was terminated from employment.
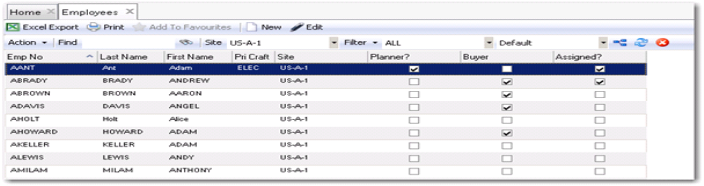
Planner
Select if the employee is defined as a planner in EAM.
Note: If planner is selected, the employee shows up on the planners lookup table.
Resp
Select if the employee is listed as a responsible individual for a group of equipment or for a group of parts.
Note: If responsible is selected, then when the lookup table is activated to search for responsible individuals, this employee is listed.
Assigned
Select if the employee can be assigned to maintenance work orders. Only employee records that are selected as Assigned appear in the Assigned Employee Lookup.
Regular Pay Rate
The standard hourly rate the employee is paid, expressed in the company’s base currency.
Note: This rate can then be combined with pay multipliers, such as time and a half or double time, depending upon the specific activity or time they are working such as holidays or weekends.
Pay Add Code
A user-defined code that specifies an amount of money that is paid to an employee on an hourly basis in addition to that employee’s regular hourly wage.
Note: This is an optional field. It could be used, for example, to pay an employee on third shift an additional 50 cents per hour. Keep in mind that, when the employee is receiving time and a half for working on Sunday, for example, the employee receives not only half again of the regular hourly wage, but also half again for the 50 cents.
OH Group
The default overhead group for an employee.
Note: Labor posted for an employee includes overhead charges defined by the overhead group. An employee overhead group overrides the site default labor overhead group.
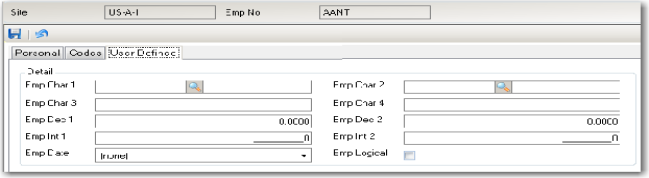
Employee Tab: User Defined
Use the Employee User Defined tab to track information against specific employees in EAM. There are ten user-defined fields.
Employee Tab: User Defined
Character 1/2
User-defined character fields. They are validated against tables that you add.
Character 3/4
Free-form user-defined character fields, not validated against tables.
Decimal 1/2
User-defined decimal fields for Employee.
Integer 1/2
User-defined integer fields for Employee.
Enable/Disable Logic
A user-defined check box.
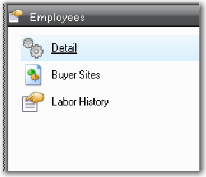
Employee Subdetail
The number of subdetail options varies from module to module. All have an option labeled Detail, which remains visible and returns you to the previously viewed tab page in the highlighted record if one of the other subdetails is selected. Normal security applies: a user can be given full, partial, or no access to each subdetail option. If no access is given, the subdetail is not visible.
Employee Subdetail
Detail
This option opens the tabbed view.
Buyer Sites
Use this option to display a buyer in a single- or multiple-site configuration. Click New to access a standard Site Maintenance lookup table. Select the appropriate site code. In addition, you can select the appropriate PO Approval Group to which the buyer is associated for the electronic approval routing of purchase orders, for organizations that use PO authorization.
You can also select the appropriate Blanket Order Approval Group with which the buyer is associated to specify electronic routing and approval of blanket orders. This step is required for organizations that use blanket orders.
Employee Buyer Sites Subdetail
Labor History
Use this option to display a browse of labor records, allowing you to view both posted and reversed records. Reversals show a negative number of hours and negative cost; postings have positive hours and costs.
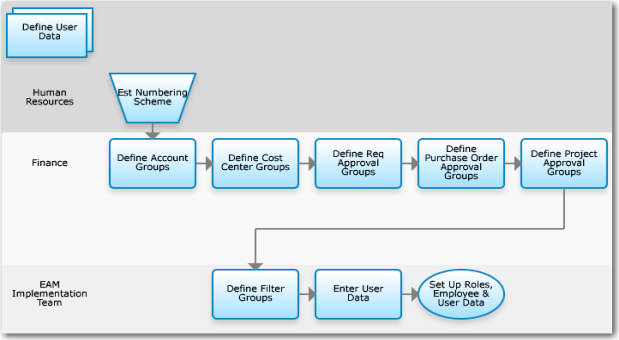
Defining User Data Process Flow
Define User Data Process Flow
1 Establish a numbering scheme.
2 Define account groups.
3 Define cost center groups.
4 Define requisition approval groups.
5 Define purchase order approval groups.
6 Define project approval groups.
7 Define filter groups.
8 Enter user data.