Set Up Sequence Data
The system administrator uses the Sequence modules to set the next number for certain tables and documents. The sequence fields are broken into two major groups: those that all sites share and those that are site-specific.
Set Up System Sequence Data
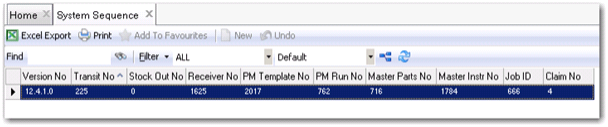
All sites share ten fields listed in the System Administration|System Sequence screen: Transit No, Stock Out No, Receiver No, PM Template No, PM Run No, Master Tool No, Master Parts List No, Master Instruction List No, Job No, and Claim No.
One site can create a Master Instruction List but any other site can access and use it. However, numbers for some other documents or files are site-specific, meaning that each site has its own set of work order numbers. If you have two sites, there could be two work orders with number 10101. It takes both the site and the work order number to create a unique identifier, whereas the Master Instruction List number is unique, regardless of the site.
System Sequence Browse
Access this browse from System Administration. Use it to organize and display the System Sequence record, to edit the record, or to export the data to Excel.
System Sequence Browse
System Sequence Record Detail
The System Sequence record detail contains the current record number for these nine fields.
Claim No
The Reimbursement Claim number is not site-specific, and this field displays the claim number used in the system. This is the number of the last claim for which a reimbursement has been received.
Job ID
The job ID is not site-specific. The administrator can change this number to a higher figure. If the number is changed, the system increments from that point forward.
Master Instr No
This field displays the last instruction list number used within the system.
Note: EAM continually changes this number as Master Instruction Lists are created. The system administrator can interrupt the automatic sequencing by coming into the system sequence module and resetting the last Master Instruction List number to any higher than the previous number. Once reset, the system continues to automatically increment that number from that point forward.
Master Parts No
This field displays the last-used Master Parts List number. The Master Parts List number has the same properties as the Master Instruction List number. It is not site-specific; therefore, the Master Parts List number 1 is the same in all sites.
PM Run No
A number representing the last batch routine event that automatically issued PMs that were due. The administrator can change this number to a higher value. If the number is changed, the system increments from that point forward.
PM Template No
The PM Template number is not site-specific, and this field displays the last PM number used in the system. The administrator can change this number to a higher value. If the number is changed, the system increments from that point forward.
Receiver No
This number represents the last used receiver document number and is not site specific. The administrator can change this number to a higher value. If the number is changed, the system increments from that point forward.
Stock Out No
This number is not site specific, and this field displays the last Stock Out number used in the system.
Transit No
This number is not site specific, and this field displays the last Transit number used in the system. EAM uses it for each unique inventory relocation from one site to another.
Set Up Site Sequences Data
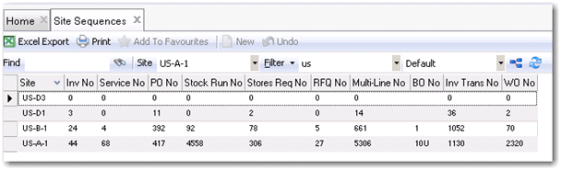
There are ten fields listed in the System Sequence module at System Administration|Site Sequence screen that are unique for each site: Inv No, Inv Trans No, PO No, Multi-Line (Req) No, RFQ No, Service No, Stock Run No, Stores Req No, WO No, and BO No.
Site Sequences Browse
Access this browse from System Administration. Use it to organize and display the System Sequence record, to edit the record, or to export the data to Excel.
Site Sequences Browse
Site Sequences Right-Click Menu
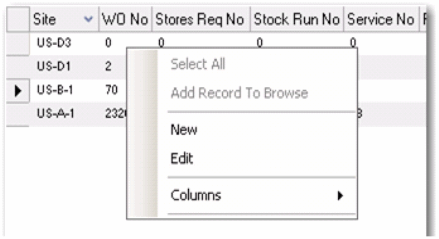
The right-click menu contains administrative functions.
Site Sequences Right-Click Menu
Edit
Use Edit to open and to edit the System Sequence record detail.
Site Sequences Record Detail
The Site Sequences records contains the current record number for these ten tables and documents.
Editing the Site Sequences Record
1 Put the cursor in the module and site with the sequence number you want to set, then enter the next number for this record.
2 Verify the field name whose number you want to change.
3 Enter or update information in the relevant fields.
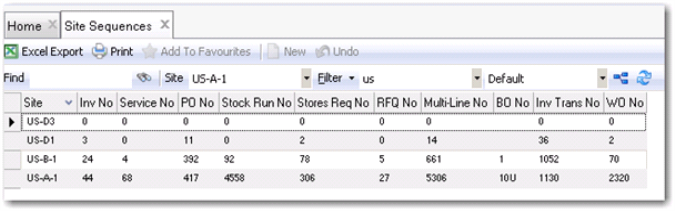
Site Sequences Browse
Inv No
This number represents the last used physical inventory number for the specific site. The system administrator can change this number to alter what the next physical inventory number is. The system refers to the number here and increments by one when creating a new physical inventory.
Service No
This number represents the last used service request number for the specific site. The system administrator can change this number to alter what the next service request number is. The system refers to the number here and increments by one when a new service request is created.
PO No
This number represents the last used purchase order number for the specific site. The system administrator can change this number to alter what the next purchase order number is. The system refers to the number here and increments by one when a new purchase order is created.
Stock Run No
This number represents the last used stock run number for the specific site. The system administrator can change this number to alter what the next stock run number is. The system refers to the number here and increments by one when a new stock run is created.
Multi-Line No (Req Header No)
This number represents the last used requisition header number for the specific site.
Stores Req No
This number represents the last used stores requisition list number for the specific site. The system administrator can change this number to alter what the next stores requisition list number is. The system refers to the number here and increments by one when a new stores requisition list is created.
WO No
This number represents the last used work order number for the specific site. The system administrator can change this number to alter what the next work order number is. The system refers to the number here and increments by one when a new work order is created.
RFQ No
This number represents the last used request-for-quote number for the specific site. The system administrator can change this number to alter what the next request-for-quote number is. The system refers to the number here and increments by one when a new quote is created.
BO No
This number represents the last used blanket order number for the specific site. The system administrator can change this number to alter what the next blanket order number is. The system refers to the number here and increments by one when a new blanket order is created.
Inv Transit No
This number represents the last used inventory transit number for the specific site. EAM defines it for each unique inventory relocation from one site to another that is designed to go through transit.
Set Up Registry Data
Set the database level features in the registry. During the installation of EAM, the registry is populated with values. Access to the registry has three purposes:
• Reviewing the registry settings in case of a question.
• Changing a value in case it was entered incorrectly during the installation
• Adding or updating a registry setting
Do not modify the registry unless there is a definite need to do so. Contact the QAD EAM Support group for advice on your situation.
Note: A number of entries in the browse are either no longer used or are scheduled for use in the future. Those items are not explained in this document.
Registry Browse
Access this browse from System Administration. Use it to organize and display the registry record, to edit the record, or to export the data to Excel. The default display consists of the following columns:
Data Name
Various elements are found in the registry. Some of the elements are children of a parent element. In other words, there are multiple lines on the browse for a single registry element such as Commodities. The default display presents the data names in alphabetical order. None of the data names can be changed or deleted.
Description
A brief explanation of the highlighted element. Not all lines have an explanation—especially a child of a parent element. None of the descriptions can be changed or deleted.
Data Value
The asked-for entry of the highlighted element. Not all lines have a data value—especially a child of a parent element. This is the only column where an entry can be made or changed.
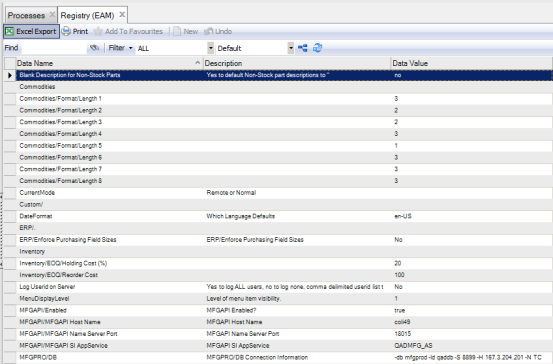
Registry Browse View 1
Blank Description for Non-Stock Parts
Yes or No data value. Enter No to default the non-stock part description to “non-stock part.”
Commodities Section
Format commodity codes to match industry standards. The element in the EAM Registry controls formatting for the commodity code on screens and when printing.
Commodity codes are an important tool for buyers to help analyze a company’s spending habits. Commodity codes group items based on the type or use of the part. Your company might have tens of thousands of part numbers. Many of these items are similar; however, it is hard for a buyer to connect two part numbers together in the same family without the use of a commodity code.
The buyer uses commodity code reports to analyze how much and where the company is spending. With this information, the buyer can focus on commodities where the company spends the most money. They can also use commodity-purchasing history to negotiate with suppliers for volume purchase discounts. In most cases, each grouping in a commodity code represents a type of part.
Starting at Commodities/Format/Length 1, update the Data Value column by placing your cursor in the field and entering the needed commodity code length. Continue adding the needed commodity code length in the rest of the fields.
The following rules apply for all new values entered:
• Length must be an integer.
• If any later lengths are not zero, length 5 cannot be zero.
• The sum of all lengths (including dashes) cannot exceed 15.
Date Format
Specify the default language to define the coordinating date format. For example, enter en-US for U.S. English.
ERP/Enforce Purchasing Field Sizes
When this is set to Yes, it prevents users from entering PO text that is more than 1140 characters.
Inventory/EOQ/Holding Cost (%)
Enter a data value for this percentage.
Inventory/EOQ/Reorder Cost
Enter a reorder cost.
Log Userid on Server
Logging is enabled for zero, one, multiple, or all users via the Registry entry.
MenuDisplayLevel
QAD sets this value. Do not change it from 1. The setting determines what menu items are visible.
MFGAPIEnabled
To use an API for integration with the QAD ERP, set the Data Value to true. If enabled, enter the Host Name, Server Port, and Service (name).
MFGPRO/DB
Enter MFGPRO/DB connection information. For example, -db mfgprod -id-qaddb -S 8899 -H 167.3.204.201 -N TC.
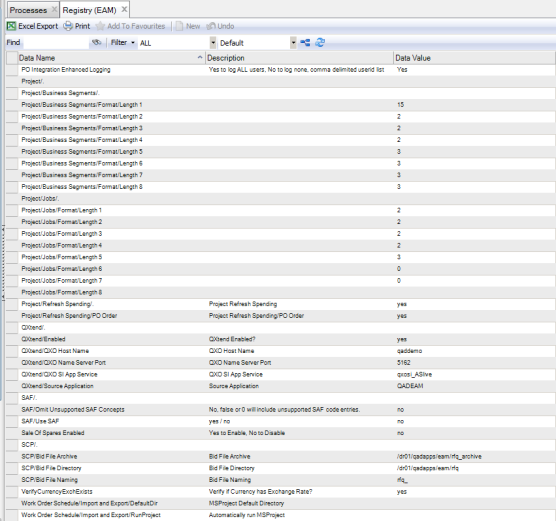
Registry Browse View 2
PO Integration Enhanced Logging
Enter yes, no, or a list. Enter yes to log ALL users, no to log no users, or a comma-delimited user ID list to log specific users.
Production Hours
EAM shows Production Hours/Readings/DataFileWithPath in the Data Name column. Update the Data Value column by placing your cursor in the field and entering the name and location of the data file of production readings to read for the Loads Production Hours batch job. If there is no entry in the registry or the file name entered cannot be found, the e-mail sent to the batch job’s Notify notes this lack of data and informs the Notify that the job ran.
Project Business Segments
An organization may have specialized business segments that operate as distinct units, concentrating on particular interests or tasks. EAM allows managers to track which business segments are initiating particular capital projects, and to identify the driving business segments in the Project module. With EAM, you can add up to eight levels to the business segment format. That provides the flexibility to define the format based on your organization’s requirements. In addition to formatting the business segment, the length of the business segment can be selected for a total of up to 15 characters among the eight levels of formatting.
Note: Both the job format and the business segments format follow the same rules.
Project Jobs
Larger projects need to be broken down into many components, called jobs. Sometimes these jobs have smaller jobs, which collectively make up the higher-level job. With EAM, you can add up to eight levels of formatting to the job number. That provides the flexibility to define the format based on your organization’s requirements. A primary reason for using the job format is to enable cost rollup of jobs in reporting. In addition to formatting the job number, the length of the job number can be selected for a total of up to 15 characters among the eight levels of formatting.
Starting at Project/Jobs/Format/Length 1 update the Data Value column by placing your cursor in the field and entering the required job code length. Continue adding the needed job code length in the rest of the fields.
The following rules apply for all new values entered:
• Length must be an integer.
• If any later lengths are not zero, length 5 cannot be zero.
• The sum of all lengths (including dashes) cannot exceed 15.
Project Refresh Spending
Enter Yes or No to indicate whether project spending is refreshed when a PO is ordered.
QXtend
QXtend, including all related fields in the Registry browse, is no longer in use.
SAF
Supplementary Analysis Fields (SAF) background: QAD Enterprise Edition provides sub-account, cost center, project, and SAF analysis to use for additional analytical reporting on transactions. SAF analysis is optional, but lets you create detailed views of data. Using SAFs, you can analyze a single sub-account in many different ways by filtering based on the SAF codes included in the postings to the account. A carefully planned set of SAF structures avoids the need to set up separate COA elements for individual reporting.
Enter Yes or No to indicate whether EAM uses SAF at SAF/Use SAF?. Enter No, false, or 0 to include unsupported SAF code entries at SAF/Omit Unsupported SAF Concepts in the Data Name column.
SCP
To use EAM to Supply Chain Portal, enter the bid file archive name and the path to use at SCP/Bid File Archive in the Data Name column. Enter the bid file directory name and path to use at SCP/Bid File Directory in the Data Name column. Enter the bid file name and path to use at SCP/Bid File Naming in the Data Name column. Update the Data Value column by placing the cursor in the field and entering the needed information.
Verify Currency Exch Exists
Enter Yes or No to indicate whether EAM verifies that a currency exchange rate exists when a PO is received. If set to No and a currency exchange rate exists, EAM uses it. If set to No and a currency exchange rate does not exist, EAM uses a 1-to-1 rate.
Work order Schedule/Import and Export/Default Dir
Enter the default directory for MS Project.
Work Order Schedule/Import and Export/Run Project
Reserved for future development.