Loading Sequence Schedule Release
Load QCS Release
This illustration is a suggested setup sequence of master records for the QCS module based on information that flows from one master record to another and prerequisites that need to be accomplished before setting up records.
Receive Schedule Release
Once you have set up a customer’s sequence scheduled order, you are ready to start receiving their schedule releases.
• Sequence schedule releases contain the customer’s demand requirements with dates, times, and quantities
• The most recently received schedule release normally supersedes all previous schedule releases
• Raw and fabrication authorization are an exception to this
• The longest authorizations, calculated by end date, are the valid ones
There are two types of schedule releases supported by QAD Enterprise Applications. Each states how much of a certain item a customer expects to need and when. The primarily difference between the two is the planning horizon. The two types of schedule releases are:
• Planning Schedule (830, Delfor) shows long-term planning (weekly, monthly buckets)
• Shipping Schedule (862, Deljit) shows short-term planning (daily buckets) and is usually the more accurate
If there are two schedules, the scheduled order’s netting logic (set up in Scheduled Order Maintenance (7.3.13)) determines how to combine the schedules to obtain a RSS.
QAD Enterprise Applications retains every schedule the customer sends until you delete them from the system using Schedule Delete/Archive (7.5.23).
Exercise: Planning Schedule
Note: The data used in these exercises may not be the same as the data shown in the screen captures in this lesson. In an exercise, if a field is not listed, you can accept the default value or leave it blank.
Note: No Planning Schedule needed for Line 1.
Use Customer Plan Schedule Maintenance (7.5.1)
1 Create a planning schedule for line 2 by entering the following:
Field | Data |
Order: | so100 |
Line: | 2 |
Release ID: | 1 |
2 Advance to the lower frame and enter:
Field | Data |
Comments: | No |
Prior Cum Date: | <Yesterday’s Date> |
Schedule Data Type: | Ship |
3 Advance to the Schedule Detail Data frame and enter the following:
Date | Time | Int | Reference | Quantity | Q | Cmt | Rqm Det |
Next Monday | | W | | 20 | F | No | No |
Monday Week +1 | | W | | 25 | F | No | No |
Monday Week +2 | | M | | 100 | F | No | No |
4 Enter Yes when the system prompts you to make this schedule active.
5 Repeat the process, creating a planning schedule for line 3 by entering:
Field | Data |
Order: | so100 |
Line: | 3 |
Release ID: | 1 |
Note: Delete the Ship-From, Ship-To, and Item fields.
6 Advance to the lower frame and enter:
Field | Data |
Comments: | No |
Prior Cum Date: | <Yesterday’s Date> |
Schedule Data Type: | Ship |
7 Advance to the Schedule Detail Data frame and enter the following:
Date | Time | Int | Reference | Quantity | Q | Cmt | Rqm Det |
Next Monday | | W | | 20 | F | No | No |
Monday Week +1 | | W | | 25 | F | No | No |
Monday Week +2 | | M | | 100 | F | No | No |
8 Enter Yes when the system prompts you to make this schedule active.
9 Repeat the process, creating a planning schedule for line 4 by entering:
Field | Data |
Order: | so100 |
Line: | 4 |
Release ID: | 1 |
Note: Delete the Ship-From, Ship-To, and Item Number fields.
10 Advance to the lower frame and enter:
Field | Data |
Comments: | No |
Prior Cum Date: | <Yesterday’s Date> |
Schedule Data Type: | Ship |
11 Advance to the Schedule Detail Data frame and enter the following:
Date | Time | Int | Reference | Quantity | Q | Cmt | Rqm Det |
Next Monday | | W | | 20 | F | No | No |
Monday Week +1 | | W | | 25 | F | No | No |
Monday Week +2 | | M | | 100 | F | No | No |
12 Enter Yes when the system prompts you to make this schedule active.
13 Repeat the process, creating a planning schedule for line 5 by entering:
Field | Data |
Order: | so100 |
Line: | 5 |
Release ID: | 1 |
Note: Delete the Ship-From, Ship-To, and Item Number fields.
14 Advance to the lower frame and enter:
Field | Data |
Comments: | No |
Prior Cum Date: | <Yesterday’s Date> |
Schedule Data Type: | Ship |
15 Advance to the Schedule Detail Data frame and enter the following:
Date | Time | Int | Reference | Quantity | Q | Cmt | Rqm Det |
Next Monday | | W | | 20 | F | No | No |
Monday Week +1 | | W | | 25 | F | No | No |
Monday Week +2 | | M | | 100 | F | No | No |
16 Enter Yes when the system prompts you to make this schedule active.
Exercise: Shipping Schedule
1 Create a shipping schedule for line 1 by entering the following:
Use Customer Ship Schedule Maintenance (7.5.2)
Field | Data |
Order: | so100 |
Line: | 1 |
Release ID: | 1 |
2 Advance to the lower frame and enter.
Field | Data |
Comments: | No |
Prior Cum Date: | <Yesterday’s Date> |
Schedule Data Type: | Ship |
3 Advance to the Schedule Detail Data frame and enter the following:
Date | Time | Int | Reference | Quantity | Q | Cmt | Rqm Det |
Next Monday | | D | | 5 | F | No | No |
Tuesday | | D | | 5 | F | No | No |
Wednesday | | D | | 5 | F | No | No |
Thursday | | D | | 5 | F | No | No |
Friday | | D | | 5 | F | No | No |
Monday Week +1 | | D | | 5 | F | No | No |
Tuesday | | D | | 5 | F | No | No |
Wednesday | | D | | 5 | F | No | No |
4 Enter Yes when the system prompts you to make this schedule active.
Note: No Shipping Schedule needed for line 2.
5 Repeat the process, creating a shipping schedule for line 3 by entering:
Field | Data |
Order: | so100 |
Line: | 3 |
Release ID: | 1 |
Note: Delete the Ship-From, Ship-To, and Item Number fields.
6 Advance to the lower frame and enter.
Field | Data |
Comments: | No |
Prior Cum Date: | <Yesterday’s Date> |
Schedule Data Type: | Ship |
7 Advance to the Schedule Detail Data frame and enter the following:
Date | Time | Int | Reference | Quantity | Q | Cmt | Rqm Det |
Next Monday | | D | | 5 | F | No | No |
Tuesday | | D | | 5 | F | No | No |
Wednesday | | D | | 5 | F | No | No |
Thursday | | D | | 5 | F | No | No |
Friday | | D | | 5 | F | No | No |
Monday Week +1 | | D | | 5 | F | No | No |
Tuesday | | D | | 5 | F | No | No |
Wednesday | | D | | 5 | F | No | No |
8 Enter Yes when the system prompts you to make this schedule active.
9 Repeat the process, creating a shipping schedule for line 4 by entering:
Field | Data |
Order: | so100 |
Line: | 4 |
Release ID: | 1 |
Note: Delete the Ship-From, Ship-To, and Item fields.
10 Advance to the lower frame and enter.
Field | Data |
Comments: | No |
Prior Cum Date: | <Yesterday’s Date> |
Schedule Data Type: | Ship |
11 Advance to the Schedule Detail Data frame and enter the following:
Date | Time | Int | Reference | Quantity | Q | Cmt | Rqm Det |
Next Monday | | D | | 5 | F | No | No |
Tuesday | | D | | 5 | F | No | No |
Wednesday | | D | | 5 | F | No | No |
12 Enter Yes when the system prompts you to make this schedule active.
13 Repeat the process, creating a shipping schedule for line 5 by entering:
Field | Data |
Order: | so100 |
Line: | 5 |
Release ID: | 1 |
Note: Delete the Ship-From, Ship-To, and Item fields.
14 Advance to the lower frame and enter.
Field | Data |
Comments: | No |
Prior Cum Date: | <Yesterday’s Date> |
Schedule Data Type: | Ship |
15 Advance to the Schedule Detail Data frame and enter the following:
Date | Time | Int | Reference | Quantity | Q | Cmt | Rqm Det |
Next Monday | | D | | 5 | F | No | No |
Tuesday | | D | | 5 | F | No | No |
Wednesday | | D | | 5 | F | No | No |
Thursday | | D | | 5 | F | No | No |
Friday | | D | | 5 | F | No | No |
Monday Week +1 | | D | | 5 | F | No | No |
Tuesday | | D | | 5 | F | No | No |
Wednesday | | D | | 5 | F | No | No |
16 Enter Yes when the system prompts you to make this schedule active.
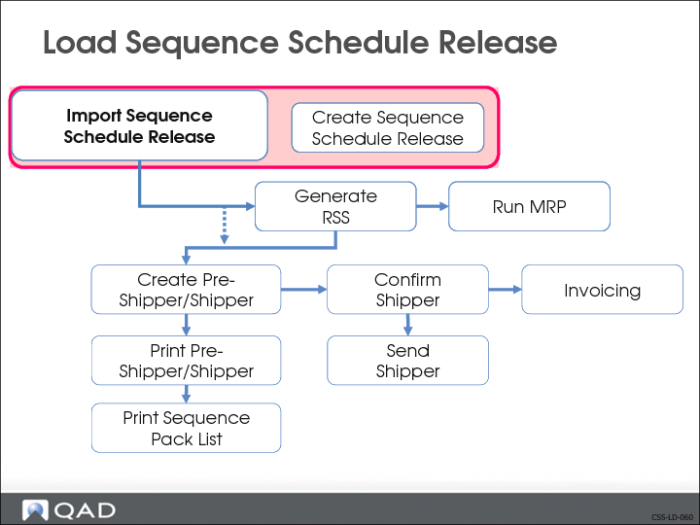
Load Sequence Schedule Release
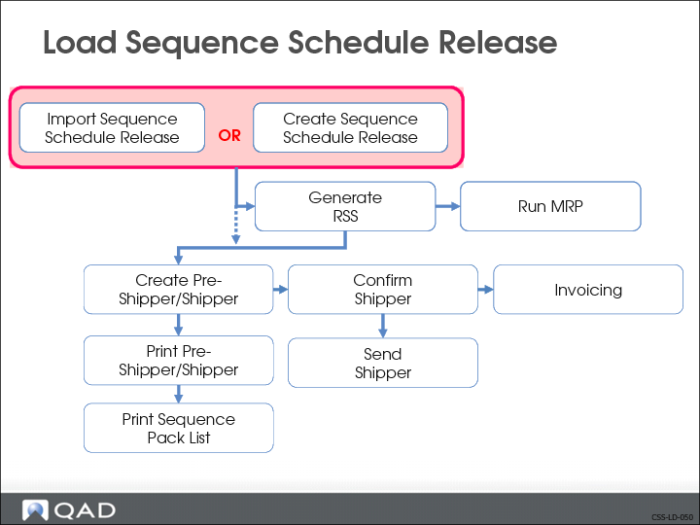
There are two ways to load a schedule release onto the system so you can begin processing the customer’s order:
• Electronically
• Document Import (35.1) (EDI eCommerce)
• Shipper Gateway (7.9.22) (ASCII file)
• Manually
• Sequence Schedule Maintenance (7.5.4.5)
Import Sequence Schedule Release
There are two ways to import a sequence schedule release:
• Import using eCommerce
• Use Document Import (35.1) (EDI eCommerce)
• Import from an ASCII formatted file from an external system
• Use Shipper Gateway (7.9.22)
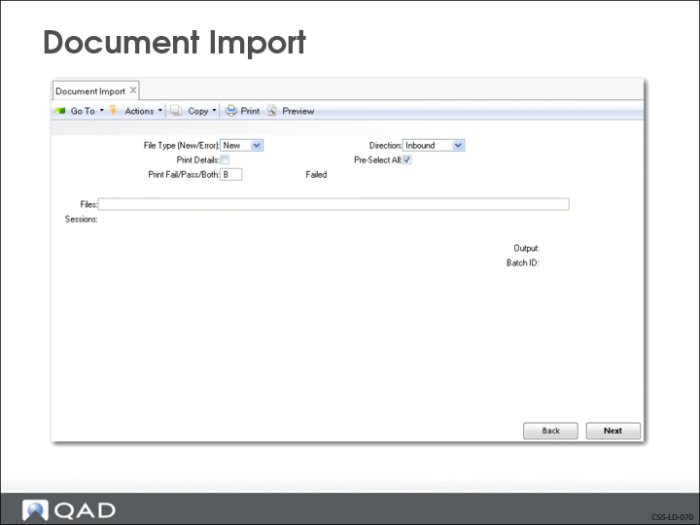
Document Import (35.1)
Use Document Import to start the process of loading standards neutral format (SNF) files from the eCommerce subsystem, transforming them into formats usable by QAD Enterprise Applications, and transferring them into the QAD Enterprise Applications database using a gateway program.
The system generates a report on the import process.
Note: Import directory specified in Inbound Directory field in eCommerce Control (35.21.13.24).
• If Error, system displays only files containing documents that encountered load errors during previous imports
Note: Stored in the error file directory specified in the Error File Directory field set in eCommerce Control.
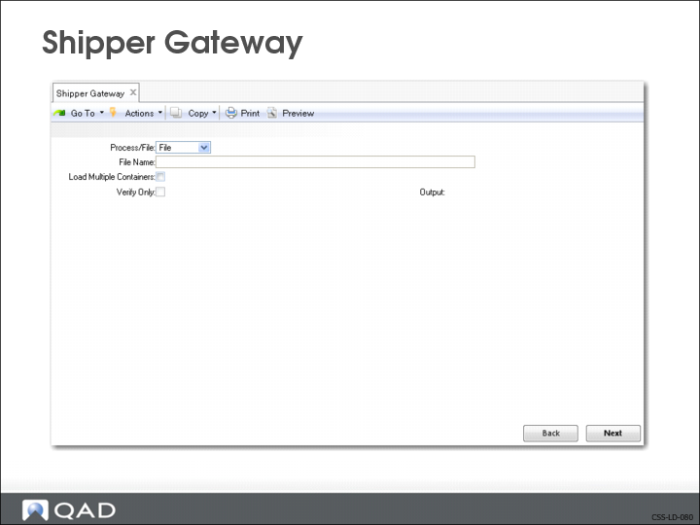
Shipper Gateway
Use Shipper Gateway import an ASCII formatted file.
• Contains fields for customer sequence information
When you import a shipper gateway file from an external system, the system looks for the corresponding sequence to pick from the sequenced scheduled order. If the corresponding sequence is not found, the system picks the next available sequence.
Exercise: Import Sequence Schedule
Note: You can load the schedule electronically via EDI/eCommerce or load the sequence schedule manually. Electronically is the preferable method, but if problems occur then load the sequence schedule manually as described in Appendix B and continue with the exercises.
Use Document Import (35.1)
1 To import the detail sequence schedule enter the following:
Field | Data |
Import from File/Process: | File |
Import File/Process Name: | train1.886 |
Report Detail/Summary: | Detail |
Update: | No |
Note: There should be one warning message, and no error messages.
2 Verify the schedule with the table entries found in Manually Create Sequence Schedule on page 315.
3 To import the summary sequence schedule enter the following:
Field | Data |
Import from File/Process: | File |
Import File/Process Name: | train1.886 |
Report Detail/Summary: | Summary |
Update: | No |
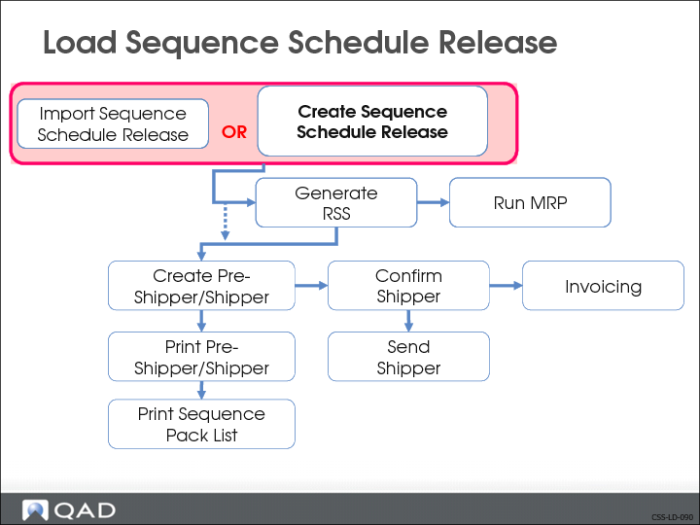
Create Sequence Schedule Release
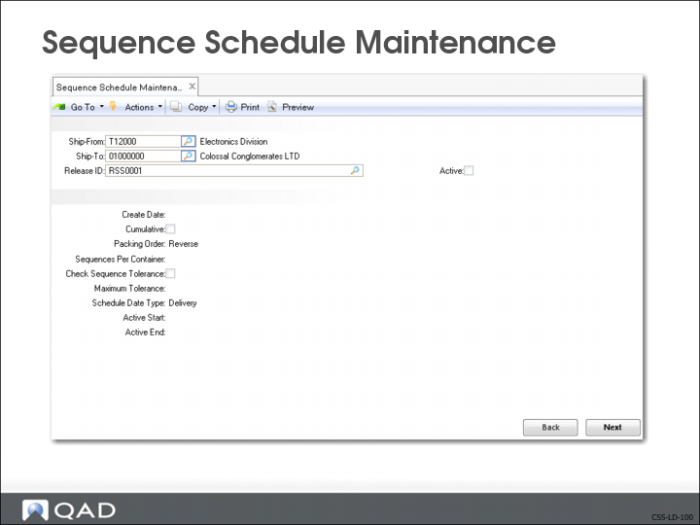
You can manually enter a sequence schedule release by using Sequence Schedule Maintenance (7.5.4.5).
Sequence Schedule Maintenance (7.5.4.5)
Use Sequence Schedule Maintenance (7.5.4.5) to:
• Manually enter (create) a sequenced schedule release
• Modify existing sequence schedule releases
• Imported
• Manually created
• Logically delete sequence records
Creating a New Release
When creating a new release, the system gives you the option of copying all non-deleted sequence records from the current active release to the new release.
If you choose to copy the data from the active release, the system checks to see if any sequences from the active release have been picked. If sequences have been picked, the system asks if you want to create cross-references between the sequences on the new release and the corresponding references on the active release.
• If you choose Yes, the system creates cross-references between the sequences on the new release and the corresponding references on the active release
You cannot pick sequences from the new release that are cross-referenced to sequences on the active release. These cross-referenced sequences have already consumed their requirements.
If you choose No, then the system:
• Copies all sequences from the active schedule to the new schedule
• Resets any sequence records previously marked as picked or cross-referenced
Note: By resetting the sequences, the system considers them as open requirements.
When you finish creating the new schedule release, the system prompts you to make the new release the active release.
Header Frame
In the header frame you identify the sequence schedule.
• A scheduled order must already exist for the ship-from/ship-to combination
Sequence Schedule Maintenance (7.5.4.5) Detail Data Frame
Use the Sequence Detail Data frame to:
• Create new sequence records
• Edit existing sequence records
• Mark existing sequence records as deleted
• System makes record inactive for the schedule release
• Sequence record is marked as deleted, but is not physically removed from the database
• To permanently delete the record, use Sequence Schedule Detail Delete 7.5.4.22
Note: Deleted sequences remain on the schedule, but are not considered for picking or planning. Once deleted, sequences are no longer active and cannot be re-activated.