Non-intrusive Customization: Supporting Tools
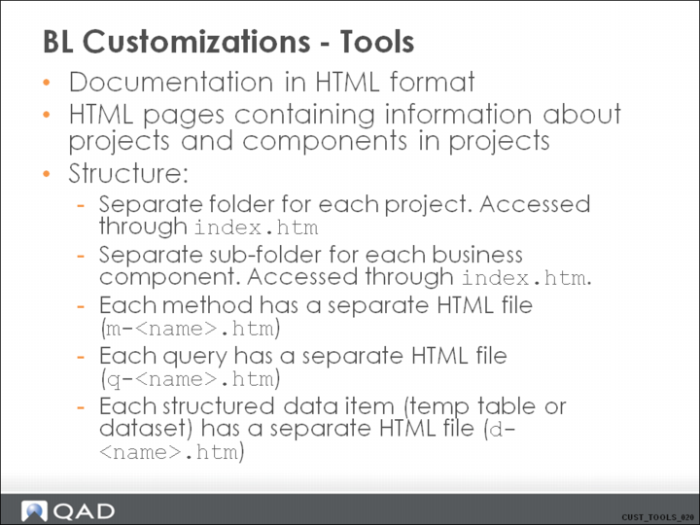
BL Customization - Tools
The HTML documentation represents the documented class model for the application business layer. The documentation is written by developers and generated in HTML by the development tool that they use (Component Builder tool).
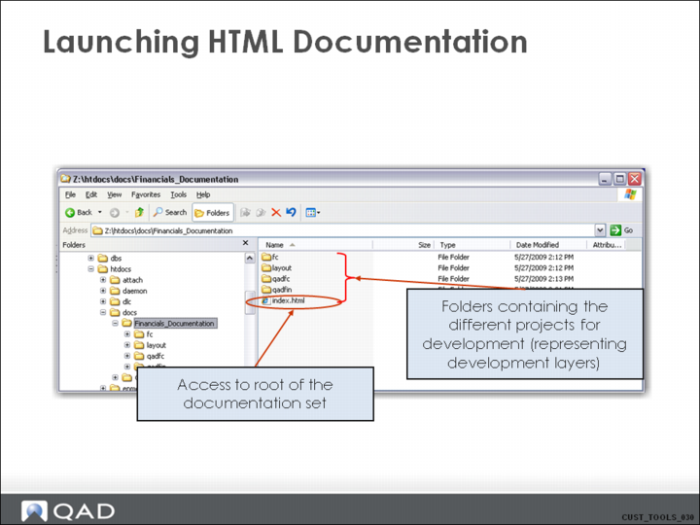
Launching HTML Documentation
Launching the documentation from Windows.
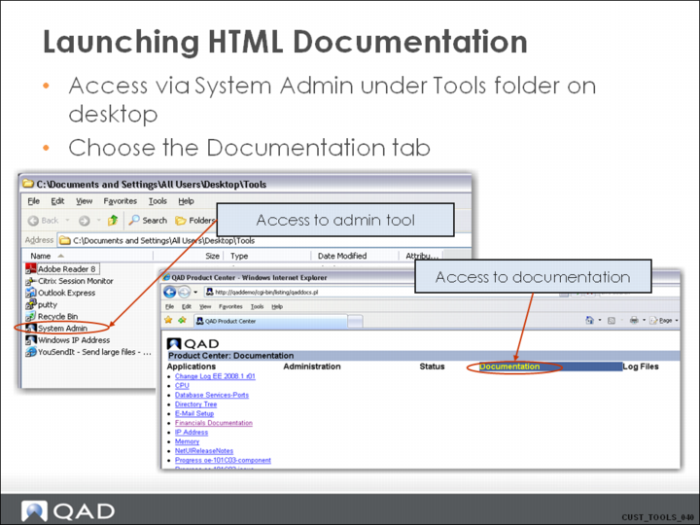
Launching HTML Documentation 2
Launching the documentation from the admin tools.
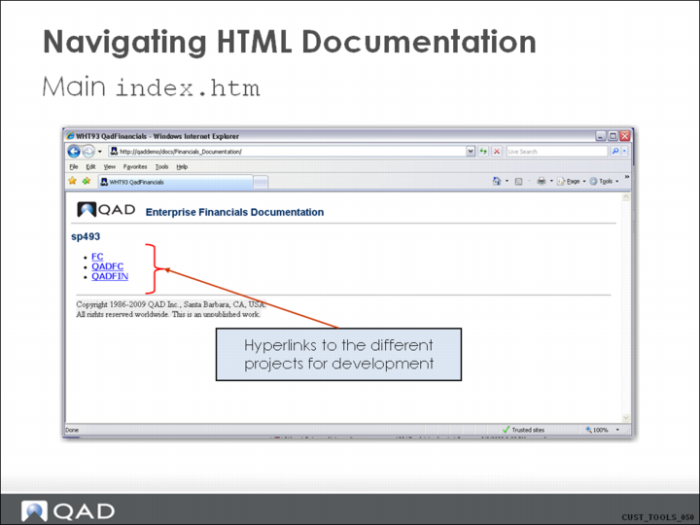
Navigating HTML Documentation 3
The main page for HTML documentation contains a hyperlink to each of the development projects that are used to create the final application code.
FC and QADFC are foundation-level projects. FC (Foundation Classes) contains a mixture of abstract classes and technical classes that are required to support all application patterns. This way, the FC project contains the pure technical implementation of the application infrastructure. QADFC (Qad Foundation Classes) is dependent on FC and contains functional implementation classes for mechanisms like role-based security, domains, entities, and so on. This way, the QADFC project contains the more functional part of the application infrastructure.
QADFIN is the application project. This is the biggest project and contains all of the business components that are required for the Financials functionality in the QAD application.
Navigating HTML Documentation 4
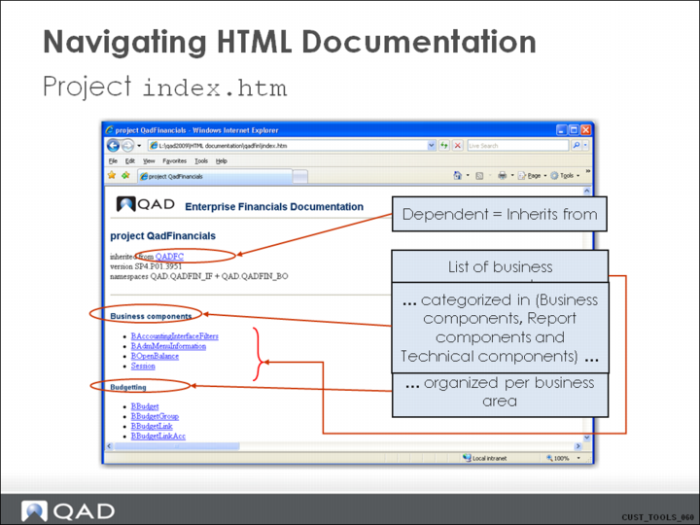
The main page for project documentation contains the following:
• Dependency information (projects on which this project is dependent).
• Namespaces (the namespaces used for the components in this project in .NET C#).
• A list of business components, categorized using the business areas (such as Budgeting, Business Relation, and General Ledger).
• A list of report components, categorized using the business areas.
• A list of technical components, categorized using the business areas.
• …
The components are all hyperlinked and you can use them to drill down for detailed component information.
Navigating HTML Documentation 5
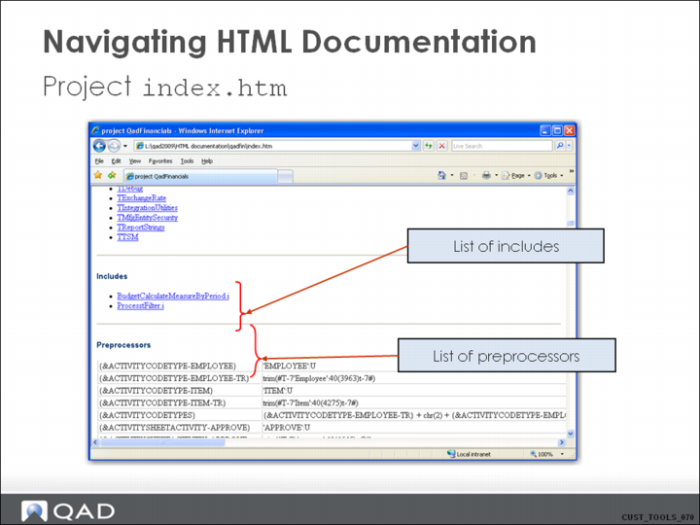
The main page for project documentation contains the following:
• …
• A list of includes defined on project level.
• A list of preprocessors available for the project.
The components are all hyperlinked and you can use them to drill down for detailed component information. This also applies to includes.
The preprocessors are also available for the Customization code. It is important that Customization developers use these to be less dependent on changes made in the standard application.
Navigating HTML Documentation 6
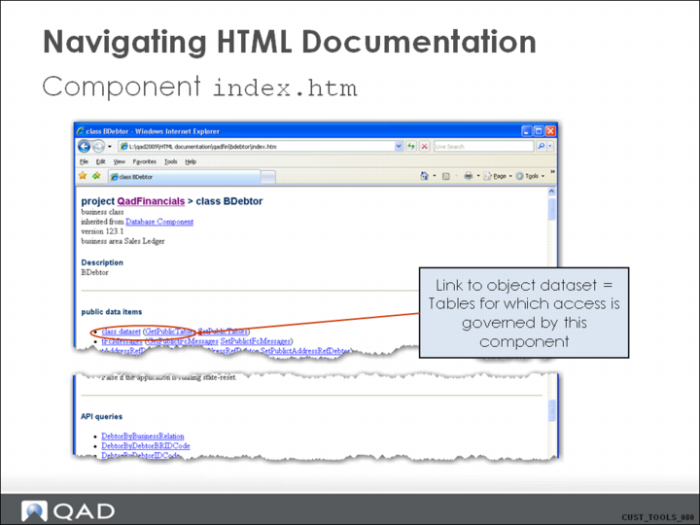
The main page for the class (component) documentation contains the following:
• A link to the project to which this component belongs.
• A link to the ancestor component (that this component inherits from).
• The internal version of the component (at the moment of generation of the HTML documentation).
• The name of the business area to which this component belongs.
• Under “public data items”:
• The object dataset (class dataset) for which data can be set and retrieved with resp. SetPublicTables and GetPublicTables.
• The list of public data item temp tables and datasets for which data can be set and retrieved with resp. SetPublic*() methods and GetPublic*().
• The list of public data items of simple data type (character, integer, decimal, logical, and date) for which the value can be set and retrieved with the resp. SetPublicData() and GetPublicData() methods.
• List of API queries: The queries that are available to be called by external parties.
All listed methods and queries are hyperlinked to the specific HTML files for each separate method or query.
Navigating HTML Documentation 7
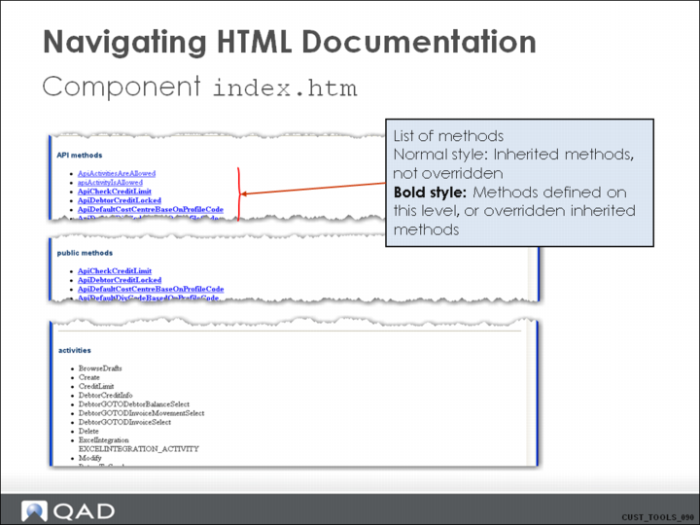
The main page for the class (component) documentation contains the following:
• List of API methods: The methods that are available to be called by external parties. Typically, calls to these methods are made via the 4GL proxies. There is more detail on this later in the presentation.
• List of public methods: The methods of the component that can be called from other components.
• List of “other” methods: The remaining methods, which do not belong to one of the above categories.
• List of activities: Activities are the secured business functions that can be executed on the business component. Most of the activities correspond with entries on the application’s menu.
All listed methods and queries are hyperlinked to the specific HTML files for each separate method or query.
If a method is inherited, but not overridden, the hyperlink brings you to the place in the code for the ancestor code.
Navigating HTML Documentation 8
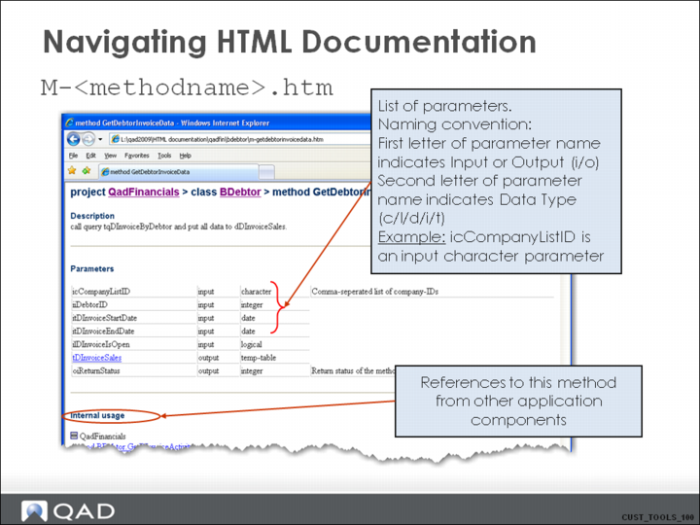
The method page contains the following information:
• The name of the method and the project and class (component) to which the method belongs.
• The return data type. Usually void. For methods of type “function”, it is a real data type.
• The description of the method.
• The list of parameters and descriptions (if available).
• The places in the code that reference this method is referenced (where it is called).
Navigating HTML Documentation 9
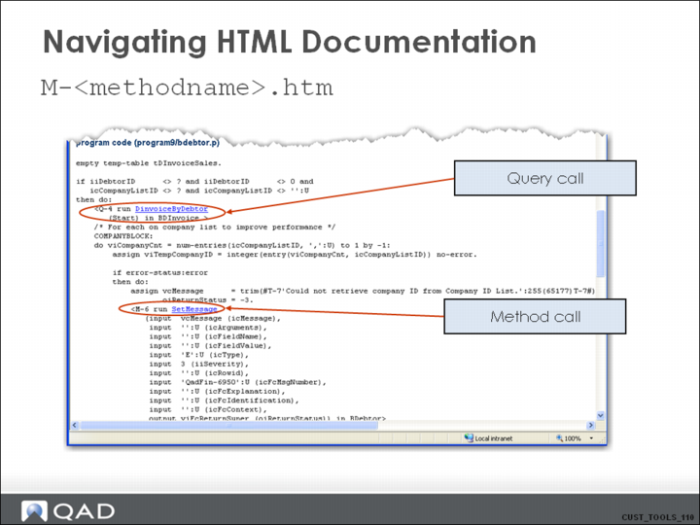
The method page contains the program code. This is the code that is inserted by the developer as part of the implementation of the method in the Component Builder.
The code can contain specific CB tags or calls. These calls can be the following:
• Query calls. (<Q-…>) These represent execution of queries to retrieve data in records of a temp table. Values for the input parameters are also visible in the query call tag. The name of the query within the tag is hyperlinked and can be used to drill down to the specific documentation for the called query.
• Method calls. (<M-…>) These represent execution of methods. Values for the parameters are also visible in the method call tag. The name of the method within the tag is hyperlinked and can be used to drill down to the specific documentation for the called method.
• Include calls. (<I-…>). These indicate the place where an include file is included in the code.
Navigating HTML Documentation 10
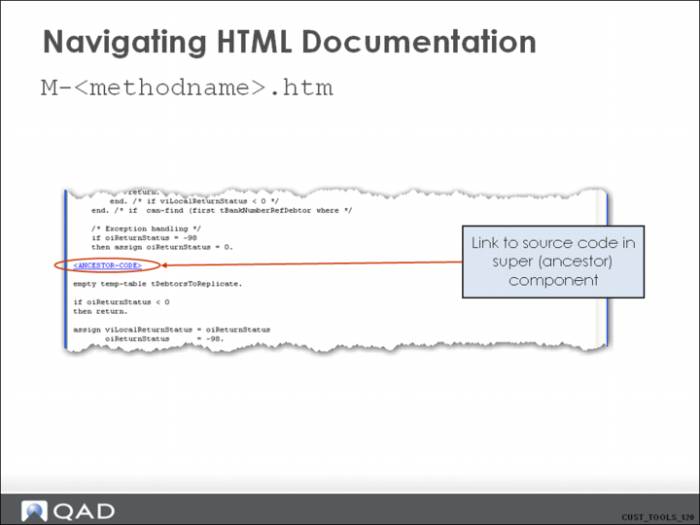
For inherited methods, the code normally includes an <ANCESTOR-CODE> tag. This is the place where the code in the method of the ancestor component is executed. The tag is hyperlinked for easy navigation to the ancestor code.
Navigating HTML Documentation 11
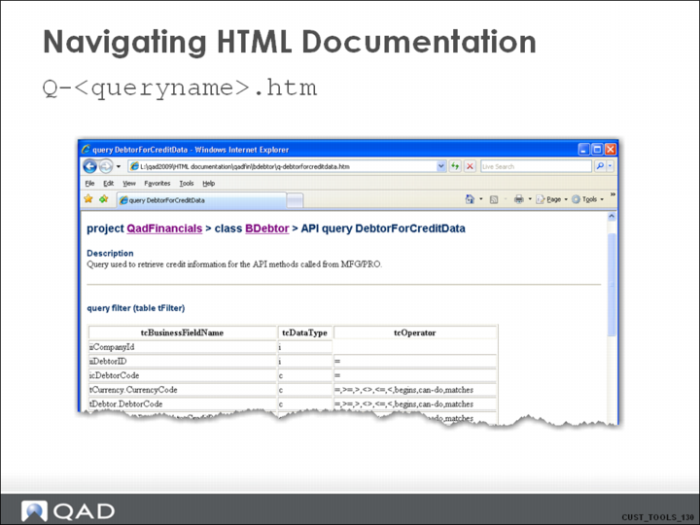
The query page contains the following information:
• The name of the method and the project and class (component) to which the query belongs.
• The description of the query.
• The list of parameters and descriptions (if available).
• The query filter. This displays all of the possible records that can be passed via the tFilter dataset or temp table.
Navigating HTML Documentation 12
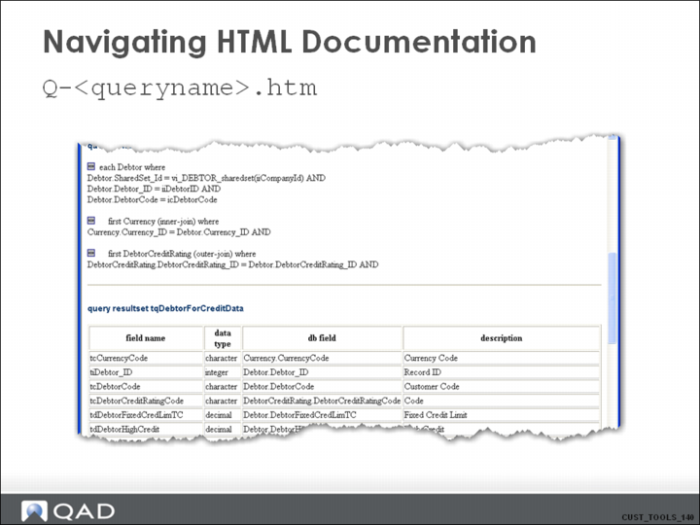
The query page contains the following information:
• The query (condition).
• The description of the query result set.
Navigating HTML Documentation 13
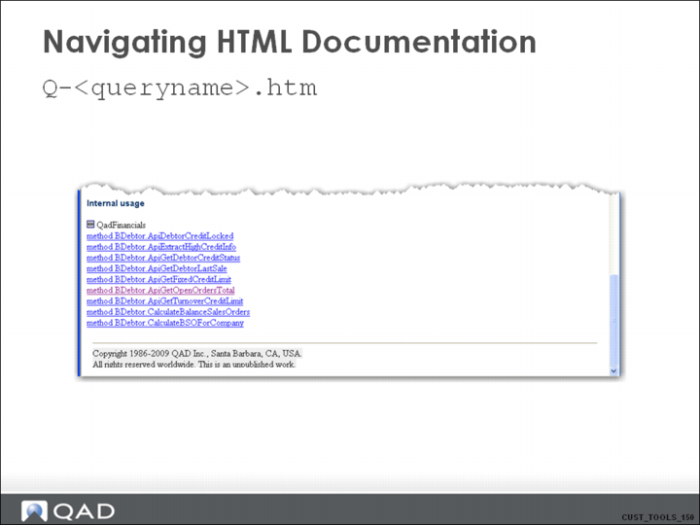
The query page contains the places in the code that reference (call) the query.
Navigating HTML Documentation 14
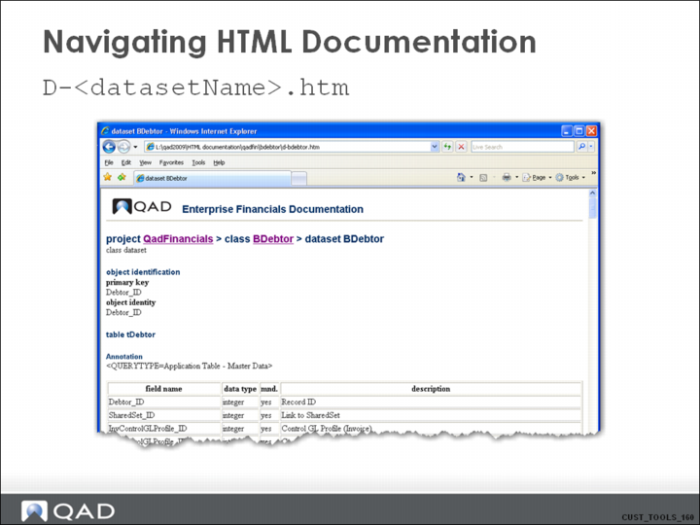
The dataset page contains the list of fields for each table in the dataset.
Navigating HTML Documentation 15
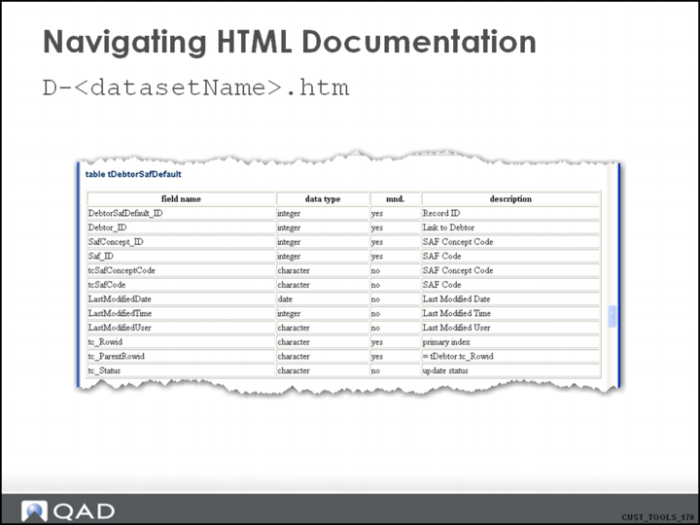
For an object dataset (for example, BDebtor), the tc_parentrowid shows the relation to the parent table in the object dataset.
Hands-on Exercise (9)
BL Customizations - Tools
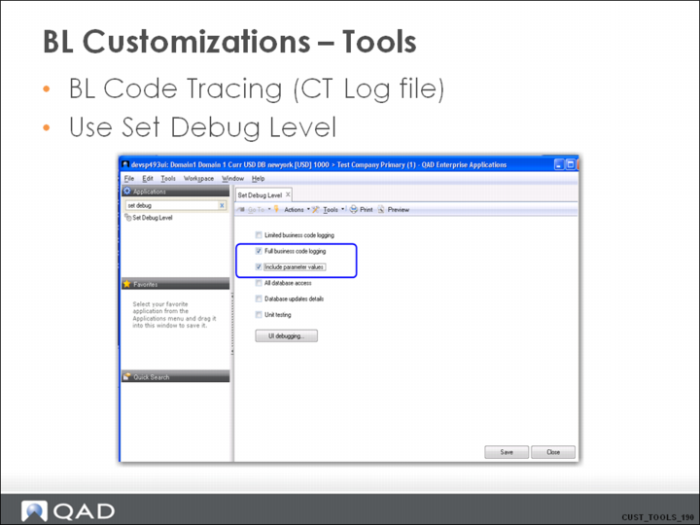
The ability to have a full code execution trace on the backend BL is indispensible for more complex Customization work. All components follow the same standard patterns for the normal maintenance functionality, and for most other functions too. But some more complex components have a lot of sub-flows or deviations from the normal flow. With the BL Code tracing capability, one can find the exact flow.
Use the “Set Debug Level” function in the menu to activate the backend logging. Make sure that all of the forms are closed before activating this feature. Typically, you select the “Full business code logging” and the “Include parameter values”. You can use the same function to deactivate the logging .
When the logging is on, a file named ct<sessionID>.log is created on the server. All methods and queries executed on the backend are logged.
BL Customizations - BL Code Tracing
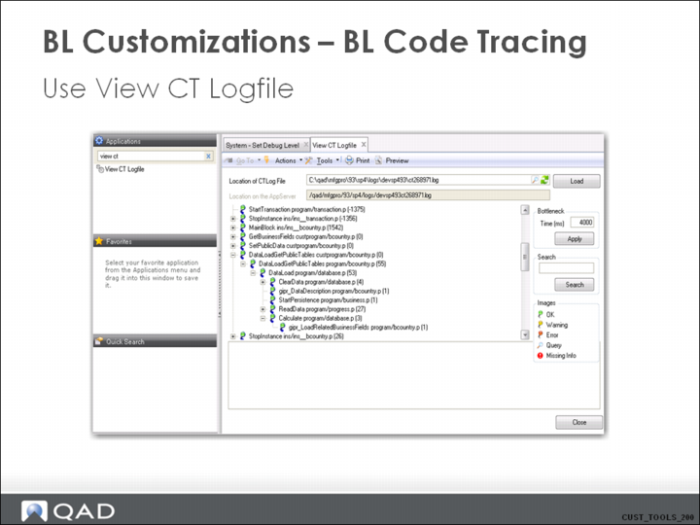
To view the contents of the current CT log file (containing the business code trace), use “View CTLog” from the menu.
Hands-on Exercise (10)
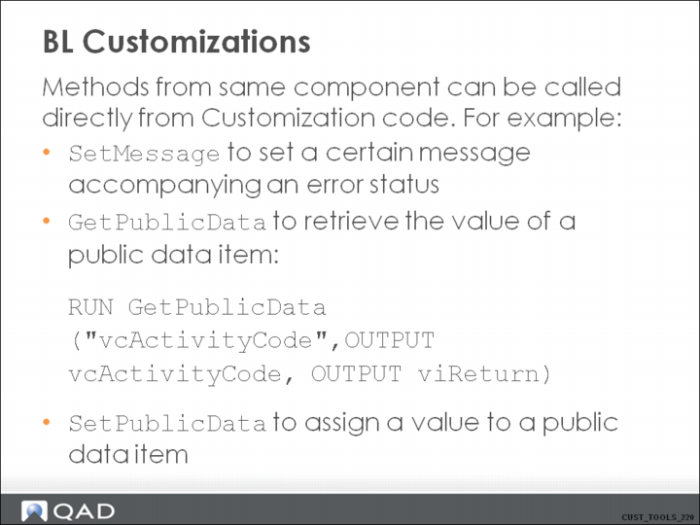
BL Customizations
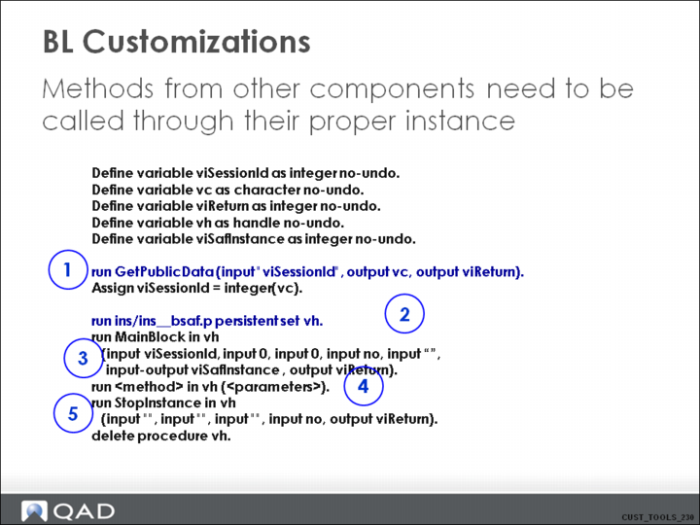
BL Customizations 2
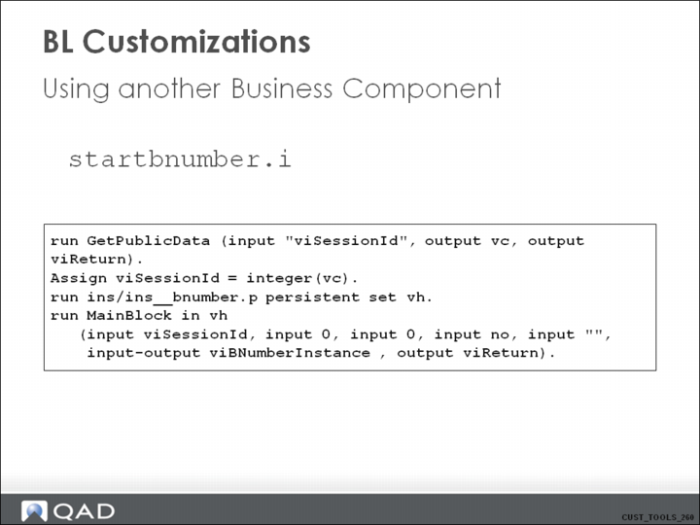
1. Retrieve the current session ID. This is required to start an instance of the business component.
2. Run the instance procedure of the business component persistently to make sure that the methods become available.
3. Run the MainBlock in the instance procedure. This ensures that the state of the business component instance is OK. Remark the viSafIntance. If this value is 0, it means that the instance is initialized. If it has a certain value, the mechanism will try to restore the instance based on previously saved state data.
4. Run the method.
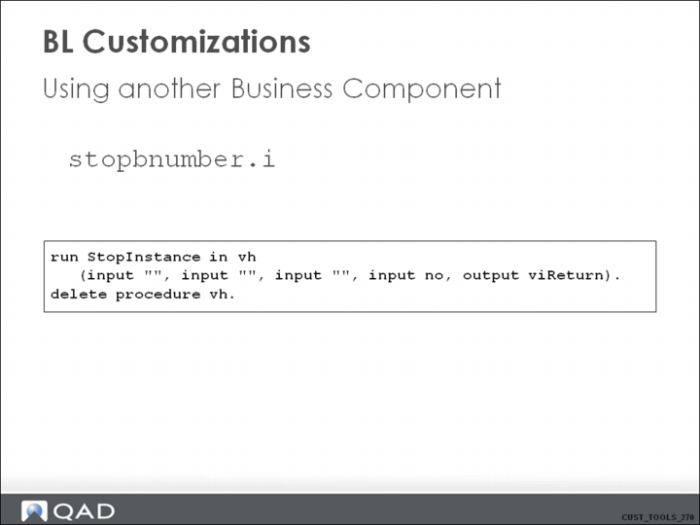
5. Stop the instance. Watch the 4th parameter, which indicates whether to keep the instance for later reuse. Right after the StopInstance call, the handle to the persistent procedure needs to be deleted! (to prevent memory leaks)
BL Customizations 3
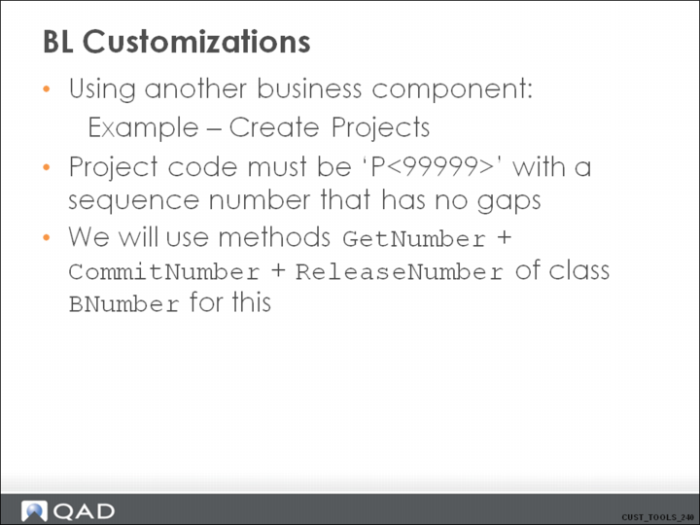
For this case, we assume that projects cannot be deleted and that projects are not created through QXtend or other integration. Read the HTML documentation on the business methods used.
BL Customizations 4
BL Customizations 5
BL Customizations 6
BL Customizations 7
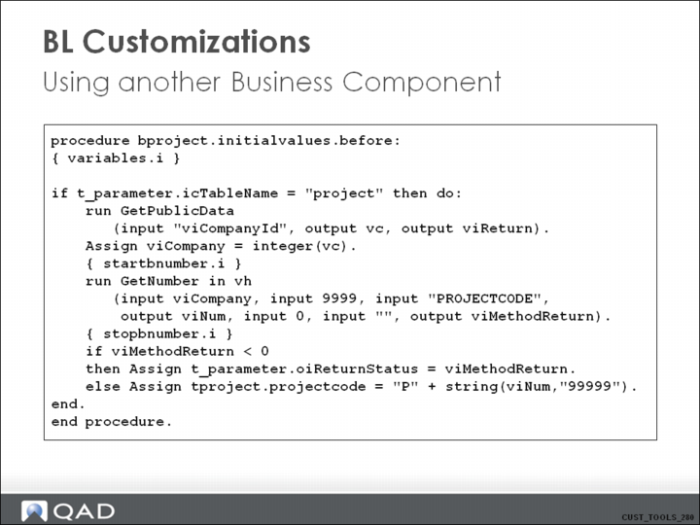
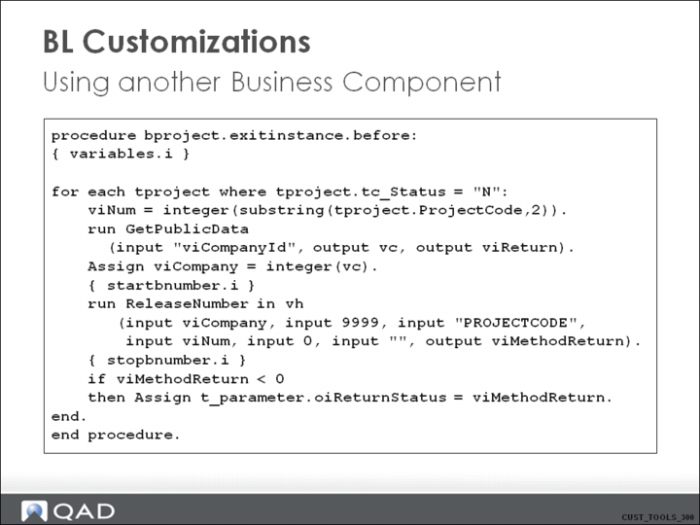
GetNumber reserves the project code number; if another user starts project create before we save our project, the user does not get the same number.
BL Customizations 8
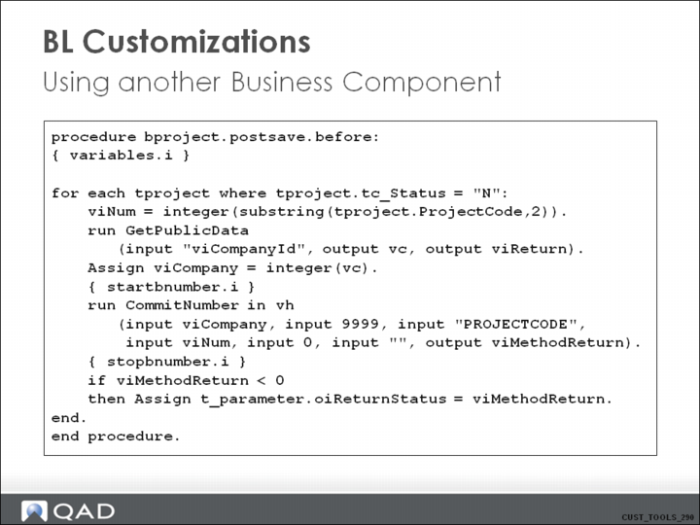
CommitNumber confirms that the number was used and is never used again.
BL Customizations 9
ReleaseNumber cancels the reservation on the number used in the project being created. If you create another project, it reuses the number.
BL Customizations 10
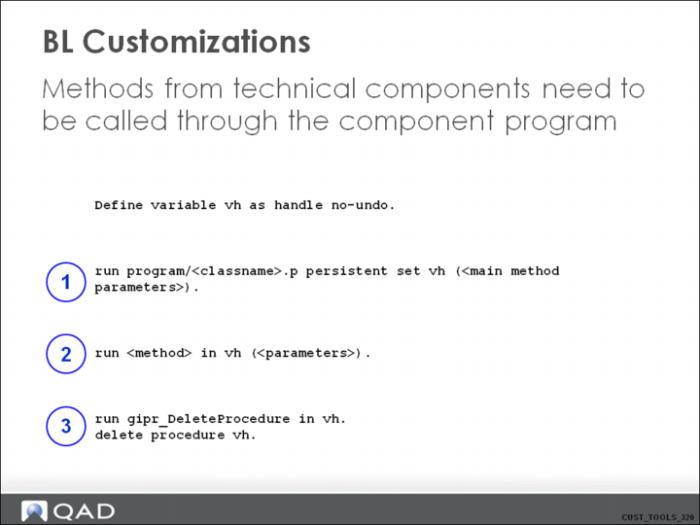
1. Run the technical component. As opposed to an instance program, a technical component does not have a fixed parameter set. Look in the HTML documentation to see which parameters to pass.
2. Run the method.
3. Stop the technical component, but first run a (generated) internal procedure to clean up any resources used by the technical component.
BL Customizations 11
BL Customizations 12
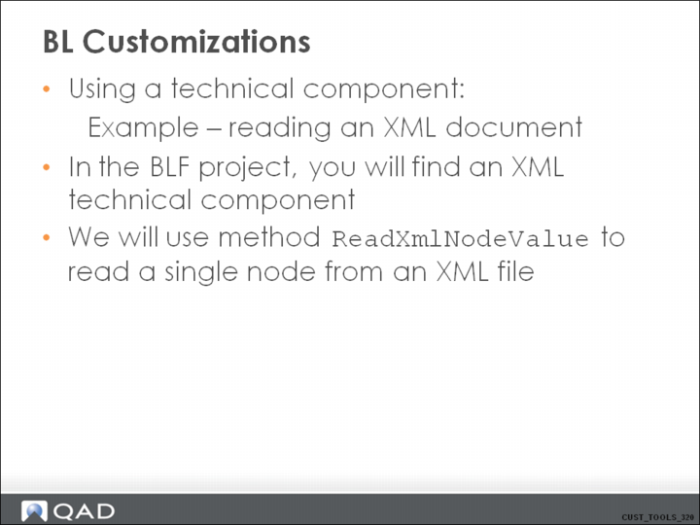
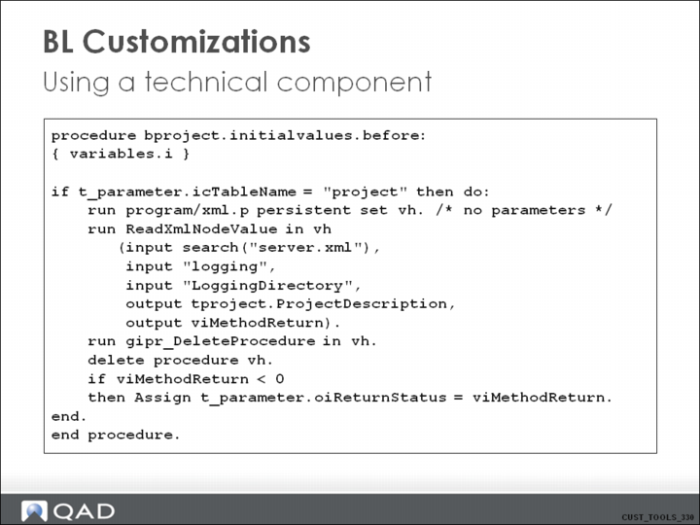
server.xml is a random XML file that is available. LoggingDirectory is a random node in this file. What would happen if you forget “gipr_DeleteProcedure”? Find out using unit test logging.
Typical Customization: Case 1
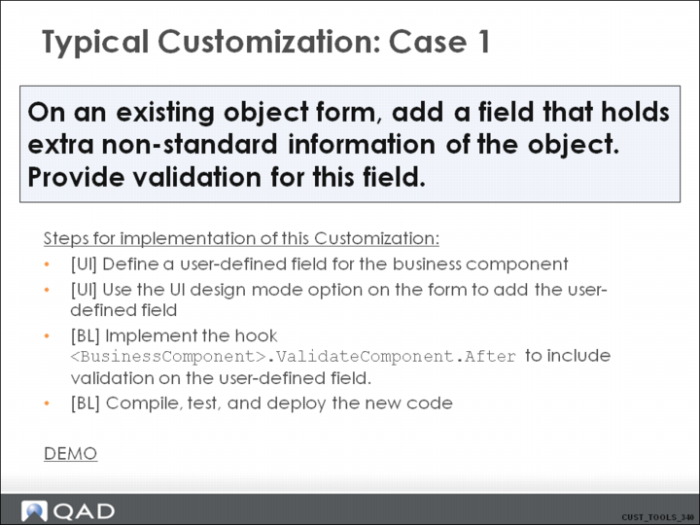
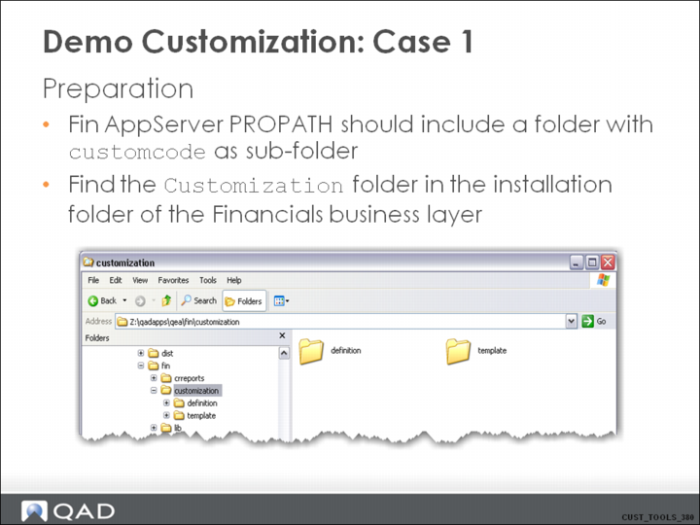
• Most of the forms in the client UI represent application objects. These forms are called “object forms”.
• Object forms are typically built up of business fields representing data for the object.
• Every object in the Financials has a set of predefined fields (called “Custom*”) that can be used as user-defined fields, for which the user can determine the meaning.
• In the slide, [UI] means that this step is done by someone straight from the client user interface in the application. No code changes are involved in these steps.
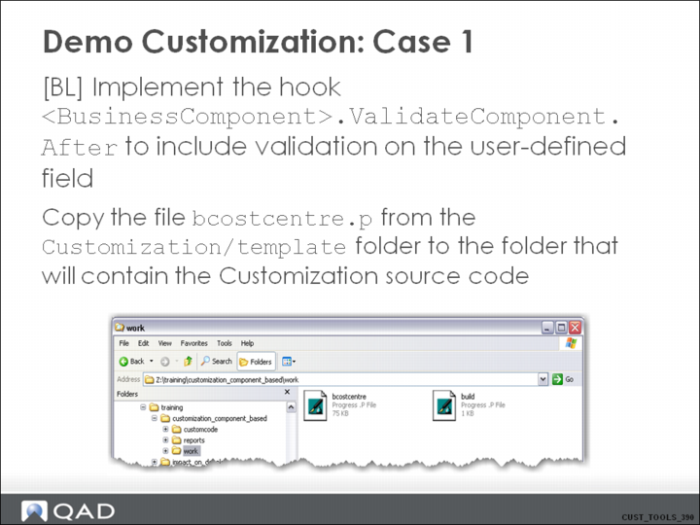
• In the slide, [BL] means that this step is done by a 4GL developer adding code in the hooks for non-intrusive Customization of the business logic running on the backend.
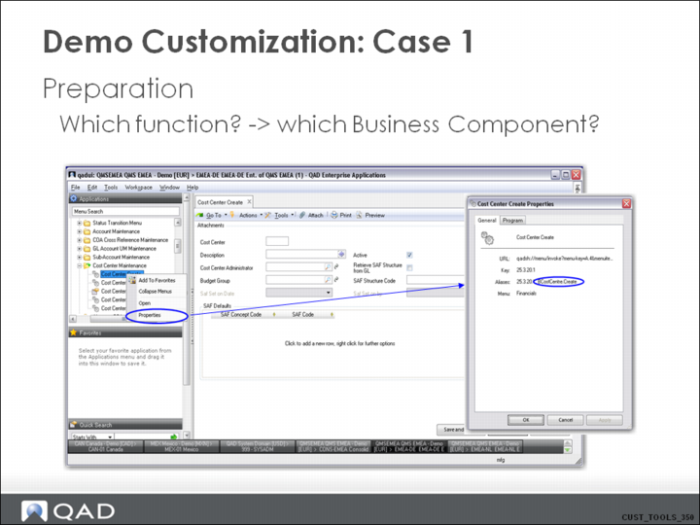
Demo Customization: Case 1
Demo Customization: Case 1 (2)
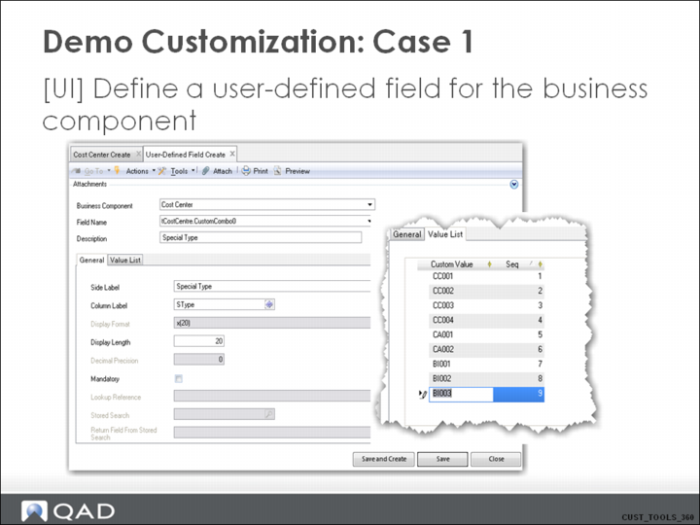
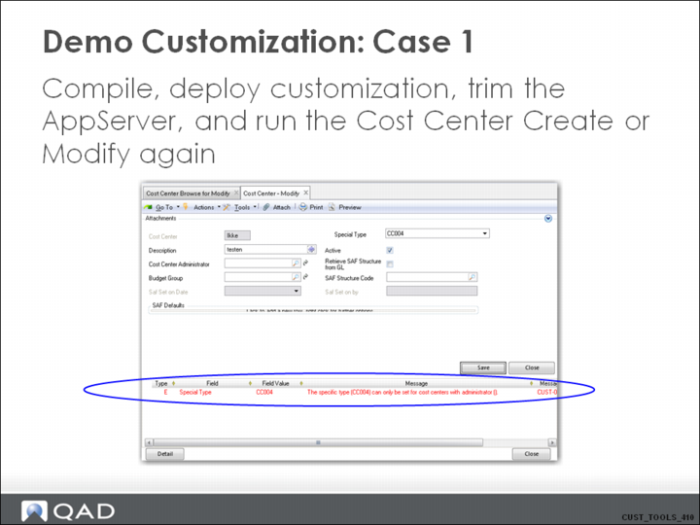
We use a “CustomCombo” type field. For this type of field, you can specify a list of possible values.
Demo Customization: Case 1 (3)
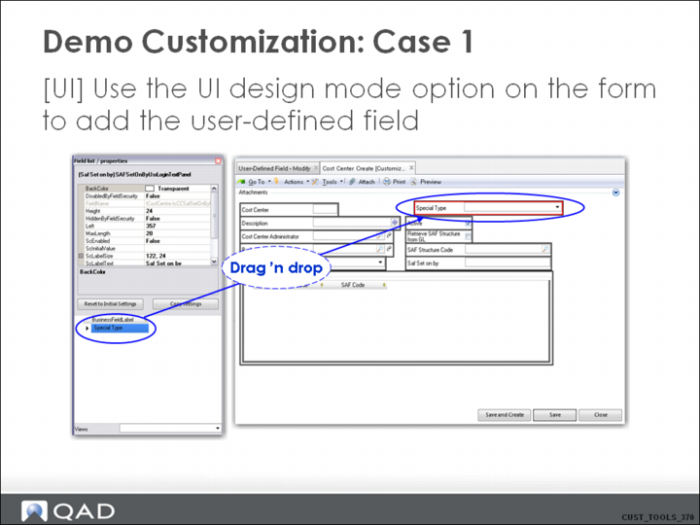
Demo Customization: Case 1 (4)
Demo Customization: Case 1 (5)
Demo Customization: Case 1 (6)
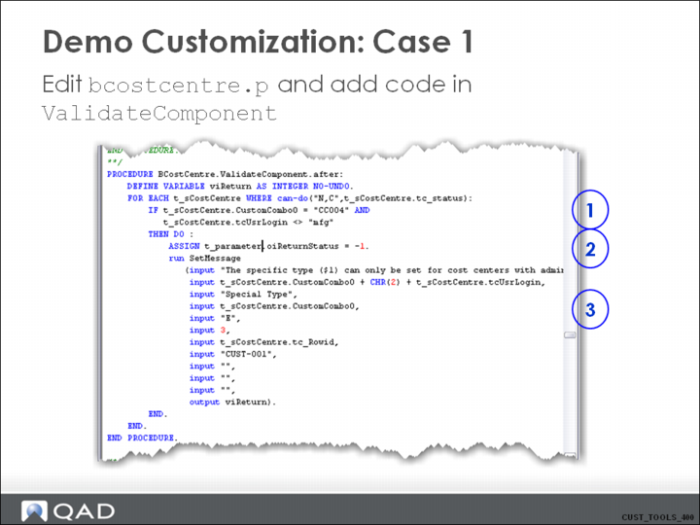
Uncomment the code for BCostCentre.ValidateComponent.After.
1. Loop through the data in the object dataset; only take the new and changed records to validate. Use the t_s buffer.
2. Assign the oiReturnStatus parameter to -1 (general validation error).
3. Use a call to “SetMessage” to pass the appropriate validation message.
Demo Customization: Case 1 (7)
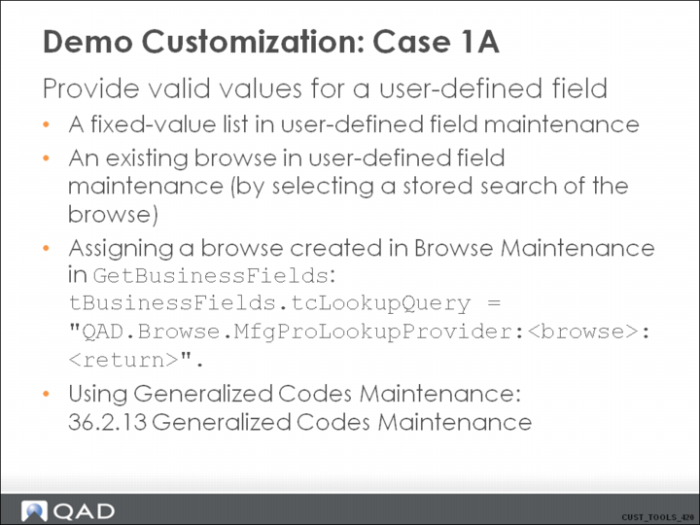
Demo Customization: Case 1A
Hands-on Exercise (11)
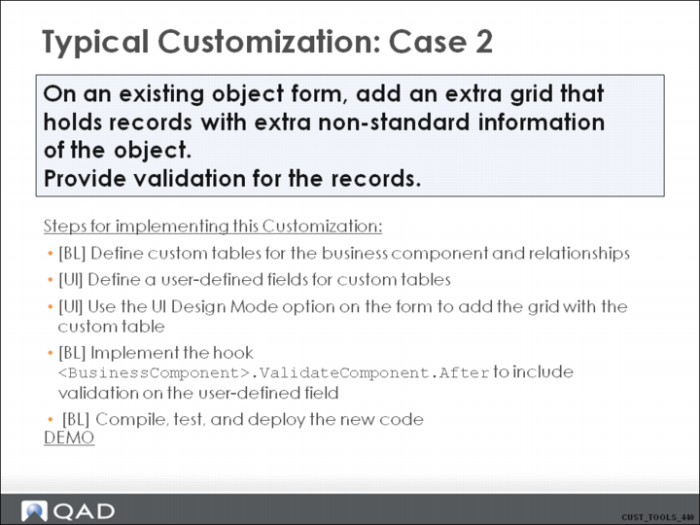
Typical Customization: Case 2
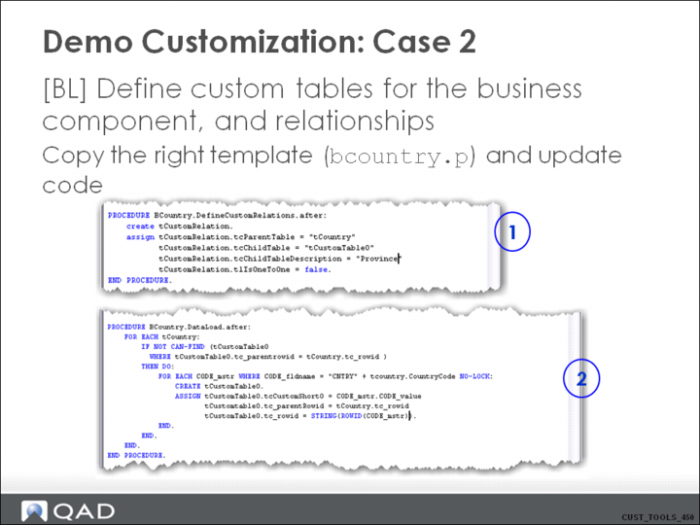
Demo Customization: Case 2
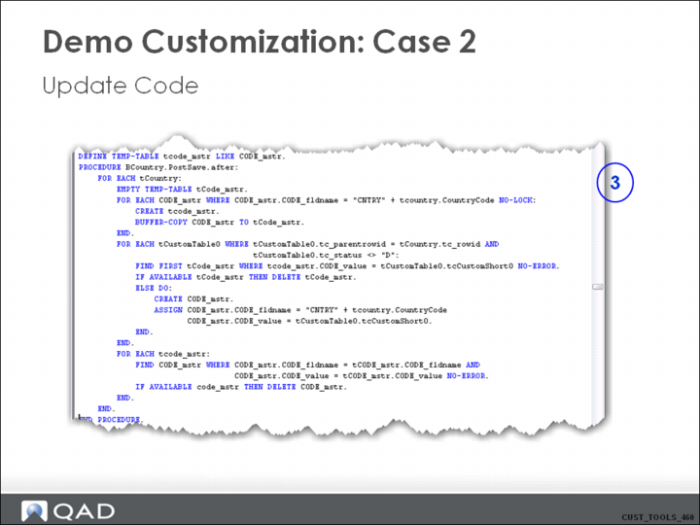
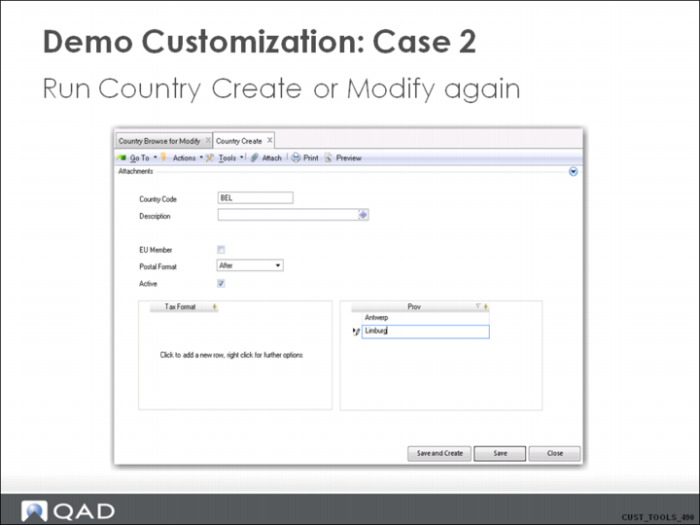
The Customization needs to contain code to complete the object dataset with the custom data, which in this example is coming from the generalized codes in code_mstr (but this can be whatever table, whatever datasource). Both data retrieval and saving of the data needs to be covered.
1. Implement the method “DefineCustomRelations.After” to give a meaning to one of the custom tables in the object dataset (tCustomTable0, tCustomTable1 or tCustomTable2).
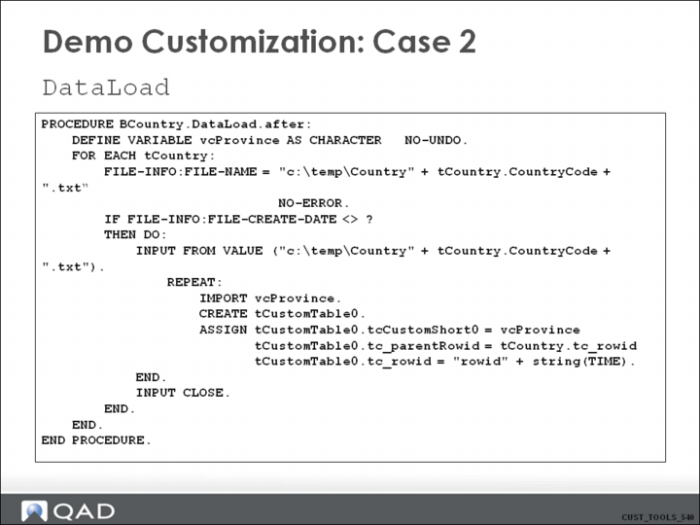
2. Implement the method “DataLoad.After” to retrieve the right data from code_mstr in case of loading of an existing country object.
Demo Customization: Case 2 (2)
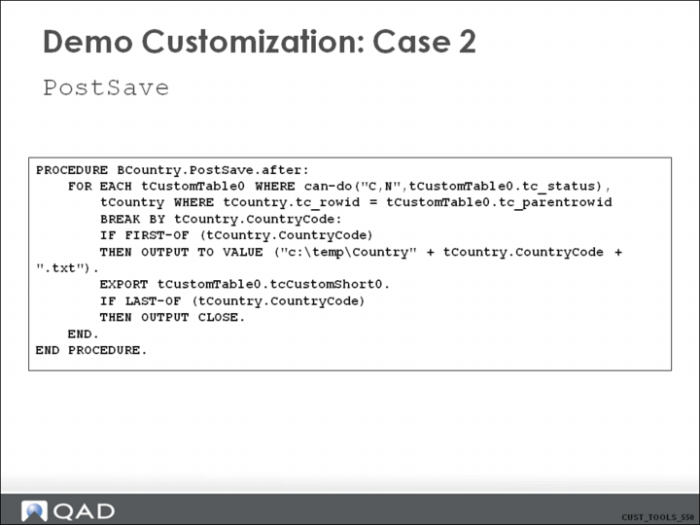
3. Implement the method “PostSave.After” to update the code_mstr table in the database with the changes.
Demo Customization: Case 2 (3)
Demo Customization: Case 2 (4)
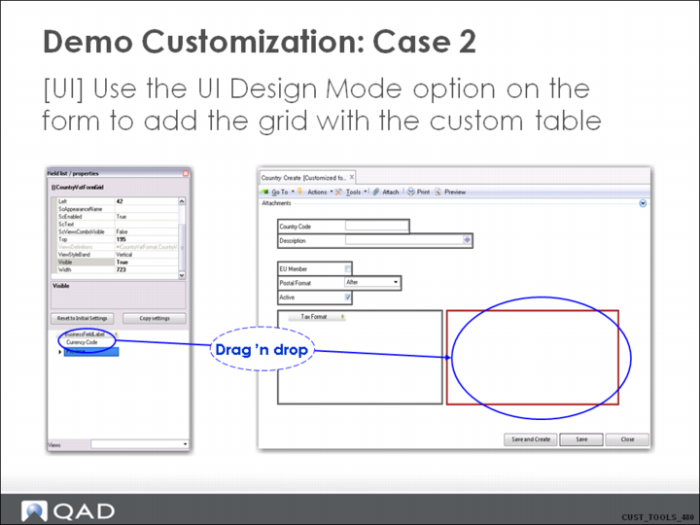
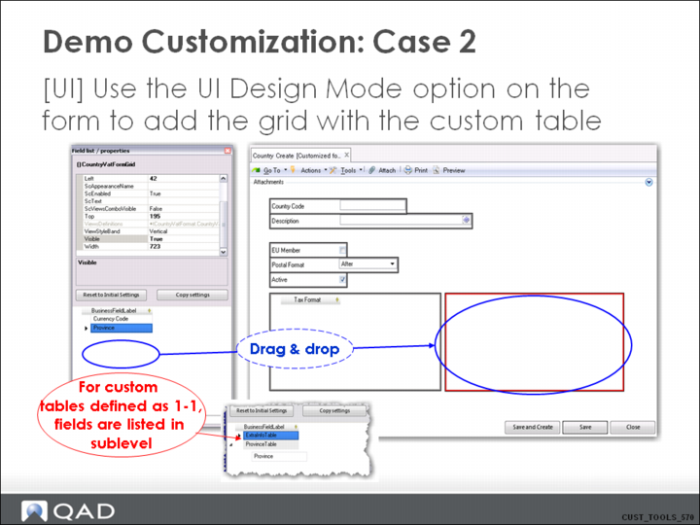
Set the property “AllowAddNew” to true in the properties panel.
Also, use the “columns” from the context menu of the new grid to make the columns visible.
Demo Customization: Case 2 (5)
Custom Tables
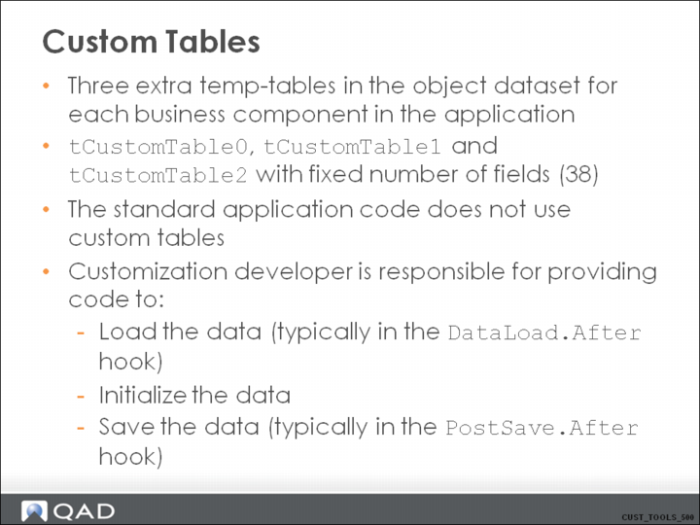
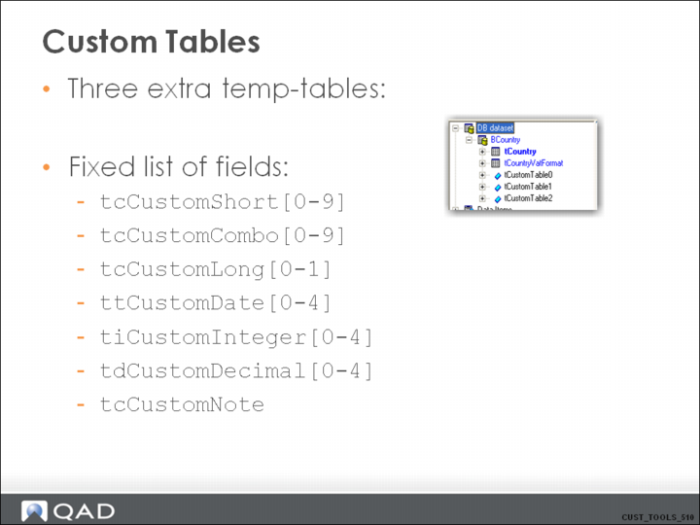
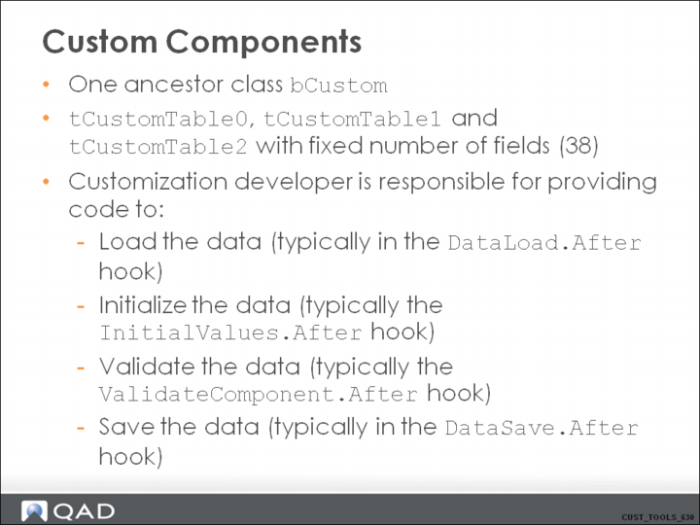
Every business component that inherits from “Database component” has these three extra temp-tables in the object dataset.
This is how extra data can be added to any object in the application in a non-intrusive way. Because the custom tables are part of the named (or typed) dataset that represents the object dataset, the interface for the object will not change from the moment a Customization developer starts using these temp-tables to transfer more than the standard object data.
Custom Tables 2
Custom Tables 3
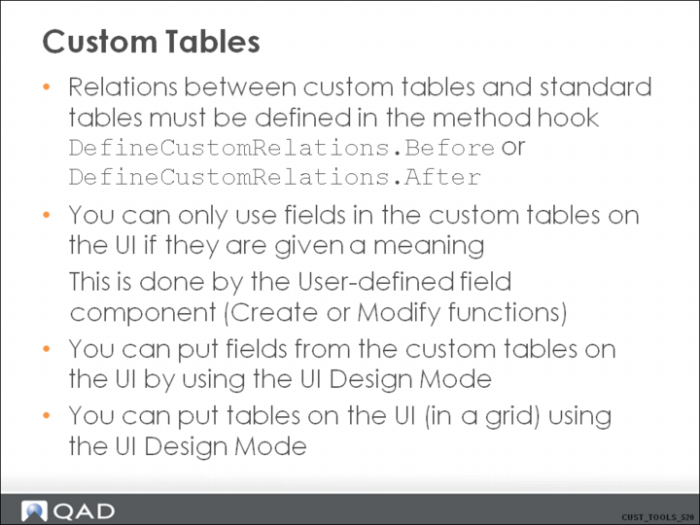
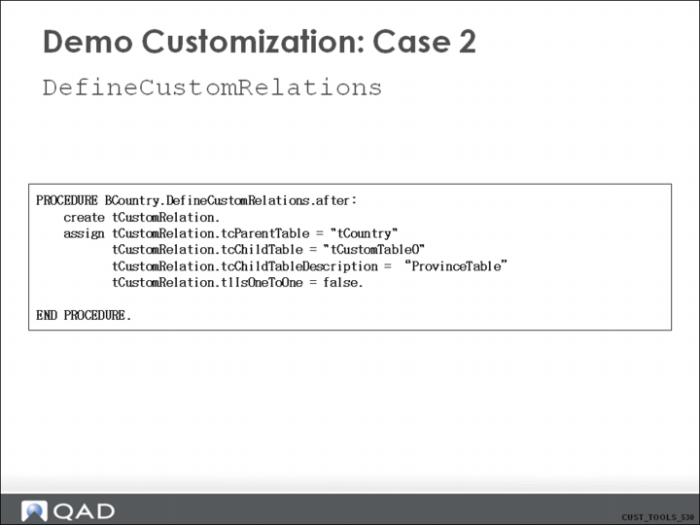
In the method DefinCustomRelations.After, the Customization developer can specify the relations between the custom tables and the other tables. This is done by adding records in the table tCustomRelation. The relation is always based on the tc_rowid and tc_parentrowid.
Demo Customization: Case 2 - DefineCustomRelations
The only way to make sure that the system recognizes the custom table is to add at least one record in tCustomRelation temp-table.
Fields in the record that needs to be assigned:
• tcParentTable: Name of the temp-table from the object dataset. Typically “t<table>”.
• tcChildTable: Name of the custom table from the object dataset that you want to give a meaning. This can be “tCustomTable0”, “tCustomTable1” or “tCustomTable2”.
• tcChildTableDescription: The logical name to use in the system when referring to the table. For example, this name is used by the UI Design mode to select the table.
• tlIsOneToOne: The cardinality of the relation. If true, it means that the table is linked 1-1 with the parent table. In this case, the fields from the table can be used to put on a form representing the parent table. If it is false, it automatically means 1-N. In this case, the user is able to select individual fields as well as the whole table to drag in the UI design mode.
Demo Customization: Case 2 - DataLoad
This example uses a plain .txt file to store data. In normal situations, the data is stored in a database table.
Demo Customization: Case 2 - PostSave
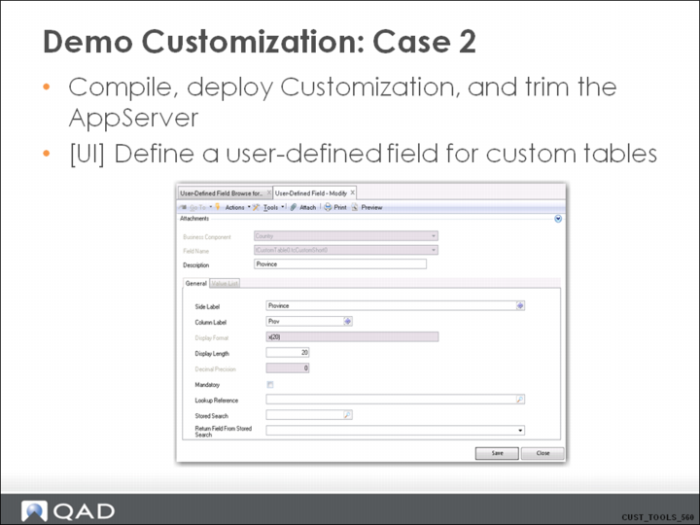
Demo Customization: Case 2 - Compile and Deploy
Demo Customization: Case 2 - Add Grid
Set the property “AllowAddNew” to true in the properties panel.
Also, use “columns” from the context menu of the new grid to make the columns visible.
Hands-on Exercise (12)
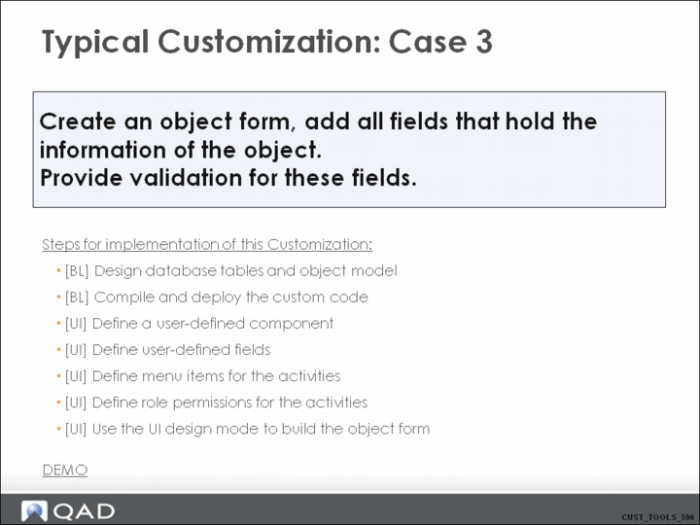
Typical Customization: Case 3
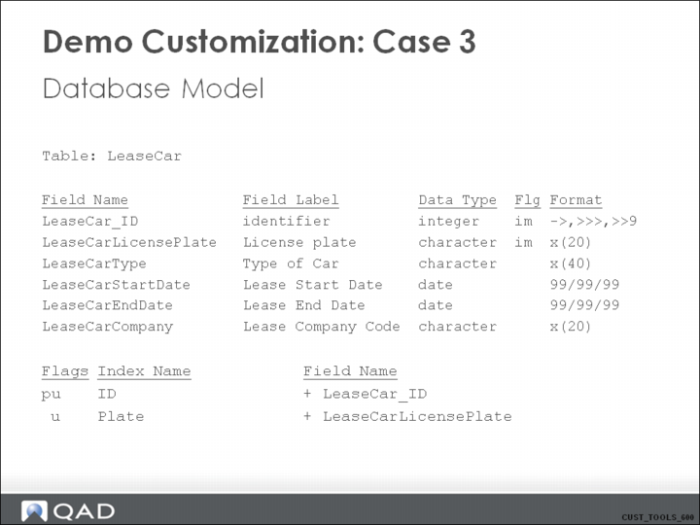
Demo Customization: Case 3 - Database Model
This Customization case demonstrates the maintenance of a fleet of leased cars and vans and to which employee a vehicle is assigned.
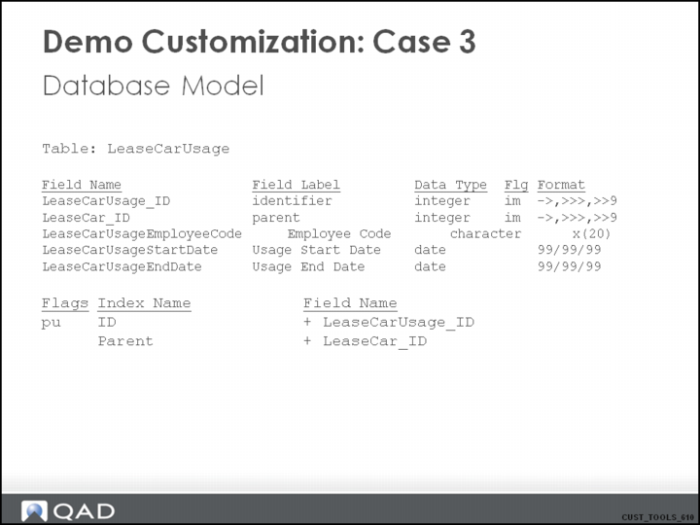
Demo Customization: Case 3 - Database Model 2
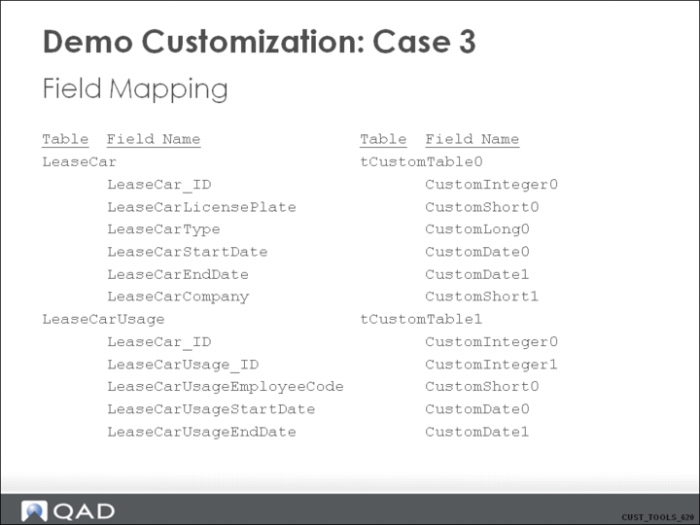
Demo Customization: Case 3 - Field Mapping
Custom Components
Every custom business component is inherited from component “bcustom”. Every custom component has access to three custom tables only.
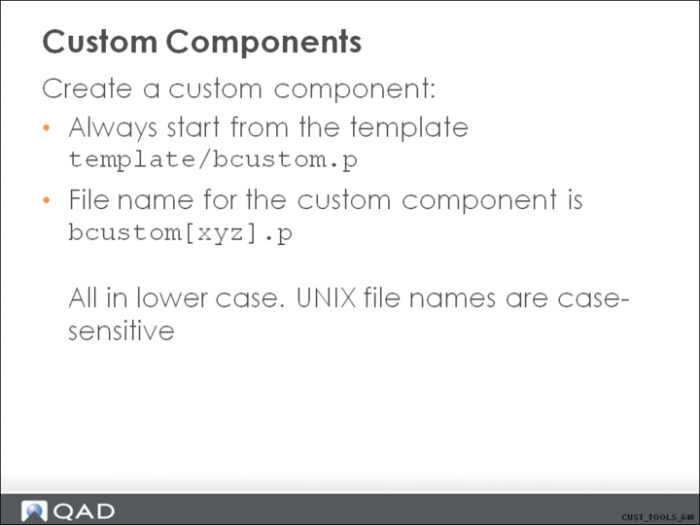
Custom Components 2
Copy the bcustom.p template into your source code folder and rename it as required.
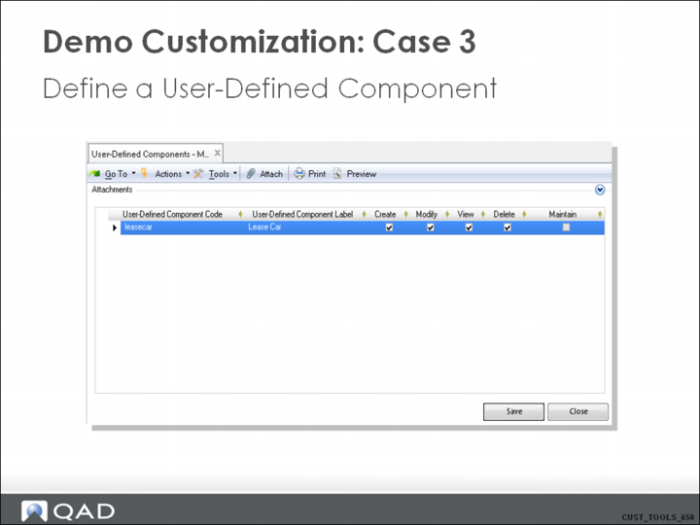
Demo Customization: Case 3 - Define User-Defined Component
Fill in code + label and select the activities Create / Modify / Delete / View.
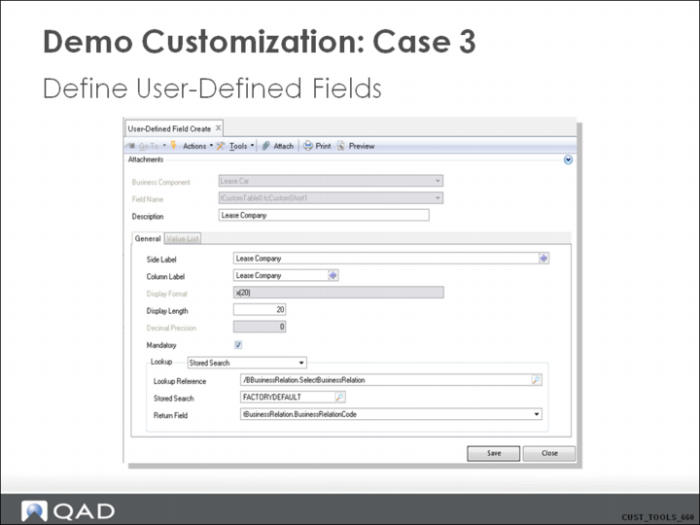
Demo Customization: Case 3 - Define User-Defined Fields
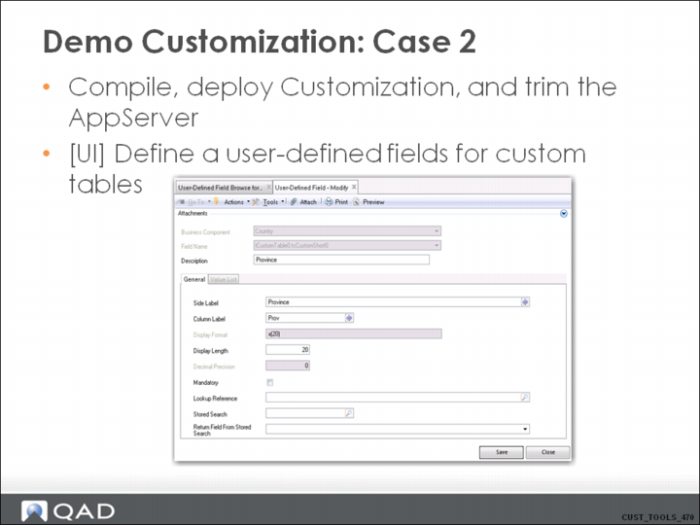
Define a user-defined field definition for these fields:
tCustomTable0.CustomShort0 (LeaseCarLicensePlate)
tCustomTable0.CustomLong0 (LeaseCarType)
tCustomTable0.CustomDate0 (LeaseCarStartDate)
tCustomTable0.CustomDate1 (LeaseCarEndDate)
tCustomTable0.CustomShort1 (LeaseCarCompany)
tCustomTable1.CustomShort0 (LeaseCarUsageEmployeeCode)
tCustomTable1.CustomDate0 (LeaseCarUsageStartDate)
tCustomTable1.CustomDate1 (LeaseCarUsageEndDate)
• All fields are mandatory.
• Select lookup BBusinessRelation.SelectBusinessRelation for field “Lease Company”.
• Select lookup BEmployee.SelectEmployee for field “Employee Code”.
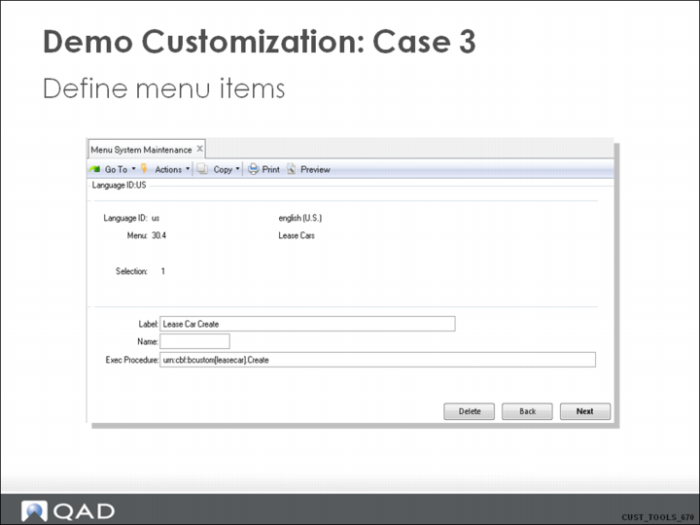
Demo Customization: Case 3 - Define Menu Items
Define these menu items:
Nr Label Procedure
30.4 Lease Cars 30.4
30.4.1 Lease Car Create urn:cbf:bcustom[leasecar].Create
30.4.2 Lease Car Modify urn:cbf:bcustom[leasecar].Modify
30.4.3 Lease Car Delete urn:cbf:bcustom[leasecar].Delete
30.4.4 Lease Car View urn:cbf:bcustom[leasecar].View
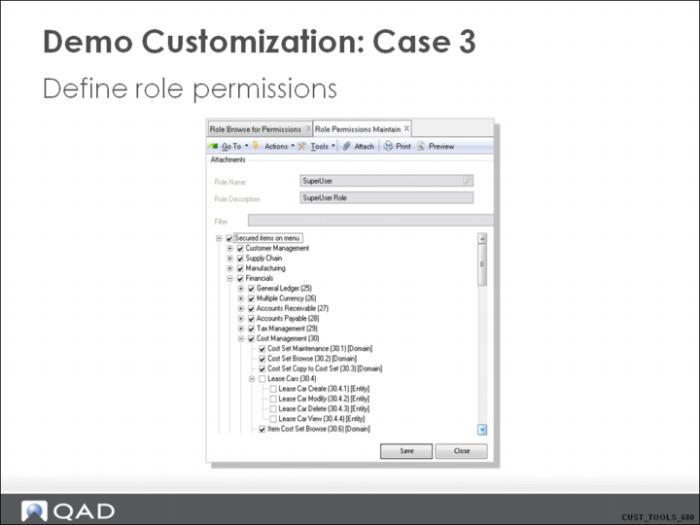
Demo Customization: Case 3 - Define Role Permissions
Edit permissions for role “SuperUser” and select the “Lease Cars” box.
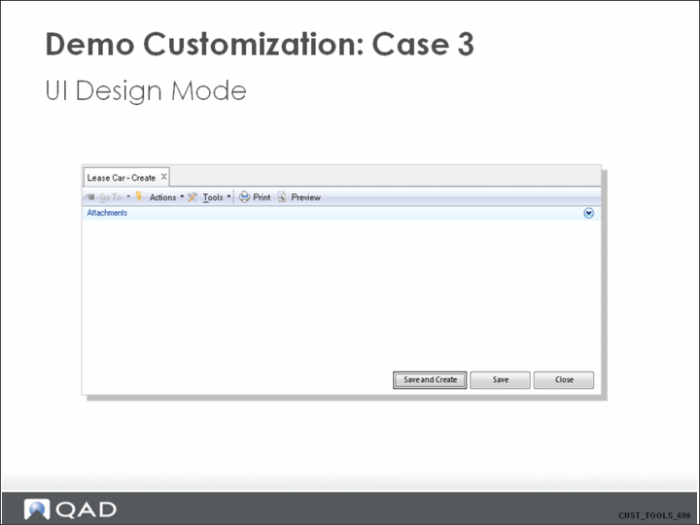
Demo Customization: Case 3 - UI Design Mode
The form is completely empty the first time you run the object form.
Demo Customization: Case 3 - UI Design Mode 2
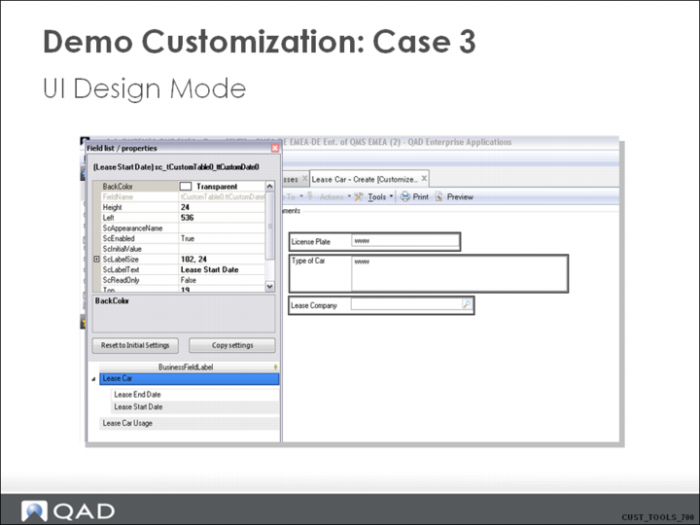
In the Field List box, the BusinessFieldsLabel tab shows two entries:
• Lease Car
• Lease Car Usage
Expand the first tab (Lease Car), then drag and drop all fields under this tab to the maintenance form.
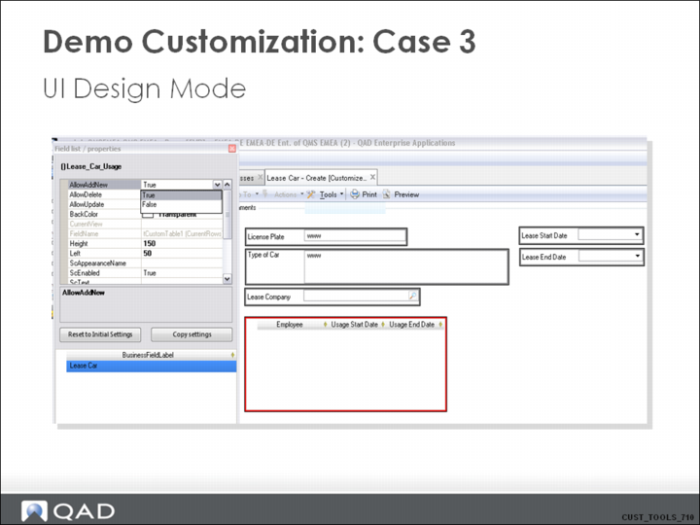
Drag and drop the entire second tab (Lease Car Usage) on to the maintenance form.
This creates a grid control. Right-click on the grid control and select “Columns”.
Select all columns available on the grid.
Demo Customization: Case 3 - UI Design Mode 3
By default, you cannot insert new lines in your grid.
Do not forget to set the “AllowAddNew” property of your grid to “True”.
Select “Design Mode” again to end the design. Make sure to select all of the activities and to save your Customization on “general” level.
Hands-on Exercise (13)