Getting Familiar with MSW
In Learning Central, the following training course corresponds to this chapter:
Planning and Scheduling Workbenches: 3. Creation of a Master Schedule - Functional Detail - 2011 Launch, code PLM11-1210.
Note: This training course includes videos for both Chapter 2 and Chapter 3.
Play the video within the course with this chapter. The video informs you when to stop the video and take the hands-on lesson.
Overview
In this chapter, you learn the fundamental operations of the Planning and Scheduling Workbenches, including how to:
• Recognize panels and maneuver within and among them
• Retrieve data
• View data
• Modifying the layout to performing a basic scheduling lesson
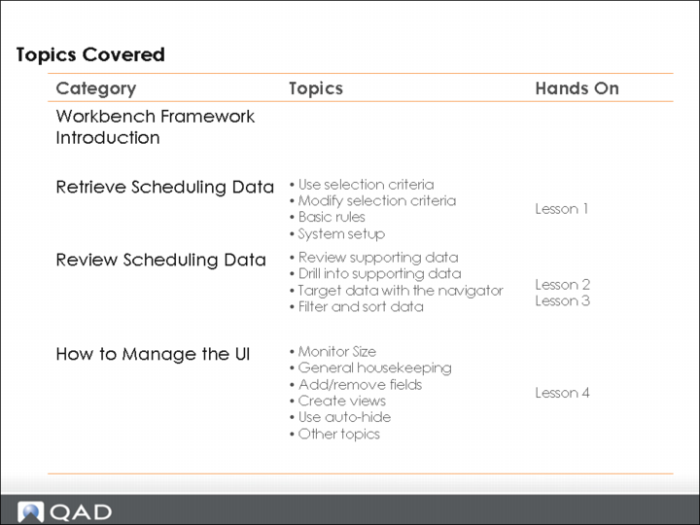
Topics Covered
MSW Framework Introduction Section
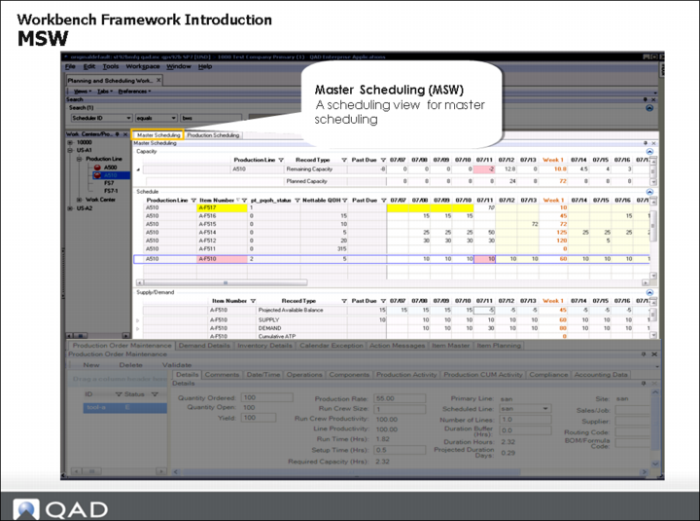
MSW Framework Introduction
MSW displays all work orders for an item in a single view and:
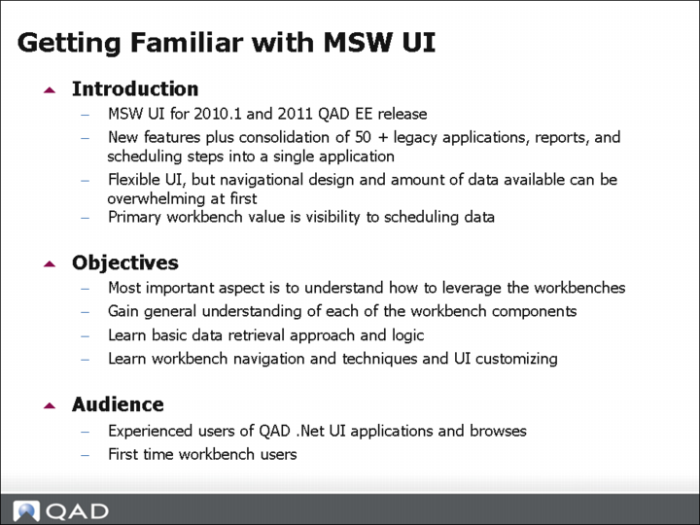
• Over 50 legacy programs and reports are consolidated into a single toolset.
• Over 100 business rules are working behind the scenes to ensure the work orders are displayed in the most effective and informative manner to eliminate the need for the scheduler to do traditional research and inquiries.
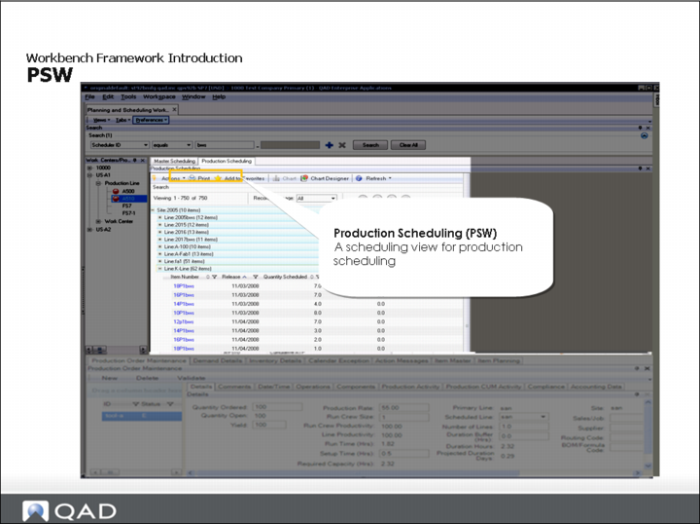
PSW Workbench Framework
Workbench Framework Introduction: Components
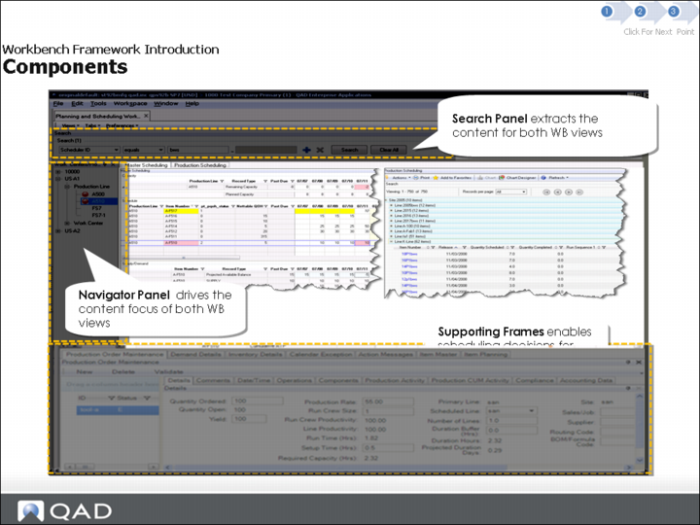
The following table provides more information on the panels.
Additional Panel Information
Panel | Description |
Search Panel | Lets you select resources and items to schedule. Results are limited to sites and domains that you can access. |
Resource Panel | Displays the sites and resources and defaults to the first record. Resources are grouped by site and resource type. Resource types are production lines and work centers. Highlights each resource with a POH shortage icon when one or more items associated with the resource have a POH shortage within the resources's defined scheduling horizon. Clicking on a work center/machine or production line resource in this panel, displays only those items associated with the selected resource in the Schedule Grid |
Supporting Panel | Production Order Maintenance, Demand Details, Inventory Details, Calendar Maintenance, Action Messages, Item Master, Item Planning |
Retrieve Scheduling Data Section
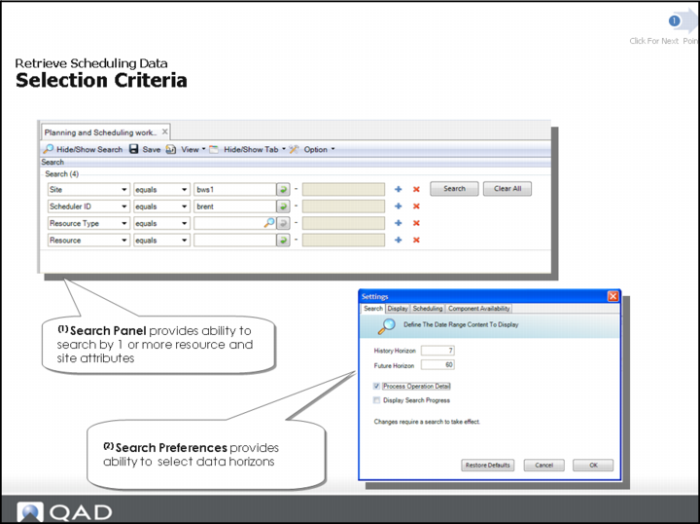
Selection Criteria
The selection results are limited to sites that you can access, based on security records defined in Site Security Maintenance (36.3.15). Additionally, if you are in a multiple-domain environment, the system only displays sites in domains that you can access based on settings in User Maintenance (36.3.1).
Enter the scheduler ID to retrieve all product lines/work centers.
Note: In the exercises and text, the Scheduler ID code is for logical grouping of resources that you want to display simultaneously in the workbenches. So, for example, a Scheduler ID can be Group1 that represents resources for a group of products, or a product family.
Examples
Search for all resources you manage by your scheduler ID code. Scheduler ID code is defined on production line and work center maintenance.
Search for a specific item across multiple sites. This is not a primary use case, but it can be done, you typically search by a specific item.
Basic Rules
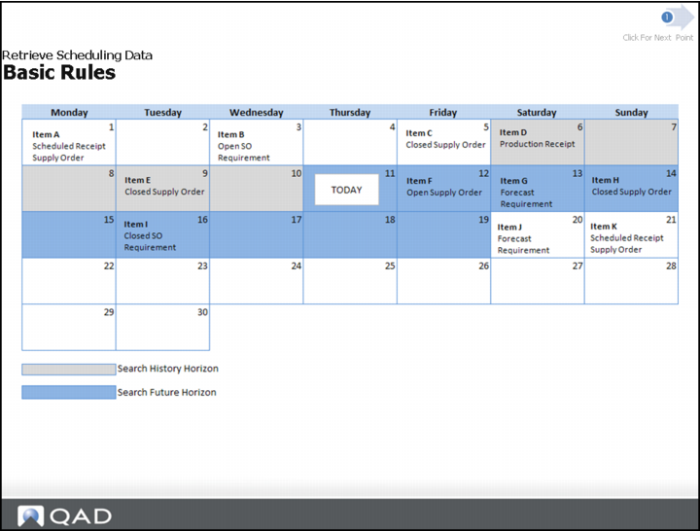
Workbench search retrieves items and transaction records based on this criteria:
• Active supply/demand records
• Within the future horizon, prior to today
• Item activity within the history/future horizon- item receipts
• Item associated with resource
Question: Which items would not appear on workbench?
In the slide:
• The display shows all activity with the horizon, including cycle counted data once you cycle count the items.
• Items display because they are open and closed when they fall in the history horizon.
• In the future horizon, only the active orders and open scheduled receipts display.
• Prior to today’s date, you see all past due data. In the slide, the dark blue area shows past due receipts and open demand.
• The display only shows manufactured items, for example, blank, M, L, Configured, DRP.
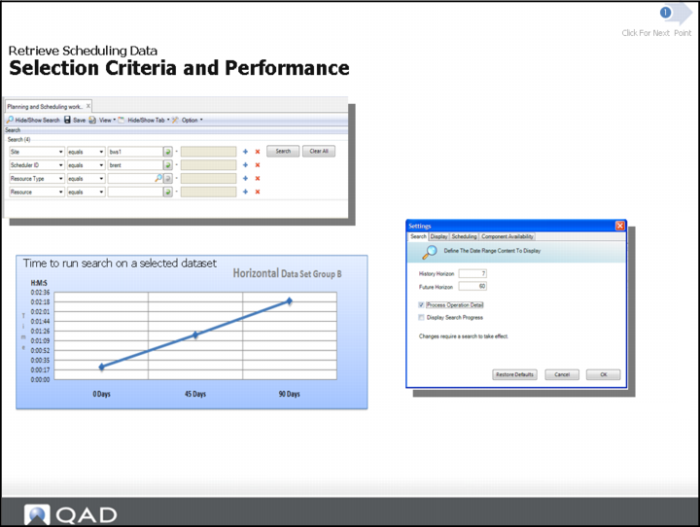
Selection Criteria and Performance
For optimum performance, a focused selection criteria is important:
• No blank site field
• Specify a Scheduler ID or Resource ID
• Consider actual needed history and future data; that is, specify a certain set of date to be seen by setting dates with a manageable history and future horizon.
Important: Data retrieval can take a significant amount of time when the system retrieves a large number of records.
To view retrieval progress, set the Display Search Progress field to Yes in the MSW Search User Preferences window in the Options drop-down menu to have the system display its progress when retrieving records.
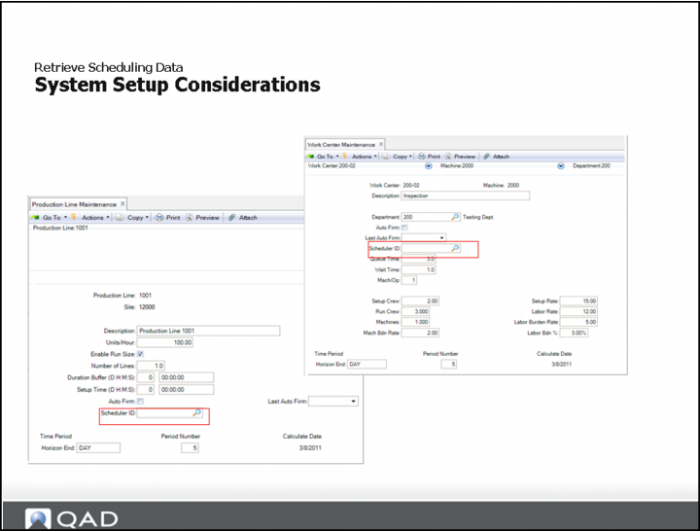
System Setup Considerations
For optimum search performance with proper selection criteria, resource naming conventions are important.
Scheduler ID is Group1 throughout these exercises.
Questions you should consider include:
• Can resources be grouped? For example, you can group resources by assembly or do a vertical retrieval, by BOM level.
• For multi-level scheduling, when you schedule – for a production line, do you wish to view and schedule all levels of the product structure at the same time?
• Can you resources be grouped by capability?
• Resource Group 1 makes heavy assembly items.
• Resource Group 2 makes light assembly items.
• Can your resources be grouped by item attributes?
• Run large items on group 1 and small on group 2.
System Setup Considerations: Grouping Resources
To group resources, enter a unique Scheduler ID for each group in Production Line Maintenance (18.1.1). You can also do this by work center or production line.
Review Scheduling Data Section
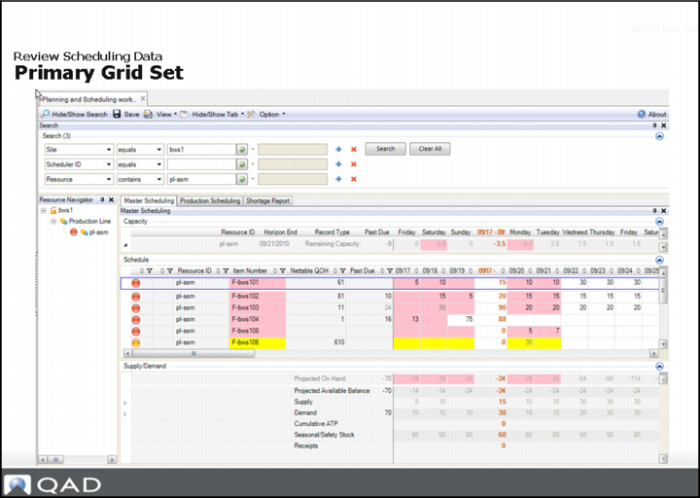
Primary Grid Set
Hands-On Lesson Section
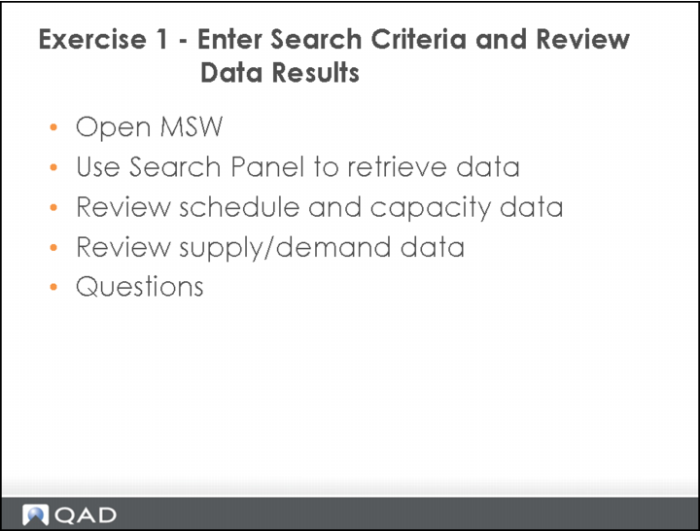
Exercise 1: Enter Search Criteria and Review Data Results
The purpose of the exercise is to learn to navigate within the workbenches.
Open MSW
1 Ensure that MSW/PSW are enabled by setting the Use Plan/Sched Workbenches field to Yes in QAD EE Site Maintenance (1.1.13).
When a site is enabled to run the MSW and PSW workbenches, Capacity Requirements Planning (CRP) runs as part of MRP for orders that have a P status. When CRP runs as part of MRP, the system:
• Explodes planned orders as they are created.
• Lets you access the orders using the work center schedule resource in MSW.
Setting this field to Yes also disables additional programs. Refer to User Guide: Planning and Scheduling Workbenches for a list of the programs.
2 Start the.NET UI.
3 Enter QMI as the user.
4 In the .NET UI Menu Navigator, enter Master Scheduling Workbench or Production Scheduling Workbench. You can also find the application by:
a Using the updated EE process maps (not available in SE process maps)
b Looking under the Manufacturing / Repetitive/ Advanced Repetitive/ Schedule Menu, then selecting Production Scheduling Workbench.
c Looking under the Forecast / Master Plan / Master Scheduling Workbench Menu.
5 Add the program to your MENU FAVORITES for quick future reference.
6 Open the workbench.
Use the Search Panel to Retrieve Data
1 Enter selection criteria: Site equals 10-202
2 Enter Resource equals ASSY-01.
3 Click Search.
The system retrieves item/resource records.
Review Schedule and Capacity Data
1 In the Schedule Grid, review the parts and information :
Questions: Why are some items red and some items yellow? Which items have past due requirements?
2 Review the capacity information for the resource.
• Open/expand the Capacity Panel.
• Resize the panel to view all the information.
• Question: What capacity information do you see?
Note: The preface of this training guide provides a table that lists the various colors and symbols that the workbenches use and describes the meaning of each.
Questions
1 Name at least three major areas of the MSW.
2 True or False. There are no limitations when you enter a site as search criteria.
3 Which of the following is NOT a criteria for records and transactions for which the workbench searches:
• Active supply/demand records
• Within the future horizon, prior to today
• Item non-activity within the history horizon
• Item associated with resource
4 What are the two primary item types that the workbench can handle?
5 How do you know when the workbench has fully loaded data?
Answers
1 Search Panel, Navigation Panel, Schedule Grid, Supporting panels, such as Production Order Maintenance, Calendar Exception, and so on.
2 False. The selection results are limited to sites that you can access, based on security records defined in Site Security Maintenance. In a multiple-domain environment, the system only displays sites in domains that you can access based on settings in User Maintenance.
3 Item non-activity. MSW retrieves item activity, within the history or future horizon.
4 Repetitive and discrete items.
5 When data displays in the Schedule Grid.
Review Supporting Data Section
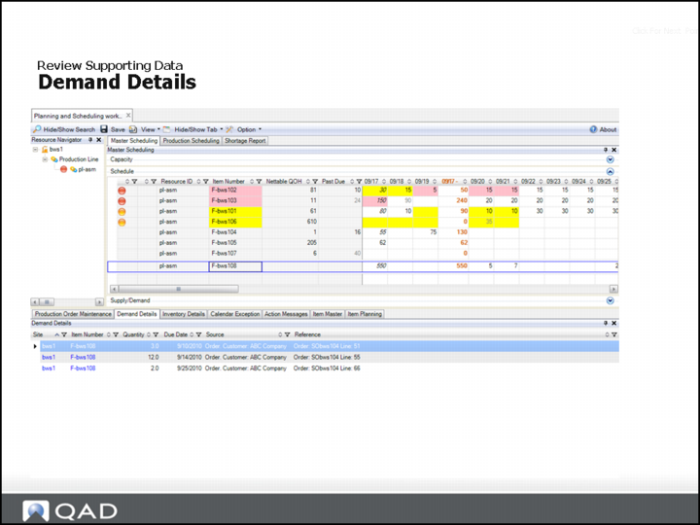
Demand Details
Inventory Details
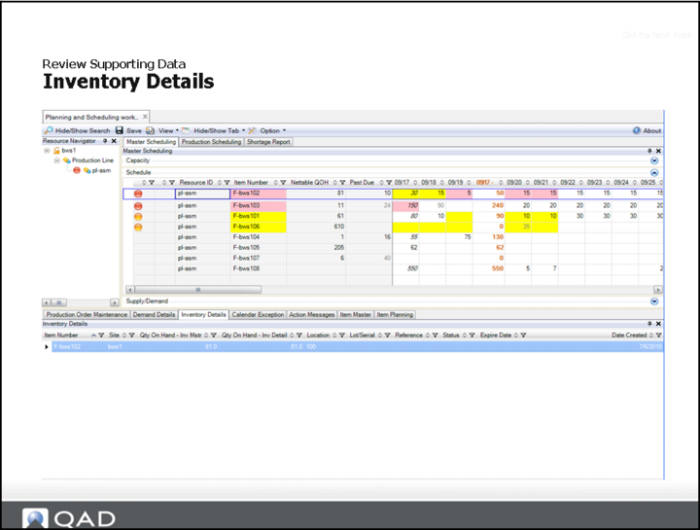
The Inventory Details panel displays the item number, site, quantity on hand, inventory master data, location, lot/serial, status, expiration date, and the date created. For all areas, you can choose to display details for all, custom, blanks, or so on.
Item Planning
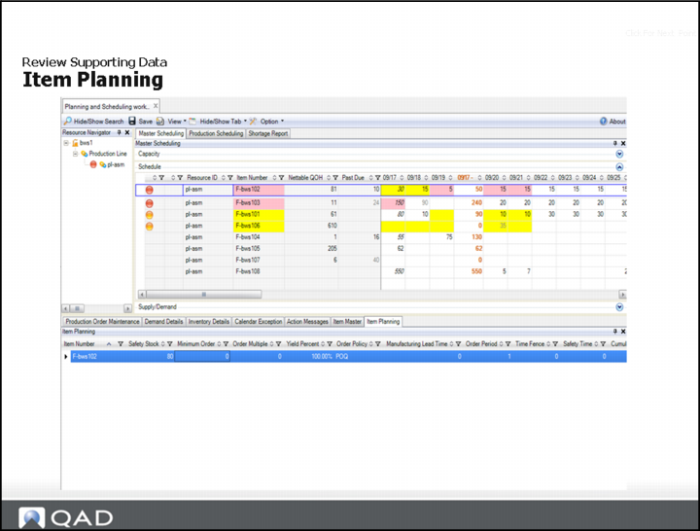
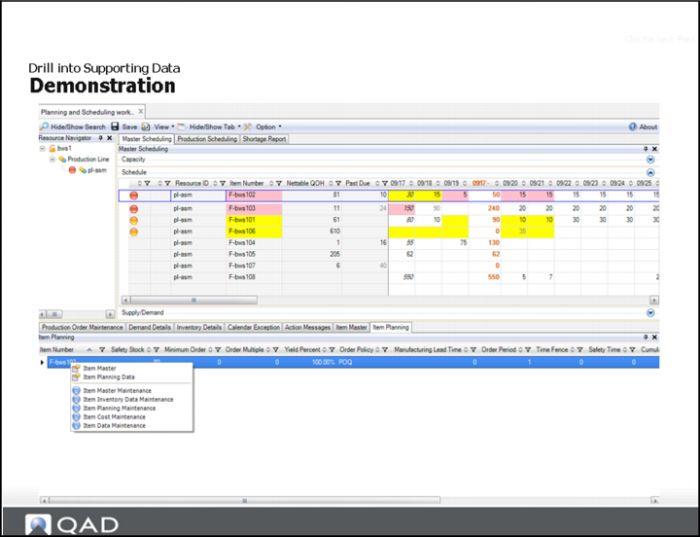
The Item Planning panel displays item master/planning details for a selected item. At any point during the scheduling process, you can refer to the Item Planning panel to find information to identify lead time, order quantity, and so on. If an item-site record exists, planning data from item-site record display for the selected item-site record. You can modify item details to include information from any field in the Item Master Maintenance.
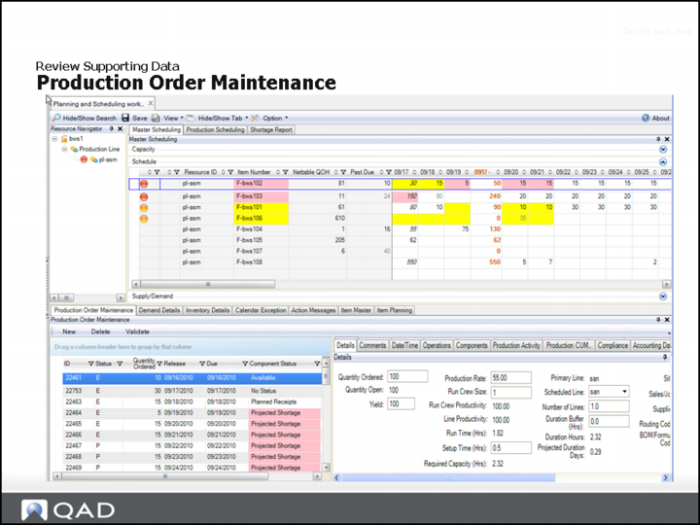
Production Order Maintenance
Production Order Maintenance lets you view individual item production order supply records for items that display in the MSW Schedule Grid. You can view, monitor, and interact with all operations of a production order independent of the Schedule Grid.
The left-side displays production order summaries with the order ID, status, quantity ordered, and release date columns. For each of these fields, you can select to see all, custom, blanks, or non-blanks. If you select custom, the system displays an additional panel to enter additional filter criteria for the field. For example, if you customize data to display for the Qty Ordered field, you can specify operands so that only those orders that equal a quantity ordered of 500 display. You can also add or delete conditions.
Use Production Order Maintenance within the workbench to:
• View orders, including planned orders, and delete, copy, or split orders
• Modify the quantity, dates, or status of the order
• Modify order operations, setup, or runtime
• Align order dates
• Create a new production order
• Identify and correct capacity issues
Drill Into Supporting Data Section
Demonstration
The system provides visual indicators of items with issues. You can select the items with issues, then drill down to the supporting panels to find data to resolve the issue.
For example, you can drill down to the Demand Details panel to view demand records by ascending due dates. You can then scroll up or down to see additional demand records within the history horizon or future demand. This helps you focus on a specific demand record to correct the issue. Or, you can drill down to data in the Demand/Supply Grid to view the supply of: P(lanned), F(irm), or R(eleased) production orders.
Target Data with the Navigator Section
Demonstration1
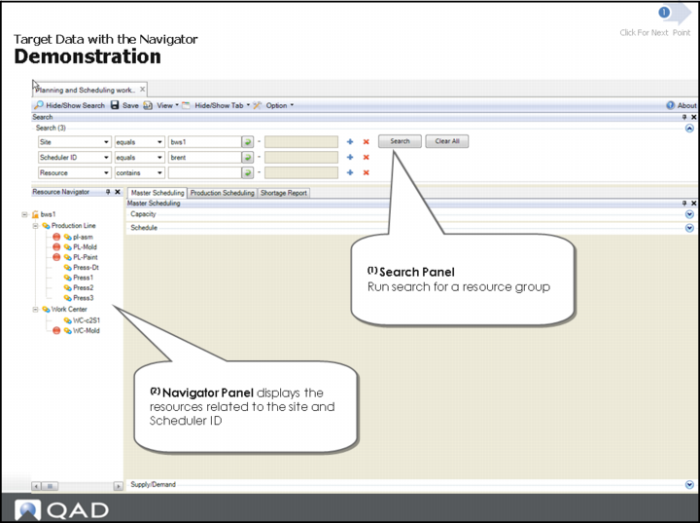
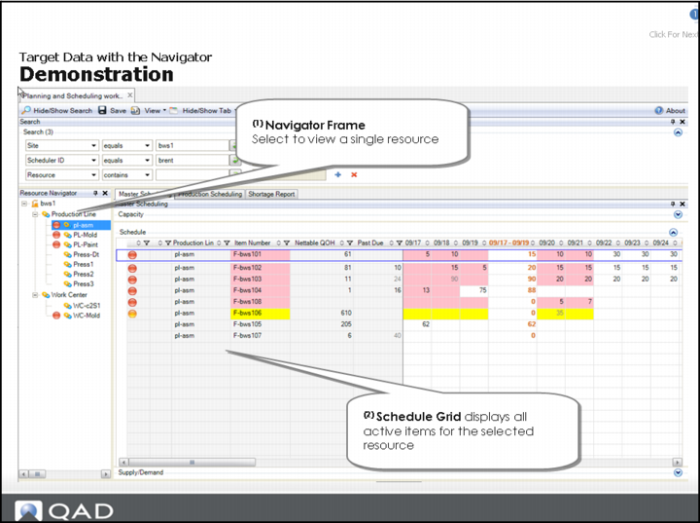
Use the Search Panel to enter search criteria. For example, set criteria to run a specific Scheduler ID, site, and resource group. The Navigator panel displays the resources related to the site and scheduler ID.
Note: Selection results are limited to sites that you can access, based on security records defined in Site Security Maintenance (36.3.15). Additionally, if you are in a multiple-domain environment, the system only displays sites in domains that you can access based on settings in User Maintenance (36.3.1).
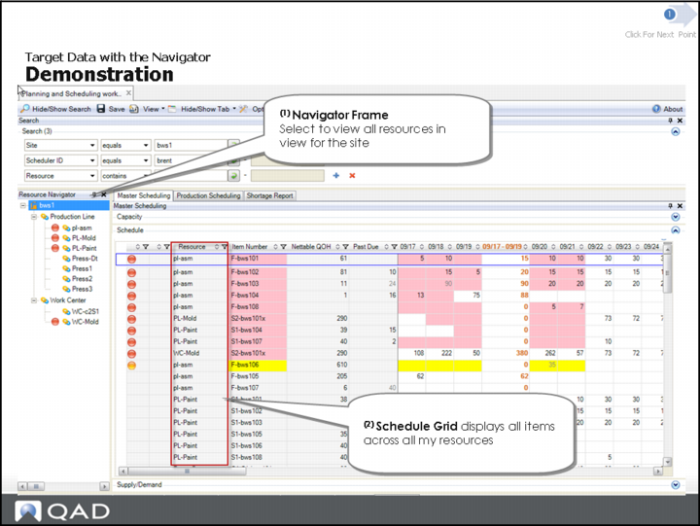
Then, use the Resource Navigator to view all resources for the site; the Schedule Grid displays all items for the resources.
Then, select a single resource in the Resource Navigator; the Schedule Grid displays all items for the resource.
Demonstration (Continued)
Demonstration (Continued)
Filter and Sort Data Section
Sort on the Schedule Grid
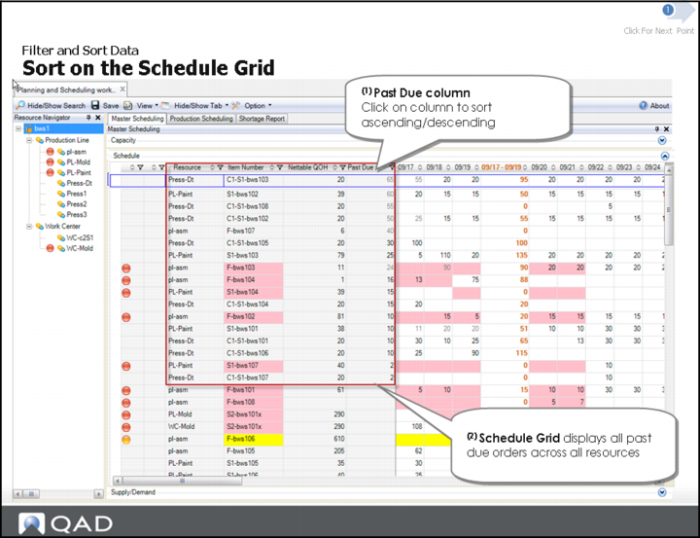
Because the system calculates the net past due quantity remaining for an item, you can view items that are scheduled and are past due as your day begins. This lets you check results of prior shifts.
Production orders that are past due, have conflicts, cannot complete on time, need production scheduling, have availability shortages, or are released.
You can click on a column to start ascending/descending order; the Schedule Grid displays all past due orders across all resources.
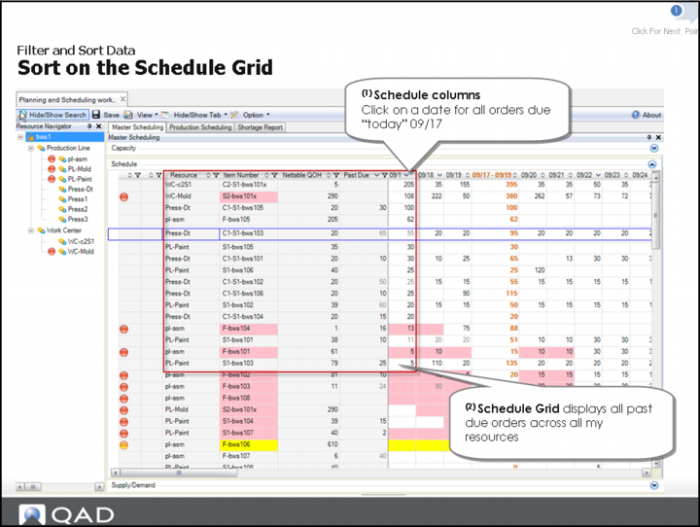
You can then click on a date for all orders that are due today; the Schedule Grid displays all past due orders across all resources.
Sort on the Schedule Grid (Continued)
Sort on the Schedule Grid (Continued)
Sort on Item Attributes
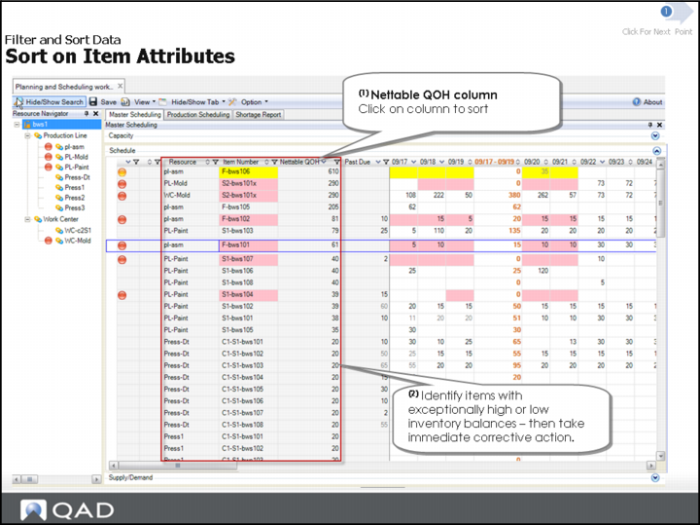
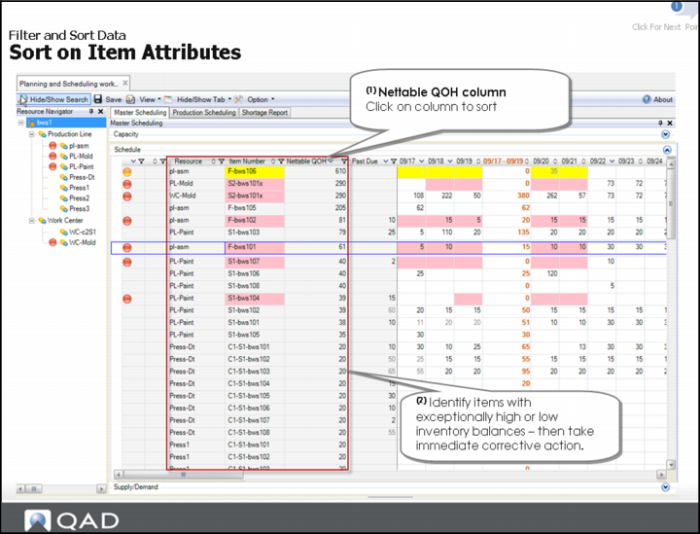
You can click on the Nettable QOH column to sort data, then view inventory balances.
You can then identify items with exceptionally high or low inventory balances.
Filter on the Schedule Grid
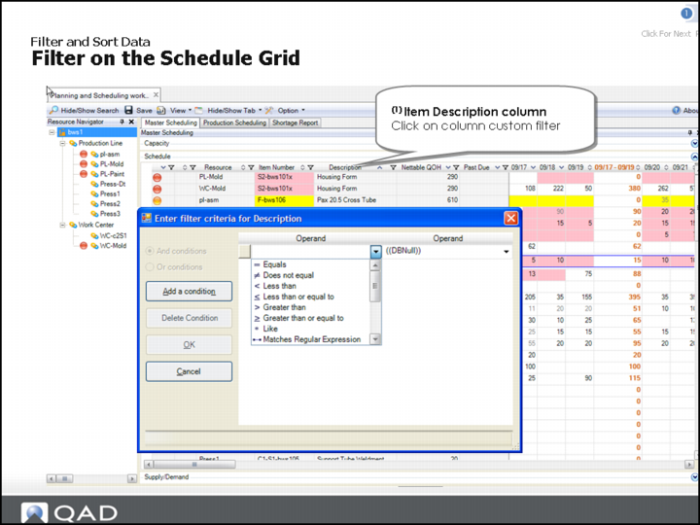
You can right click on the Description column, then select Custom Filter. A window displays that lets you enter filter criteria for the item description column.
You can specify an operand, like you can when you set up selection criteria to pull records. You can also add or delete conditions.
Once you set up the filter criteria, select OK.
Hands-On Lesson Section
Exercise 2: Use the Navigator Panel to Drive Content
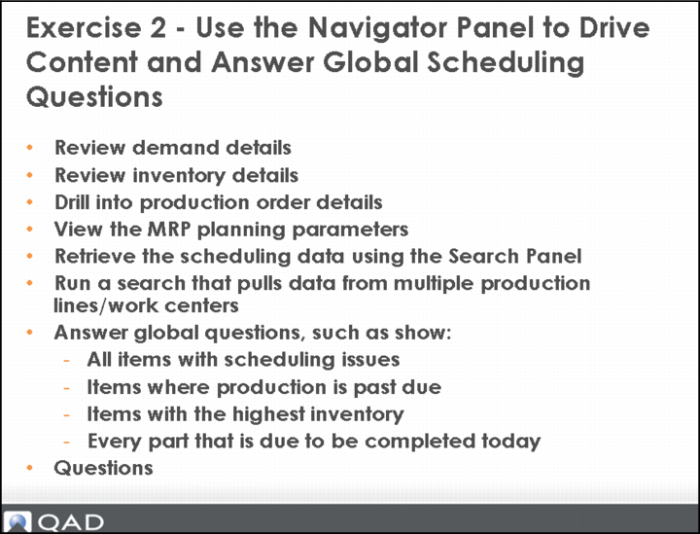
Review Demand Details
When determining if the master schedule should be changed, viewing the demand details is important to determine the actual customer (source) requesting the item.
1 Select item number 02308.
2 Click on the Demand Details panel.
The Demand Details panel displays all demand records for the item.
3 For the same selected item, click on the Schedule Grid on the Date Column date of tomorrow.
The Demand Details panel displays only demand records with due dates equal to selected column date.
Review Inventory Details
Inventory On-hand balance for item may be less or more than expected. Viewing inventory details could be helpful to determine if there is inventory that is non-nettable or to determine the last cycle count.
1 Select item number 02308.
2 Click on the Inventory Detail panel.
The system displays a few inventory records for the item.
• Question: What is the value of visibility of inventory of cross sites?
3 Right-click on the item number in Inventory Details.
The system displays a list of program options.
4 Select Transactions by Item.
The system displays all inventory transactions for this item.
Hint: Click on Transaction by Item at the very bottom of the workbenches and pull the panel up by dragging the fame upward.
5 Filter on specific transactions, for example, determine when the last inventory cycle count took place.
Drill into Production Order Details
The schedule grid displays a quantity in grey text, you cannot modify the value. You can drill down into the production order details for the item.
1 Select item number 02303.
2 Click on the Schedule Grid cell that displays the scheduled value in grey text.
Text is greyed because there is more than one order viewable on the workbenches.
3 Click on Production Order Maintenance tab.
The system displays all the production orders for this item.
Click on the quantity on the date, the specific cell of the date.
• Questions: Did you notice that the system selected the production order record where the due date was equal to the record/date selected in the Schedule Grid?
• Did you notice there are two production order records for the same due date?
Note: This is why you cannot edit the schedule quantity value in the Schedule Grid.
4 Click on some of the tabs within the Production Order Maintenance.
The system displays all information relevant to the production order.
View the MRP Planning Parameters
If you do not believe MRP is planning your item correctly, you need to view the MRP planning parameters for the item.
1 Select item number 02303.
2 Click the Item Planning tab.
The system displays the item planning information. If there is an item-site record for the item, the planning details per the item-site record displays.
Retrieve Scheduling Data using the Search Panel
1 Enter selection criteria: Site equals 10-202.
2 Enter Scheduler ID equals Group1.
Scenario: You ran a search that pulls data from multiple production lines and work centers. Use the Navigator Panel to target the resources you wish to view and manage.
3 In the Resource Navigator Panel, expand site, production line, and work center lists.
The system displays several production lines and work centers.
The resources with the red bulb indicator shows resources with scheduling issues to address.
4 In the Navigator Panel, click on site.
The Schedule Grid displays all items scheduled across all resources in view.
5 In the Navigator Panel, click on production line.
The Schedule Grid displays all items scheduled across all production lines.
6 In the Navigator Panel, click ASSY-01.
The Schedule Grid displays all items scheduled on the selected resource.
Answer Global Question: Show All Items with Scheduling Issues
1 In the Navigator Panel, click site(10-202).
The Schedule Grid displays all items with supply shortages. All items with shortages are highlighted in red.
Prior to this tool - a scheduler might spend hours trying to determine if they have any items with scheduling shortages, just for production today and tomorrow.
Answer Global Question: Show All Items with Past Due Production
1 In the Schedule Grid, click the Past Due column.
The Schedule Grid displays all items displays all items first which are past due.
You have instant visibility to production performance to schedule.
Ensure the Navigator Panel is still at the site level selection.
Answer Global Question: Show All Items with Highest Inventory
1 In the Schedule Grid, click twice in the nettable QOH column.
The Schedule Grid displays all items first that are past due.
You have constant visibility to on-hand inventory is critical for many schedulers.
Ensure the Navigator Panel is still at the site level selection.
Answer Global Question: Show Every Part Due to be Completed Today
1 In the Navigator Panel, click twice on the Date column with today’s date.
The Schedule Grid displays all items with due date of today.
Ensure the Navigator Panel is still at the site level selection.
Questions
1 True or False. The summarized quantity values within the Schedule Grid are production order quantities.
2 List at least two navigational functions that you can do in Production Order Maintenance within the workbench.
3 True or False. Does Inventory Details display item master data?
4 Which kinds of data does the Item Planning panel display?
• Item master/planning details for a selected item.
• Planning data from item-site record display for the selected item-site record.
• Neither type of data.
• Both types of data.
5 True or False. You can modify item details in the Item Planning panel. It is read-only. To change data, you use the EE Item Master Maintenance program.
Answers
1 True.
2 In Production Order Maintenance, you do the following navigational functions:
• Sort data
• Display a list of production orders
• List details of production orders
• Display calendar exceptions
3 True. Inventory details displays inventory master data.
4 Both types of data. The Item Planning panel displays item master/planning details for a selected item. At any point during the scheduling process, you can refer to the item planning panel to find information to identify lead time, order quantity, and so on. If an item-site record exists, planning data from item-site record display for the selected item-site record.
5 True. You can modify item planning data in the Item Planning panel.
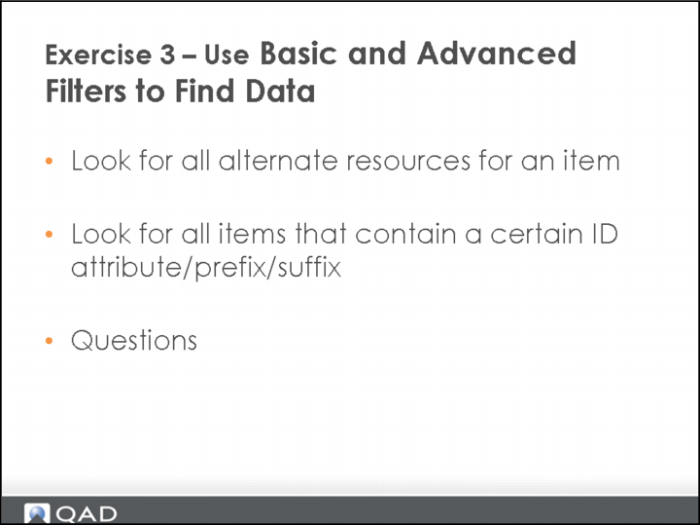
Exercise 3: Use Basic and Advanced Filters to Find Data
Look for All Alternate Resources for an Item
1 In the Navigator Panel, click on Site (10-202).
The Schedule Grid displays all items scheduled across all resources in view.
2 In the Schedule Grid, click on the Item Number column Filter Icon, then select 53103.
The Schedule Grid displays four resources: Stamp-01, Stamp-02, Stamp-03, Stamp-G.
Note: In PSW training, you will learn details on master and production scheduling across multiple resources for the same item. This is a preview into one method to view alternate resources for an item.
Look for All Items that Contain a Certain ID Attribute/Prefix/Suffix
1 In the Schedule Grid, click the Item Number column Filter Icon, then select custom.
2 In the Operand field, select contains.
3 Enter an Operand value of: 53, then click OK.
The system displays a list of item numbers that match this selection.
4 Try additional columns to filter. Think of scenarios applicable in your environment.
5 Remove filters when complete with the above steps by selecting (All) when you click on the icon in the item number.
Questions
1 True or False. You must always check the Resource Panel to ensure whether you are working on a work center or production line.
2 True or False. The Schedule Grid can display all items with issues across all resources.
Answers
1 False. The label changes from resource to production line, if that is what you are focusing on in the Navigator Panel.
2 True.
Manage the UI Section
Manage the UI
The following topics discuss various aspects of the UI that can improve the way you view the workbench.
Monitor Size Section
Monitor Size
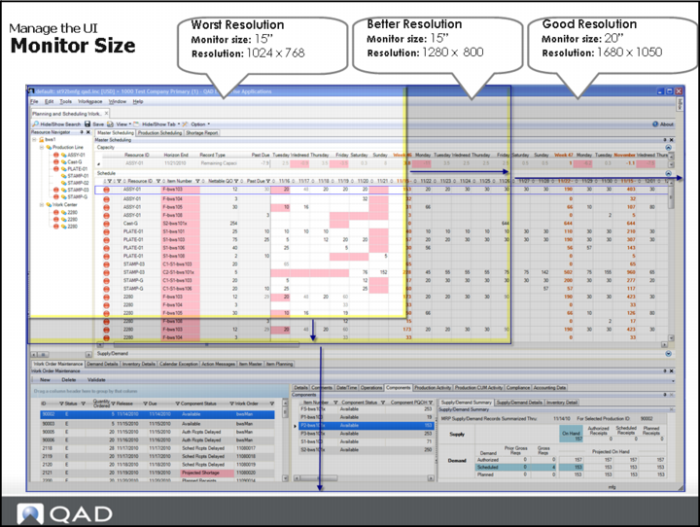
Small monitor size/resolution reduces usability.
Usability improves or worsens with monitor and resolution attributes as follows:
Attributes and Usability
Attribute | Results |
Small monitor | Reduces usability |
Low resolution | Reduces usability |
Higher resolution | Improves usability |
Larger monitor | Improves usability |
General Housekeeping Section
General Housekeeping
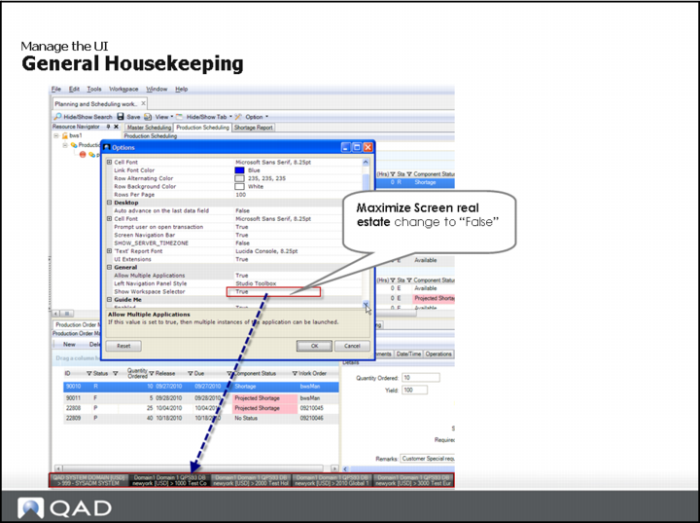
You can gain more display room by configuring .NET UI options. To do this, use the following procedure:
1 In .NET UI, select Tools from the top menu bar.
2 Select Options.
3 In the General category, change True to False for Show Workspace Selector.
Add/Remove Fields Section
Add/Remove Fields
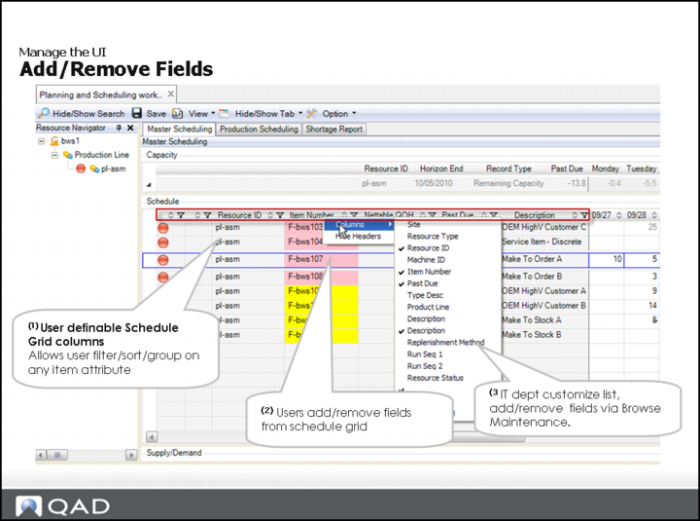
You select the fields to display in columns by right clicking on the column, then selecting from the Column pull-down menu. If you want more or different fields to display in the pull-down your IT department can customize the list through the QAD EE Browse Maintenance in .NET UI.
Create View Section
Create Views
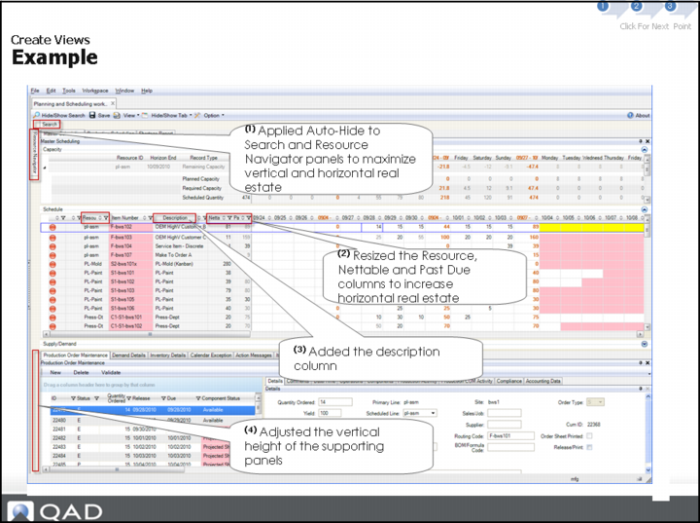
Create Views Example
Note: If you are following topics, your slides may be different from those shown in the user guide as the demonstration takes you down several functional paths within the View category.
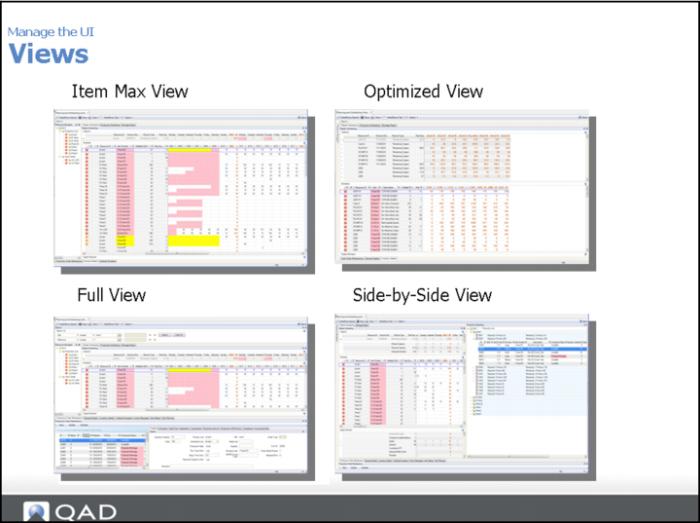
Views
There are a number of components of the workbenches that can be customized and saved as part of a view:
• Grid column settings (examples)
• Sorting
• Filter
• Hide or unhide
• Position
• MSW grids:
• Capacity Grid
• Schedule Grid
• Supply/Demand Grid
• PSW grids:
• Sequence Grid
• Browse Grid
You can move a tab on a workbench to a new location or hide a tab that you typically do not use. Repositioning/hiding the following workbench tabs can be saved as part of a view:
• Supporting panels
• PSW, MSW, or Shortage Report tabs
If you are working in any of the supporting programs that display at the bottom of the workbenches, and the program has multiple tabs, you can right-click on the tab, then select the Auto Hide option to display only the data in that tab.
For example, when working in Production Order Maintenance, you want to focus only on the dates and times of operations for a particular order. You select the order on the left side, then select the Date/Time tab on the right side. You right click to select Auto Hide so that only the date and time data for that order displays on the right side.
Auto-Hide to Maximize Screen Real Estate
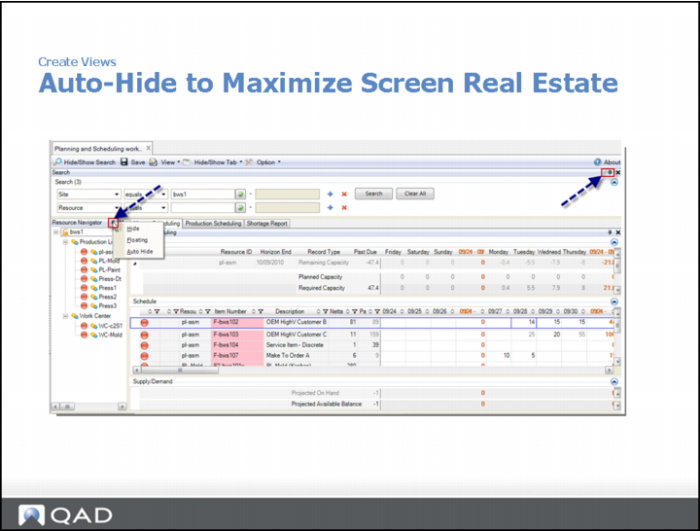
To focus on a particular set of data, you can auto-hide panels so that your screen displays only the data you upon which you want to concentrate.
You can right click on a column, then select the auto-hide option to hide the panel from view.
Note: See User Guide: Planning and Scheduling Workbenches for a complete list of icons that represent features and functions and descriptions of those functions.
Save Views
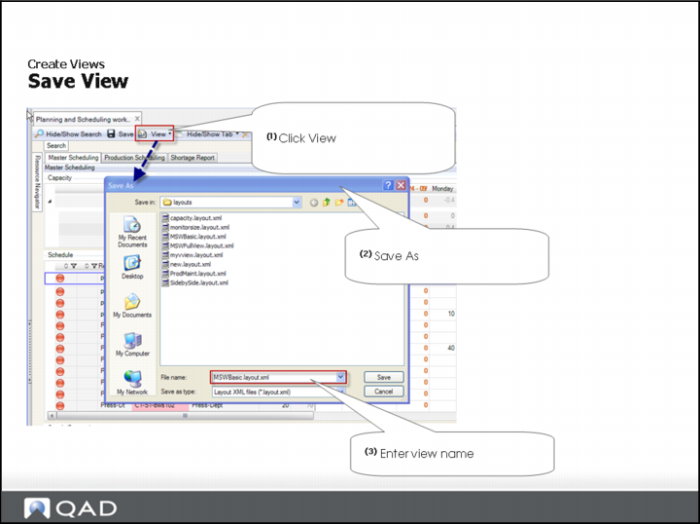
From the Views pull-down menu, select Save or Save As to save the view. If you select Save As, name your view, then save the view.
There are limitations when you save your view. You cannot have the following in your view name:
• Spaces
• Special characters (*&^%)
• Numbers
Note: The view is only saved locally on your PC, not on the system.
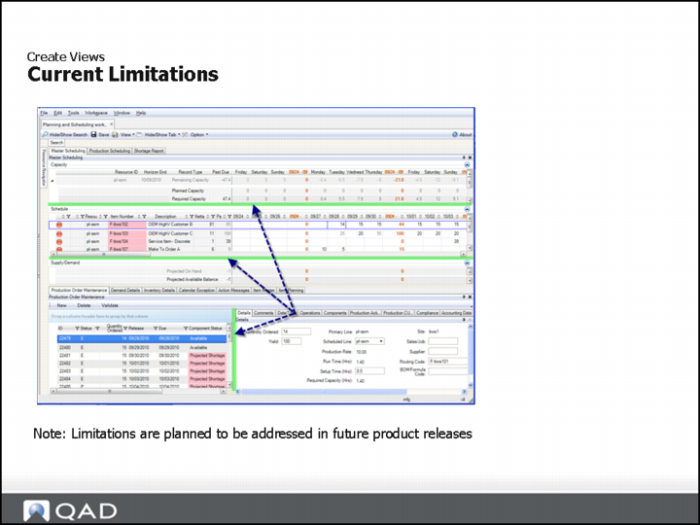
Current Limitations
Sizing of the following panels are not saved as part of the view:
• Capacity panel
• Supply/Demand panel
• The panel divider on the Production Order Maintenance tab
Hands-On Lesson Section
Exercise 4: Personalize Your UI
Run a Search
Pull up the following data:.
1 Ensure selection criteria: site equals 10-202.
2 Enter Scheduler ID equals Group1.
3 In the Navigator Panel, click on Production Line ASSY-01.
Note: Ensure that you removed all filters from the previous exercise.
Add Additional Fields to the Schedule Grid
The system default fields on the Schedule Grid are not sufficient for the data filtering and sorting required in your environment. You need to add additional fields.
1 In the Schedule Grid, right-click and select Columns and Description (the first description field in the list.
The Description 1 field is added to the Schedule Grid
2 Left-click on the Description column and while selected, drag the Description column to the right of the Item Number column.
Optimize Column Widths
By adding the new column, you have noticed it has consumed some precious real estate, reducing the number of Schedule Grid date columns you can see on the right, so, now, you optimize the column widths.
1 Resize the Production Line, Item Number, Nettable QOH, and Past Due columns to reduce the column widths to a minimum.
Note: Once you are familiar with the column headings, it is not necessary to view the entire column name such as Nettable QOH or Past Due. You can make these columns smaller to view just the minimum data necessary in the column. This lets you view more Scheduling Grid date columns to the right of the screen.
Create a View
After making your basic screen changes, save your changes by creating a View.
1 On Toolbar, click View.
2 Click Save As.
3 Enter a view name, for example, enter MSW.
Note: Currently, you cannot name a view starting with a number.
4 Close the Planning and Scheduling Workbenches.
Questions
1 What is the best situation for your monitor and resolution to improve usability?
• Larger monitor
• Smaller monitor but higher resolution
• Larger monitor with higher resolution
• Two monitors
2 Which selection in .NET UI options increases display room?
3 True or False. Every user can add fields as well as customize the drop-down list of fields that displays when you right click on a field.
4 Which of the following areas can you customize in the UI:
• Grid column settings: sorting, filter, hide/unhide, and position
• MSW grids: Capacity Grid, Schedule Grid, and Supply/Demand Grid
• PSW grids: Sequence Grid and Browse Grid
• The tabs within the Production Order Maintenance
5 What is the Column Auto-Hide and where can you use it?
Note: The question is about the column Auto-Hide feature, not the panel Auto-Hide.
Answers
1 Two monitors is best, but if you use a single monitor, then a larger monitor and higher resolution improves usability.
2 By changing Show Workspace Selector from True to False, you can increase display room. Show Workspace Selector is in the .NET UI, select Tools, then Options, then General category.
3 True. Only if you have access to Browse Maintenance can you add/remove field to the drop-down list of fields.
4 All except for the tabs in Production Order Maintenance.
5 If you are working in any of the supporting programs that display at the bottom of the workbenches, and the program has multiple tabs, you can right-click on the tab, then select the Auto Hide option to display only the data in that tab.
Exercise 5: Select and Apply Additional View Personalizations
Select Your Saved View
You closed down the Planning and Scheduling Workbenches and when you open them again, you wish to select your saved view.
1 Open the Planning and Scheduling workbenches.
Note: The Master Scheduling or Production Scheduling Workbench program should be available in your favorites list.
2 Enter selection criteria Site equals 10-202.
3 Enter Scheduler ID equals Group1.
4 On the Toolbar, click View and select the view MSW.
The Description field and column sizing on the Schedule Grid should return in view.
Important: You cannot select your view until after you run your first search. Also, you cannot default a specific view.
Hide Tabs
Applying additional personalization to your view, you wish to hide some tabs you may not use.
1 On the Toolbar, click Hide/Show Tab.
2 Select Action Messages.
The system hides the Action Message tab.
Use Auto-Hide
The Search Panel consumes valuable real estate, the Auto-Hide feature lets you automatically hide panels that you do not view constantly.
1 On the Search Panel, right-click the Thumbtack icon.
2 Select Auto-Hide.
3 Click somewhere on the Schedule Grid.
The Search Panel disappears.
4 Hover over the Search Panel tab on the top left of screen.
The Search Panel redisplays.
5 Consider applying Auto-Hide for the Navigator panel.
6 Important: Save your additional UI changes by clicking on View, then selecting Save.
Currently, your view should be MSW and by clicking on save, the additional changes applied above will be saved as part of this view.
7 Click inside the panel, then drag it upward into the workbench.
Notice that the data displays and covers most of the Schedule Grid, depending on how far up you drag.
8 Click on the auto-hide thumbtack to re-display your data.
9 Important: Save as part of your view.
Other Topic Section
Other Topics