|
Field
|
Data
|
|
Product Line
|
15; click Next
|
|
Description
|
Quality
|
|
Field
|
Data
|
|
Current Cost
|
Last
|
|
Field
|
Data
|
|
Default Site
|
10-100
|
|
Field
|
Data
|
|
Item Number
|
01010; click Next twice
|
|
Site
|
10-100 (in Item Inventory Data frame)
|
|
Location
|
010 (in Item Inventory Data frame)
|
|
Field
|
Data
|
|
Item Number
|
01010; click Next
|
|
Mstr Sched
|
Yes (checked)
|
|
Plan Orders
|
Yes (checked)
|
|
Order Policy
|
POQ
|
|
Order Qty
|
0
|
|
Purchase/Manufacture
|
M
|
|
Min Order
|
1
|
|
Order Mult
|
1
|
|
Field
|
Data
|
|
Item Number
|
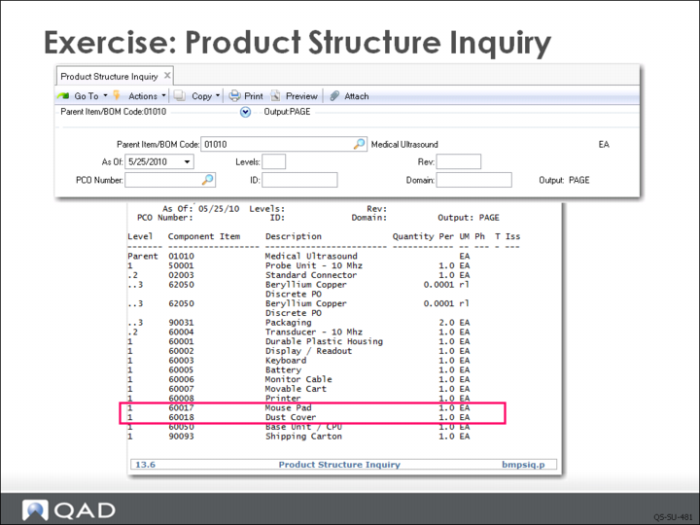
60017; click Next
|
|
Unit of Measure
|
EA
|
|
Description
|
Mouse Pad; click Next
|
|
Prod Line
|
10
|
|
Item Type
|
COMP
|
|
Status
|
ACTIVE
|
|
Group
|
Medical; click Next
|
|
ABC Code
|
A
|
|
Location
|
020; click Next twice
|
|
Supplier
|
10S1002
|
|
Purchase/Manufacture
|
P; click Next
|
|
Price
|
3.99; click Next
|
|
Material
|
0.49; click Next twice
|
|
Field
|
Data
|
|
Item Number
|
60018; click Next
|
|
Unit of Measure
|
EA
|
|
Description
|
Dust Cover; click Next
|
|
Prod Line
|
10
|
|
Item Type
|
COMP
|
|
Status
|
ACTIVE
|
|
Group
|
Medical; click Next
|
|
ABC Code
|
A
|
|
Location
|
020; click Next twice
|
|
Supplier
|
10S1002
|
|
Purchase/Manufacture
|
P
|
|
Price
|
9.99; click Next
|
|
Material
|
2.49; click Next twice
|
|
Item Number
|
ABC Class
|
Site
|
Location
|
|
50001
|
B
|
10-100
|
020
|
|
02003
|
C
|
10-100
|
010
|
|
62050
|
A
|
10-100
|
020
|
|
90031
|
C
|
10-100
|
020
|
|
Field
|
Data
|
|
Mstr Sched
|
Yes
|
|
Plan Orders
|
Yes
|
|
Order Policy
|
POQ
|
|
Order Qty
|
0
|
|
PO Site
|
<blank>
|
|
Purchase/Manufacture
|
M
|
|
Mfg LT
|
0
|
|
Minimum Order
|
1
|
|
Order Multiple
|
1
|
|
Field
|
Data
|
|
Mstr Sched
|
No
|
|
Plan Orders
|
Yes
|
|
Order Policy
|
POQ
|
|
Order Qty
|
0
|
|
PO Site
|
<blank>
|
|
Purchase/Manufacture
|
M
|
|
Mfg LT
|
2
|
|
Minimum Order
|
0
|
|
Order Multiple
|
0
|
|
Field
|
Data
|
|
Mstr Sched
|
Yes
|
|
Plan Orders
|
Yes
|
|
Order Policy
|
POQ
|
|
Order Qty
|
0
|
|
PO Site
|
<blank>
|
|
Purchase/Manufacture
|
M
|
|
Mfg LT
|
1
|
|
Minimum Order
|
0
|
|
Order Multiple
|
1000
|
|
Field
|
Data
|
|
Mstr Sched
|
No
|
|
Plan Orders
|
Yes
|
|
Order Policy
|
POQ
|
|
Order Qty
|
10
|
|
PO Site
|
<blank>
|
|
Purchase/Manufacture
|
P
|
|
Pur LT
|
3
|
|
Minimum Order
|
1
|
|
Order Multiple
|
1
|
|
Field
|
Data
|
|
Mstr Sched
|
No
|
|
Plan Orders
|
Yes
|
|
Order Policy
|
POQ
|
|
Order Qty
|
0
|
|
PO Site
|
<blank>
|
|
Purchase/Manufacture
|
P
|
|
Pur LT
|
2
|
|
Minimum Order
|
1000
|
|
Order Multiple
|
100
|
|
Field
|
Data
|
|
Mstr Sched
|
No
|
|
Plan Orders
|
Yes
|
|
Order Policy
|
POQ
|
|
Order Qty
|
0
|
|
PO Site
|
<blank>
|
|
Purchase/Manufacture
|
P
|
|
Pur LT
|
2
|
|
Minimum Order
|
0
|
|
Order Multiple
|
0
|
|
Field
|
Data
|
|
Mstr Sched
|
No
|
|
Plan Orders
|
Yes
|
|
Order Policy
|
POQ
|
|
Order Qty
|
0
|
|
PO Site
|
<blank>
|
|
Purchase/Manufacture
|
P
|
|
Pur LT
|
5
|
|
Minimum Order
|
0
|
|
Order Multiple
|
0
|
|
Field
|
Data
|
|
Mstr Sched
|
No
|
|
Plan Orders
|
Yes
|
|
Order Policy
|
POQ
|
|
Order Qty
|
0
|
|
PO Site
|
<blank>
|
|
Purchase/Manufacture
|
P
|
|
Pur LT
|
5
|
|
Minimum Order
|
0
|
|
Order Multiple
|
0
|
|
Field
|
Data
|
|
Mstr Sched
|
Yes
|
|
Plan Orders
|
Yes
|
|
Order Policy
|
POQ
|
|
Order Qty
|
0
|
|
PO Site
|
<blank>
|
|
Purchase/Manufacture
|
P
|
|
Pur LT
|
5
|
|
Minimum Order
|
0
|
|
Order Multiple
|
0
|
|
Field
|
Data
|
|
Mstr Sched
|
No
|
|
Plan Orders
|
Yes
|
|
Order Policy
|
POQ
|
|
Order Qty
|
0
|
|
PO Site
|
<blank>
|
|
Purchase/Manufacture
|
P
|
|
Pur LT
|
1
|
|
Minimum Order
|
0
|
|
Order Multiple
|
0
|
|
Field
|
Data
|
|
Mstr Sched
|
No
|
|
Plan Orders
|
Yes
|
|
Order Policy
|
POQ
|
|
Order Qty
|
0
|
|
PO Site
|
<blank>
|
|
Purchase/Manufacture
|
P
|
|
Pur LT
|
2
|
|
Minimum Order
|
0
|
|
Order Multiple
|
0
|
|
Field
|
Data
|
|
Mstr Sched
|
No
|
|
Plan Orders
|
Yes
|
|
Order Policy
|
POQ
|
|
Order Qty
|
0
|
|
PO Site
|
<blank>
|
|
Purchase/Manufacture
|
P
|
|
Pur LT
|
2
|
|
Minimum Order
|
0
|
|
Order Multiple
|
0
|
|
Field
|
Data
|
|
Mstr Sched
|
No
|
|
Plan Orders
|
Yes
|
|
Order Policy
|
POQ
|
|
PO Site
|
<blank>
|
|
Order Qty
|
0
|
|
Purchase/Manufacture
|
P
|
|
Pur LT
|
5
|
|
Minimum Order
|
0
|
|
Order Multiple
|
0
|
|
Field
|
Data
|
|
Mstr Sched
|
No
|
|
Plan Orders
|
Yes
|
|
Order Policy
|
POQ
|
|
Order Qty
|
0
|
|
PO Site
|
<blank>
|
|
Purchase/Manufacture
|
P
|
|
Pur LT
|
5
|
|
Minimum Order
|
5
|
|
Order Multiple
|
5
|
|
Field
|
Data
|
|
Mstr Sched
|
No
|
|
Plan Orders
|
Yes
|
|
Order Policy
|
POQ
|
|
Order Qty
|
0
|
|
PO Site
|
<blank>
|
|
Purchase/Manufacture
|
P
|
|
Pur LT
|
1
|
|
Minimum Order
|
0
|
|
Order Multiple
|
0
|