Configuring Databases
There are four QAD Enterprise Edition databases:
• Main
• Single R-Code
• Admin
• Help
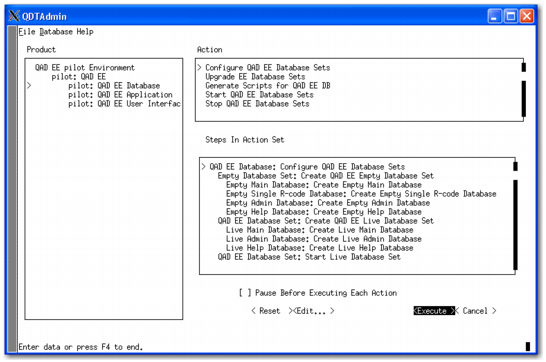
Configure QAD EE Database Action Steps
If you select Pause Before Executing Each Action, the system will wait after performing each action. This feature is primarily used to create a conversion restore point. For more information, refer to the Conversion Guide: Enterprise Edition - Progress Database.
Warning When renaming a database, do not exceed the Progress database name size limit of 11 characters. Also, database names must begin with an alphabetic character and can contain only alphanumeric characters.
Advanced Database Configuration
The Advanced Database Configuration screens allow you to specify or change database settings to improve database performance. For more information regarding these settings, refer to the Progress documentation.
The settings are saved to the conmgr.properties file, which allows you to manage the database with the Progress Explorer Utility.
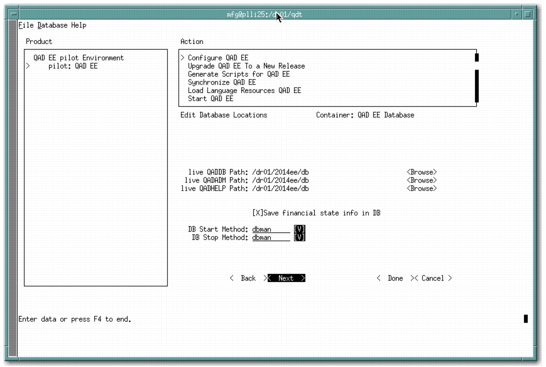
Editing Database Locations
The Edit Database Locations screen now allows you to specify the processes used to start up and shut down the live main databases. The options for starting and stopping databases are dbman and dbman, proserve and proshut, and dbman and proshut, respectively.
Edit Database Location Screen
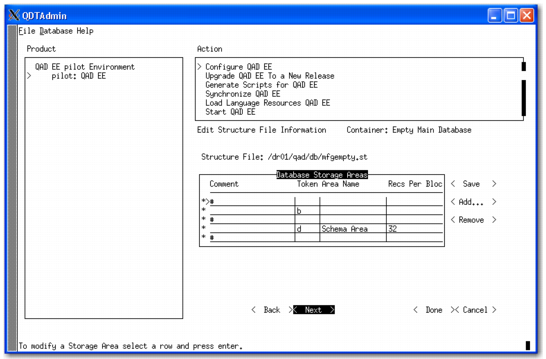
Editing Structure File Information
The structure file defines how the database is created on the disk (the storage areas, their sizes, locations, and whether the extents are of fixed or variable length).
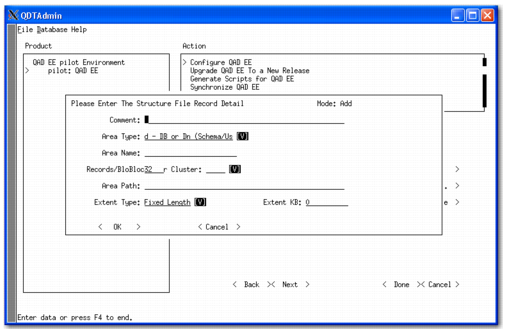
The Structure File Record Detail screen lets you edit the Storage Area Path and the Extent Size for fixed-length extents.
• Use the Extent Pathname to distribute your database onto drives to maximize performance and optimize disk access.
• Use the Extent Size on fixed-length extents to control the size of each storage area. This field does not appear for variable-length extents.
Note: Most storage areas consist of two extents. One extent is of fixed length. The other extent is of variable length to allow for growth. For best performance, try to keep all of the data in fixed database extents. QAD Global Services can assist with optimizing the structure file configuration.
Warning
• Do not edit the Comment line in a storage area. Editing this line converts the storage area definition to a comment and nullifies the storage area. To add a comment to the file, select a comment line (#) from the Database Storage Area’s selection list and press Enter.
• Do not change the storage Area Name. This name matches the Area definition in the data definition (.df) files for the database. When Progress encounters data files without defined storage areas, it creates them in the system storage area, which is also used to maintain the database structure.
The first configuration screen is Edit Structure File Information.
Edit Structure File Information Screen
This screen allows you to scroll through the Progress structure file line-by-line and make any necessary changes. You can add lines by selecting Add or edit the content of any line by selecting the line so that the line detail displays.
The second screen is the Edit Structure File Detail Screen. It is used to specify additional parameters.
Edit Structure File Detail Screen
Editing Data Load Options
Note: Not all databases have data load options. The Edit Data Load Options screen does not display for these databases.
The data load options are database-specific. Other databases, such as admin, have different paths and most do not require an object identifier (OID) value.
Data Bulk Load
If the environment you are configuring will contain a complete data set, you can use the optional bulk data load feature to load the data. This option is only available when loading data that is complete, including OID values. The loading is performed without integrity to speed up the process. Refer to the Progress documentation for more information about the bulk load process.
When you select Bulk Data Load in the Edit Data Load Options action screen, the main and administrative databases must both use the same data load method. Once you select Bulk Data Load, OID input is disabled. This behavior is expected because the OID is populated with the current values in each data dump file.
To bulk load data, do the following:
1 Select Bulk Data Load for the Main database and select Next.
2 Select Bulk Data Load for the Admin database and select Next.
3 Restart the environment for client use.
AIA Compression
Beginning with QAD 2011 Enterprise Edition, you can enable or disable the use of AIA compression. This configuration is done as follows:
1 Select QAD <environment_name> under Product.
2 In the Action pane, select Configure QAD EE.
3 Select UI Configuration: Build UI Configuration in the Steps In Action Set pane.
4 Select Enable AIA Compression.
5 Select Done.
6 Select Execute.
7 The system prompts you to execute all of the steps listed for Configure QAD EE. Select yes.
8 The system prompts you to clear the log. Select yes.
9 After you exit QDT, go to $TOMCAT/conf/server.xml.
10 Locate the compression setting. In many cases, AIA compression is enabled by default. To use compression, verify that the compression setting says compression=”on”.
To disable AIA compression, change the compression setting to compression=”off”.
Adding Custom Databases
Beginning with 2013.1 Enterprise Edition, you can add a custom database to the compile by including the database in the extradbs.pf file.