Self‑Billing
>
Creating a Self-Bill in Self-Bill Maintenance
Creating a Self-Bill in Self-Bill Maintenance
You usually use Self-Bill Auto Create or Document Import to create a self-bill. However, you can also use Self-Bill Maintenance to manually create a self-bill.
In the program header do the following:
1 Enter a new self-bill number.
Leave blank for the system to create a new number from the information in the Self-Billing Control.
2 Enter or select a customer bill-to address.
On a new self-bill, information defaults for Response Date and Currency.
3 Edit Transmission, Response Date, and Amt Control Total as needed. Choose Next.
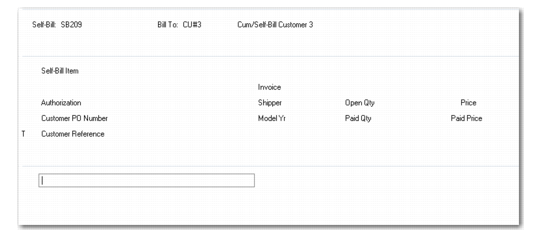
A self-bill line selection frame is displayed.
Self-Bill Maintenance, Line Selection Frame
Follow these steps to create a self-bill line:
1 Right-click the blank self-bill line and choose Insert to insert a line.
The self-bill line edit frame is displayed.
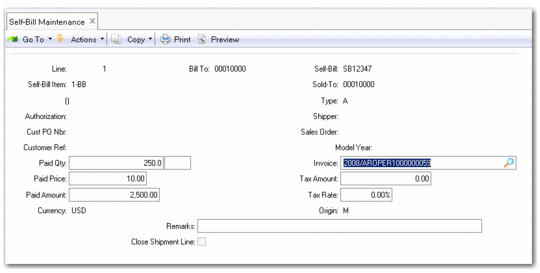
Self-Bill Maintenance, Line Edit Frame
2 Enter the Self-Bill Item or Sold-To.
3 Enter any other identifying information available. If you enter an item number associated with a customer item in Customer Item Maintenance (1.16), the customer item number is displayed below the Self-Bill Item field.
When you choose Next, the system matches shipment invoice records based on the information in these fields.
For Type:
• Leave blank if entering a shipment line.
• Enter A for an adjustment line. Use this code when creating an adjustment line to reference a write-off.
• Enter C for trailer charges line.
• Enter D for discount line.
• Enter T for tax line.
• Enter L for line charges line.
• Enter X for container charges line.
4 When the system finds multiple matches for the information you enter, a shipment selection frame is displayed. Use this frame to select the correct line.
• Use the arrow keys to scroll from line to line.
• Press Enter to select the correct line.
If only one match is found, or after you select the correct shipment line from the line match frame, the financial detail frame is displayed.
5 Enter or edit financial details and remarks for the line. Choose Next.
6 Matching shipment information is displayed in the last frame.