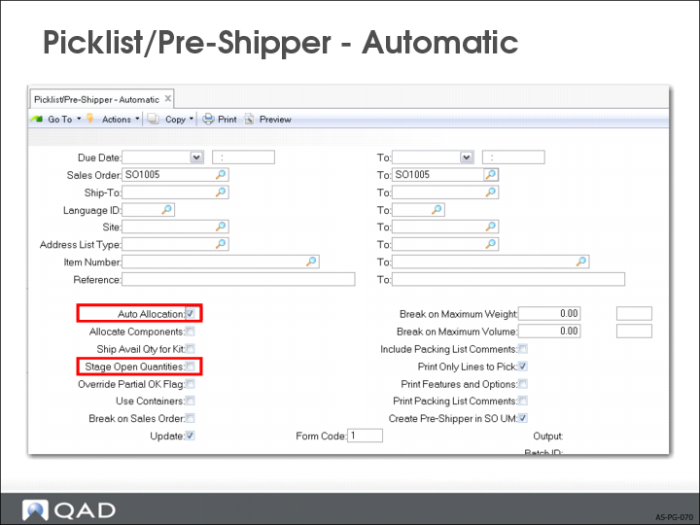
Picklist/Pre-Shipper – Automatic
• A pre-shipper is a document describing items and/or containers that should be picked.
• Pre-shippers are created based on customer requirements in Sales Orders/Invoicing and Customer Schedules.
Picklist/Pre-Shipper – Automatic
• Created based on lines that can be detail allocated only
• If the Stage Open Quantities field is Yes, pre-shippers are created based on open sales order quantities not the quantity allocated.
• Print Only Lines to Pick is No, all line items with a non-zero open quantity are printed, regardless of the quantity allocated.
Exercise: Global Shipping Process
Create a Non-Sales Shipper
You are going to ship products from your process manufacturing site (10-300) to your distribution site 1 (10-301). This transaction is an inventory transfer but if you use a common carrier, you need a shipping document. Create and print a non-sales shipper.
1 Use Receipts Unplanned (3.9) to receive 500 of item 03021 and item 03022 into location 010 at site 10-300. A lot number must be specified for each of these items.
2 Use Shipping Group Maintenance (2.18.1) to create shipping group.
Field | Data |
Shipping Group | INTRAPLT |
Description | Intra-plant shipments |
Auto Transfers | No |
Master Bill Sequence ID | MBOL1 |
Source Addresses | 10-300, 10-301 |
Destination Addresses | 10-300, 10-301 |
Inventory Movement Code | INV-TSFR |
Ship Seq | SHIP1 |
Format | SHP |
Carrier | 00009000 |
3 Use Transfer - Single Item (3.4.1) to transfer 100 EA of item 03021 from site 10-300, location 010 to site 10-301, location 010. Because the two sites belong to a shipping group, you are prompted to enter shipper information.
a Accept all the defaults and advance to the shipping information frame. Enter the following shipping information.
Field | Data |
Number | [Press Enter for system assigned No] |
Inventory Movement Code | INV-TSFR |
Carrier | 00009000 |
Ship Via | DHL |
[accept other fields at default] |
(Record Shipper Number Assigned:) ______________________
b Accept all other defaults. Set Trailer Comments to Yes and enter the following comment: A receipt should not be processed at the receiving site, since a transfer was used.
c Set Output to PAGE to view the shipper.
Create Global Sales Orders
Before you can create a sales shipper, a sales order must exist for the finished goods you plan to ship.
4 Use Sales Order Maintenance (7.1.1) to create a sales order for 100 of item 03021, 20 of item 03022 and 10 of item 03023 to customer 10C1000. Record the Sales Order number to refer to later.
,
Field | Data |
Header |
Order | [system assigned order number] |
Sold-to | 10C1000 |
Bill-to | [default] |
Ship-to | [default] |
Site | 10-300 |
Freight Data |
[If a freight list is filled in, delete the default and continue to the next frame.] |
Line 1 |
Item | 03021 |
Qty Ordered | 100 |
Line 2 |
Item | 03022 |
Qty Ordered | 20 |
Line 3 |
Item | 03023 |
Qty Ordered | 10 |
Create Sales Pre-Shippers
You require Pre-Shippers for picking orders. Generate a pre-shipper for the sales order created in the previous exercise.
5 Use Pre-Shipper/Shipper Workbench (7.9.2) to create a pre-shipper to ship the order.
a Enter the following header information.
Field | Data |
Ship-From | 10-300 |
Pre-Shipper/Shipper | Pre-Shipper |
Number | [blank] |
Ship-To/Dock | 10C1000 |
When the header information is accepted, the system assigns a shipping group based on the Ship-From and Ship-To/Dock sites entered.
(Record Pre-Shipper Number Assigned:) ______________________
b The system looks for the appropriate shipping group.
c Set Multi to No. Click Next or Enter.
d In the Shipper Workbench, select Insert from the Actions drop down menu. Select 1 (Add Item) from the Add options, and click OK.
e In the Item Information frame, tab to the Sales Order field and use the lookup to find and select line 1 of your sales order; then click Next.
f In the Quantity field, enter 100; then enter the corresponding lot number. Click Next twice to return to the workbench, where you can add more items or containers.
g Select Insert from the Actions drop down menu. Select 3 (Add new container plus contents) from the Add options, and click OK.
h In the Container Information frame, leave the Next Container field blank and press Next. Use the lookup on the Container Item field to select the standard shipping carton then press Next. Enter a quantity of 2, then click Next.
i In the Item Information frame, tab to the Sales Order field and use the lookup to find and select line 2 of your sales order; then click Next.
j In the Quantity field, enter 20; then enter the corresponding lot number. Click Next until you return to the workbench, where you can add more items or containers. If you specify multiple containers in the Container Information frame, the system evenly distributes the item quantity over the number of containers specified.
k Select Insert from the Actions drop down menu. Select 4 (Add existing container) from the Add options, and click OK.
l In the Container Information frame, use the lookup to select one of the containers previously created in the Container Workbench exercise. Click Next to return to the workbench.
m The container you have added to the pre-shipper does not reference a sales order line. You now have to link this container to line 3 of your sales order. Select the pre-shipper line for item 03023 then click Enter.
n Use the lookup on the Sales Order field and select line 3 of your sales order. Click next to return to the workbench where you can add more items or containers. In our case, we are finished with adding items, so click Back until you return to the menu. Do not print the pre-shipper. The pre-shipper will be printed in the next exercise.
Modify Pre-Shipper/Shippers
Use the workbench to modify existing Pre-Shippers/Shippers.