Creating a New Report Template
1 Launch Template Designer. Type Template Designer in the menu search field and press Enter.
2 Click the New button on the toolbar.
3 In the Create Template dialog box, enter a unique template name and click OK.
Important: QAD-provided built-in reports, report resources, and templates all begin with “QAD_”. Do not create or modify reports, report resources or templates with this prefix. Otherwise, your customized changes will get overwritten during system upgrades from QAD.
4 In the Design pane, create and format field classes in the same way as you work with fields when working with a report definition. Provide unique class names for the classes. See
Enhancing the Report with Fields.
5 If you want to define a header, page header, page footer, and footer section class name, click the default section name and enter a new name in the (name) field in the Properties pane.
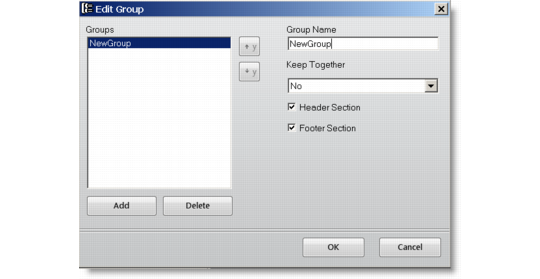
6 If you want to add new sections, use the following steps:
a Click the New Group button on the toolbar.
b In the Edit Group dialog box, click Add and specify the properties for the new group.
Add Group
c Click OK.
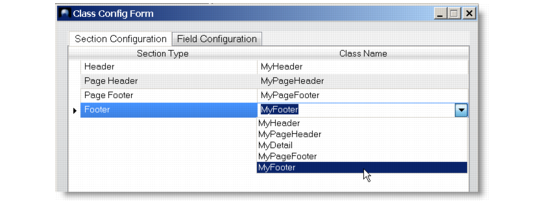
7 Configure the default section and field class mapping to specify the default classes to be applied to the corresponding sections and fields in the report definition.
a Click the Configure button on the toolbar. The Class Configuration Form dialog box appears.
b Under the Section Configuration tab, specify a class name for each section type.
Section Configuration
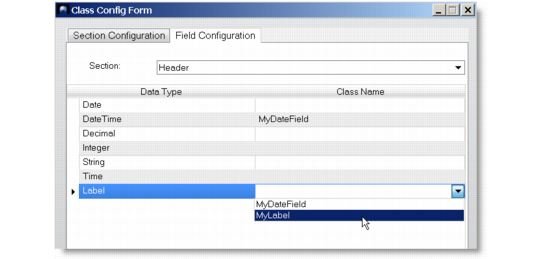
c Under the Field Configuration tab, for each data type, select a section in the template and specify a class defined within that section.
Field Configuration
d Click OK.
8 Back in the Template Designer main screen, click the Save button on the toolbar to save the template.