Customizing Template-Based Report Definitions
Applying a report template to a report definition applies classes to affected sections and fields in the report definition across the board. You can still customize the report definition by applying a different class to individual report element or modifying their other properties in Report Designer.
However, when you manually change an element’s properties including applied class in a template-based report definition and confirm the change, the element is disengaged from the report template in the report definition and will no longer be affected by the template. If at a later time it is desired to re-engage a property to the template you can select the property in the property grid, and then click the Use Default Value button at the top of the property grid. This will change the value of the property to match the value in the template, and re-engage the connection of that property to the template such that any future changes to that property in the template will be passed to the report.
Applying a Report Template Class to an Individual Element
1 In Report Designer, select the element by either clicking it in the Application area, or selecting it from the element list in the Properties window.
2 In the Properties window, expand Template, and click the Browse button next to the Class property.
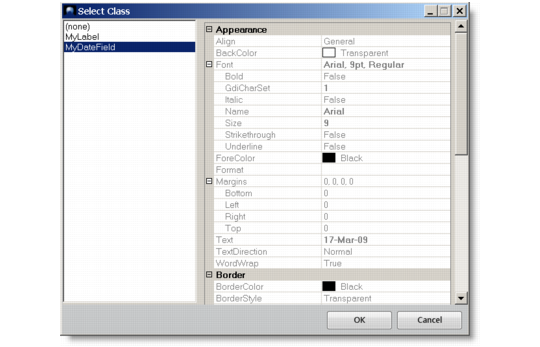
3 The Select Class dialog box displays all the classes of the matching type (section or field) defined in the current report template. Select the class you want to apply and click OK.
Select Class
4 The class is applied to the element with immediate changes in layout and formatting.
Exporting Report Templates
Perform the following steps to export report templates from the database to XML files:
1 In the Template Designer, click the Export button.
2 Select the check boxes in the list for the templates that you want to export. You can use the Check All and Uncheck All to select or clear all the check boxes.
3 Specify the directory to which you want to export template data files in the Export Directory field. You can open a Browse for Folder dialog to select the folder by clicking on the button to the right of the field.
4 Click Export to begin the export process.
5 After the export process is complete, look at the Status field for the items in the list to check whether the export completed successfully or if errors occurred.
Importing Report Templates
Perform the following steps to import report templates from XML files to the database.
1 In the Template Designer, click the Import button.
2 Specify the directory from which to import template data files in the Import Directory field. You can open a Browse for Folder dialog to select the files by clicking on the button to the right of the field. You must enter a valid directory in this field.
3 Click the Refresh button. The system then inspects the directory and displays a list of all template data files in that directory.
4 Select the Update check box to indicate whether you want to overwrite existing templates in the system with the imported templates. If the box is selected, the template will be imported regardless of whether it already exists in the system, possibly overwriting the contents previously in the system.
5 Select the check boxes in the list for the reports that you want to import. You can use the Check All and Uncheck All to select or clear all the check boxes.
6 Click the Import button to begin the import process.
7 After the import process is complete, look at the Status field for the items in the list to check whether the import completed successfully or if errors occurred.