QAD 2017 Enterprise Edition
>
User Guides
>
Security Administration
>
Authentication
>
User Authentication
>
Verify LDAP Instance Definition for DSML Gateway Using User Sync
Verify LDAP Instance Definition for DSML Gateway Using User Sync
Note: You should have your LDAP/Active Directory administrator present when connecting to the authentication server during initial setup and configuration.
The YAB console configures the DSML gateway instance for you in QAD Enterprise Edition. You can verify the configuration by testing one user.
Use User Maintenance (36.3.1) to sync one user at a time. This method is useful for debugging your connection methodology before starting batch imports, updates, or deletes.
1 Select the user you want to sync.
2 Select Next until the Active Directory fields are enabled at the bottom of the screen.
User Maintenance
3 Select the Active Directory Enabled check box.
4 Enter the LDAP Instance Name; for example, opendj
5 Enter the Active Directory Username. This does not have to match the user name that is used to sign in to QAD Enterprise Edition.
6 Enter the LDAP Distinguished Name. This is the path that is used by your LDAP compatible product, such as Active Directory.
Note: Active Directory requires you to escape special characters in an LDAP Distinguished Name. See documentation on Active Directory for details.
7 Click Next. If the sync completes successfully, the user record displays information from the LDAP server, which can include user details in the Remark field.
8 Check the ldapsync-users.xml and ldapsync-exceptions.xml log files for errors. These files are usually found in your working directory:
./build/work/client/ldapsync-exceptions.update.xml/ldapsync-users.xml
./build/work/client/ldapsync-exceptions.update.xml/ldapsync-exceptions.xml
Once you have successfully synced one user, you can use the LDAP Distinguished Name information in Active Directory User Sync (36.3.11) to create, update, or deactivate a single user or groups of users in QAD Enterprise Edition.
• Remove user information from the connection string.
• To update users, enter the remaining LDAP Distinguished Name information in the Update Search Root field.
• To deactivate users, enter the remaining LDAP Distinguished Name information in the Deactivate Search Root fiel.d
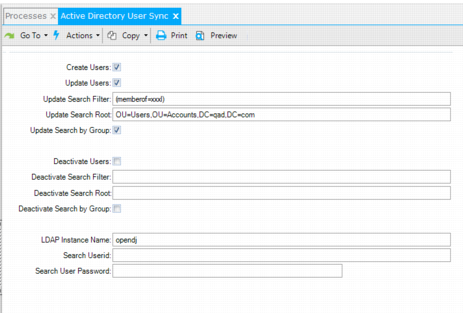
The following example uses the memberof function to add multiple users at once. You must add users to a group to use this functionality. The Update Search Filter field identifies the group being added, while the Search UserID field identifies a user that can authenticate against the directory to get access to the directory data. The specifics for the Update Search Root and SearchUserID settings depend on your LDAP directory structure configuration.
Active Directory User Sync
1 Open Active Directory User Sync (36.3.11), and set the following fields.
Note: Use your memberof ID rather than xxx.
• Create Users: on
• Update Users: on
• Update Search Filter: (memberof=xxx)
• Update Search Root: OU=Users,OU=Accounts,DC=qad,DC=com
• Update Search by Group: off
Note: Update Search by Group simulates the memberof function in Update Search Filter by running two queries. If your configuration supports memberof, do not select the Update Search by Group check box.
• Deactivate Users: off (and subsequent Deactivate-related fields are blank)
• LDAP Instance Name: (as specified in LDAP Instance Maintenance)
• Search UserID: domain\UserID
• Search User Password: (enter the password for the user specified in Search UserID)
2 Click Next.