Pre-Shipper/Shipper Picking
You can use Pre-Shipper/Shipper Picking (7.8.1) to pick serial IDs for a pre-shipper/shipper and link them with specific SO lines or customer scheduled order lines.
Note: Serialized items cannot be shipped to customers as consignment. So you cannot pick a pack that holds serialized items or a loose serialized item for a consigned SO or customer scheduled order line.
Navigation
This program contains several frames.
In the Pre-Shipper/Shipper frame, enter the SO pre-shipper/shipper information. If you have not already created a pre-shipper or shipper, leave the Number field blank to let the system automatically generate an SO pre-shipper or shipper.
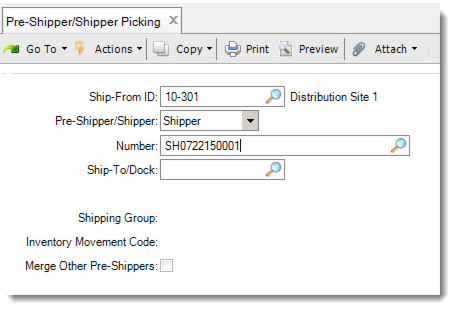
Pre-Shipper/Shipper Picking (7.8.1) - Header
If you want to merge the current pre-shipper or shipper with another pre-shipper or shipper, select the Merge Other Pre-Shippers field. Then, in the displayed Merge Pre-Shipper field, enter the pre-shipper or shipper ID with which to merge. The system merges the pre-shippers and displays a message that a picklist has been added to the merged pre-shipper. After you finish merging, click Back to display the Serial frame. If you do not want to do merging, do not select the Merge Other Pre-Shippers field. Click Next.
In the Serial frame, specify the serial IDs to pick for the current pre-shipper/shipper.
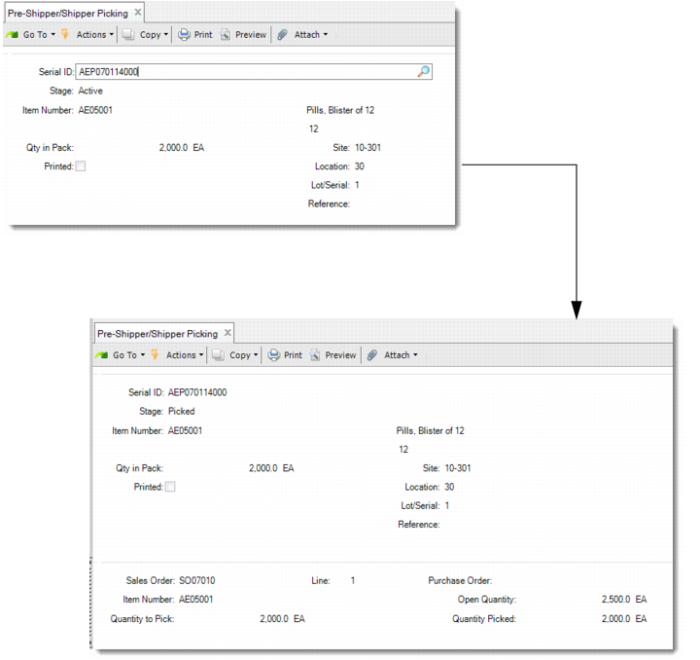
Pre-Shipper/Shipper Picking (7.8.1)
To pick an active assembly pack that contains single items, enter the serial ID of the assembly pack in the Serial ID field.
• If the assembly pack does not contain items at the lower level, the system displays the stage, item number, quantity available, site, location, lot/serial, and reference of the item. The displayed data is from the serial ID you enter. In the SO Line frame, you enter the SO or customer scheduled order number and line. Then the whole assembly pack is picked.
• If the assembly pack contains items at the lower level, you have two options. You can directly pick the whole assembly pack, or you can pick the assembly pack part by part. If you directly pick the whole assembly pack, this pack can only be picked for a single SO line.
• To directly pick the whole assembly pack, leave the Item Number, Lot/Serial, and Reference fields blank and click Next. Then, in the SO Line frame, enter a single SO and line number.
• To pick the assembly pack part by part, first pick the lower-level items. Enter the item number, lot, and reference data to indicate which inventory you are picking. Then, in the SO Line frame, enter SO line and quantity to pick information. The system prompts you to enter SO lines until all the quantity of the same combination of item, lot, reference is assigned. Then enter the serial IDs of other lower-level packs to pick the packs one by one. Finish picking all the other lower-level packs or items. Otherwise, when you click Back, you are prompted to remove those unpicked packs or items from the master pack. If you answer No, the system prompts you to remove the master pack from the pre-shipper or shipper.
To pick an active assembly pack that contains multiple items, you cannot directly enter the serial ID of the assembly pack in the Serial ID field. Instead, enter the serial IDs of lower-level packs to pick the lower-level packs one by one. If there are items at the lower level, enter the inventory information of the items to pick them. After entering the serial ID of a lower-level pack, answer No when prompted to remove it, and then enter data in the SO Line frame to pick the lower-level pack. In the Sales Order Line frame, you accept or enter the SO or customer scheduled order number and line. For unit packs, you are required to specify the quantity to pick. The system displays the item number and PO. The system prompts you to continue entering multiple SO lines until the Qty in Pack is all assigned to the SO lines. If the lower-level pack is a unit pack and contains multiple items or lots, after entering the pack serial ID, enter the inventory information to indicate which inventory you are picking. This function does not support the scenario where a lower-level pack is an assembly pack and contains multiple items.
To pick an active unit pack, enter the serial ID of the unit pack in the Serial ID field.
• If the unit pack contains items of a single item number, lot and reference, the system displays inventory information. Enter the SO line and quantity to pick information to pick the unit pack. The system prompts you to continue entering SO lines until all the quantity in pack is assigned to the SO lines.
• If the unit pack contains single items with multiple lots or references, you have two options. One is to directly pick the whole unit pack for a single SO line. The other is to select specific inventory to pick for different SO lines.
• To directly pick the whole unit pack, leave the Item Number, Lot/Serial, and Reference fields blank. Then enter a single SO line to pick the whole unit pack.
• To select specific inventory to pick, enter inventory information to indicate which inventory you are picking. Then enter the SO line and quantity to pick information to pick the specified inventory. The system prompts you to enter SO lines until all the quantity of the specified inventory in the unit pack is assigned. Finish picking all the other inventory in the unit pack. Otherwise, when you click Back, you are prompted to remove the unpicked inventory from the unit pack. If you answer No, the system prompts you to remove the unit pack from the pre-shipper or shipper.
• If the unit pack contains multiple items, you are required to select the specific inventory to pick. Enter inventory information to indicate which inventory you are picking. Then in the SO Line frame, enter the SO line and quantity to pick data. The system prompts you to enter SO lines until all the quantity of the specified inventory in the unit pack is assigned. Finish picking all the other inventory in the unit pack. Otherwise, when you click Back, you are prompted to remove the unpicked inventory from the unit pack. If you answer No, the system prompts you to remove the unit pack from the pre-shipper or shipper.
You can also pick loose serialized items using this function. In the Serial ID field, enter an active item serial ID and then enter SO line information to pick the serialized item.
When you finish the SO Line frame, click Back to display the Destination frame and enter the staging area. To pick serial IDs without transferring packs to the staging area, leave all fields blank.
If you are using the Logistics Accounting functionality, click Back and you come to the Logistics Charges Detail frame. In this frame, logistics charges are calculated and displayed for the current pre-shipper or shipper. You can specify the logistics charge code and logistics supplier.
Pre-Shipper/Shipper Picking (7.8.1) - Logistics Accounting
After the Logistics Charges Detail frame, if the current is a shipper rather than a pre-shipper, click Back and the system displays the Complementary Data frame. In the Complementary Data frame, provide additional information as required by the legal document and indicate whether you want to print the legal document immediately.
Pre-Shipper/Shipper Picking (7.8.1) - Legal Document
Ship-from ID
Enter the site from which the serial IDs are shipped.
Pre-Shipper/Shipper
Enter either shipper or pre-shipper. The default is pre-shipper. The value you enter determines whether you pick serial IDs for a pre-shipper or a shipper.
Number
Enter the number of the pre-shipper or shipper, or leave it blank to let the system generate an SO pre-shipper or shipper.
Note: Do not enter a pre-shipper or shipper that links with an open task in Warehousing. Otherwise, the system displays an error message.
Ship-To/Dock
This field is display only when you enter the pre-shipper/shipper number and shows the ship-to address to which this pre-shipper/shipper is to be delivered.
If you leave the Number field blank, you are required to enter the ship-to or dock address code to which this shipper is to be delivered.
Shipping Group
This field is display only. The system searches for a shipping group based on the Ship-From and Ship-To/Dock address combination.
Inventory Movement Code
Enter an inventory movement code for this shipment. Inventory movement codes determine the default Number Range Management (NRM) sequences, carriers, and document formats. If specified, the system verifies that the code exists in the inventory movement detail record for the shipping group. If no shipping group is available for the Ship-From and Ship-To/Dock address combination, leave this field blank.
You are required to have access to this inventory movement code, defined in Inventory Movement Code Security.
Merge Other Pre-Shippers
Indicate Yes to merge a pre-shipper with this pre-shipper/shipper. When Yes, the system prompts you to enter the pre-shipper number to merge with this pre-shipper/shipper.
Merge Pre-Shipper
Enter the pre-shippers you want to merge with the pre-shipper/shipper. You can enter more than one pre-shipper. The cursor remains on the field until you press F4.
When you enter a pre-shipper or shipper with different values in the header fields of the pre-shippers to merge, the system displays a warning and prompts you to continue. Once you specify Yes, the system merges the pre-shippers and displays a message that a picklist has been added to the merged pre-shipper.
Serial
Enter a valid serial ID to pick for the pre-shipper/shipper. Item serial ID, unit pack, and assembly pack are all supported. If the entered serial ID is aggregated on an active pack, the system prompts you to remove the pack from its master pack automatically. If you enter a serial ID that is picked for the current pre-shipper/shipper, it means that you want to unpick it. Do not enter a serial ID that is picked for another pre-shipper/shipper.
Sales Order/Line
Enter the sales order and line for which you pick the serial ID. The SO or customer scheduled order and line default based on the following logic:
• When the serial ID is linked with a sales order line, the system validates that the sales order line has the same ship-from and ship-to as the pre-shipper/shipper. If yes, the system defaults the SO and line number.
• When serial ID is linked with a master sales order line and the sales order line has different ship-from or ship-to than the pre-shipper/shipper, the system locates other sales order lines that have the same sold-to, PO, and item as the master sales order line. When a match exists in ship-from and ship-to with the pre-shipper/shipper, the system defaults the matching SO and line number.
• When the pre-shipper/shipper has pending pick items, the system locates a sales order line in the pending pick list and defaults the SO and line number.
Qty to Pick
Enter the number of items in the serial ID to pick for the SO and line. The value defaults from the Qty in Pack of the entered serial ID. When you enter a serial ID that is an assembly pack, the system calculates the quantity of the inventory items and defaults the value here.
Transfer To Site
Enter the destination site to which the packs move. The value defaults from the ship-from of the pre-shipper/shipper.
Location
Enter the destination location to which the packs move.
Note: If the specified pack is associated with an open task in Warehousing, the system does not transfer it to the specified location.
Effective Date
Enter the GL effective date for the transfer transaction. This value defaults from the system date.
Remarks
Optionally, enter brief remarks associated with this transfer transaction.
Logistics Charge Code
Enter a logistics charge code.
Logistics Supplier
Enter a supplier.
Driver
Optionally enter the name of the carrier vehicle’s driver. This field is for reference only and appears on some legal documents.
License Number
Optionally enter the license number of the carrier’s vehicle. This field is for reference only and appears on some legal documents.
Print Comments
Specify whether to print shipper comments on the legal document.
Print Legal Document with Shipper
Choose Yes to immediately print the legal document along with the shipper. If you choose No, you can print the legal document later using Legal Document Print (7.10.4). This value defaults from the Print Legal Document option in Legal Document Control (7.10.24).
Number of Copies
Specify how many copies of legal documents you want to print.
Volume
Enter a code indicating the amount of space the inventory occupies.
Volume UM
Enter a unit of measure in which the net weight is expressed, such as CF, SF, CM. This field is validated against predefined values entered in Generalized Codes Maintenance for field pt_size_um, if any.
Legal Document Detail Maint
Choose Yes to review and maintain legal document details.
Pre-shipper/Shipper Workbench Data Changes
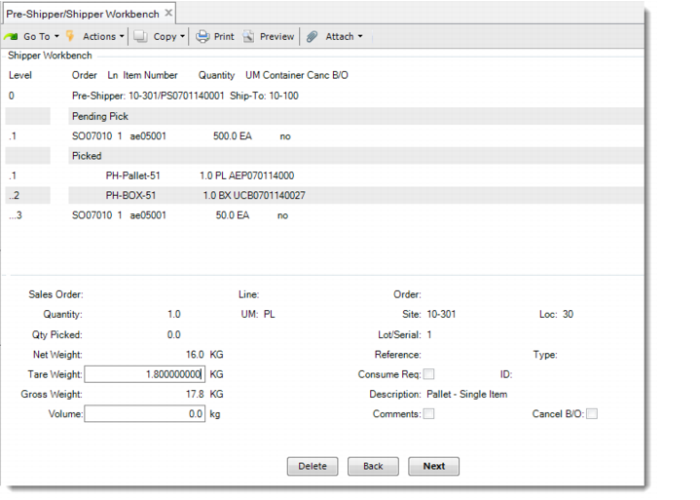
After SO picking, if you go to Pre-Shipper/Shipper Workbench, you can see that the Shipper Workbench frame includes two sections: Pending Pick and Picked.
Pre-Shipper/Shipper Workbench-Shipper Workbench Frame
The Pending Picked section displays information in the same way that the Shipper Workbench frame does before SO picking.
The Picked section displays all picked pack serial IDs and loose serialized items.
• The levels follow the serial hierarchy. Because pre-shipper/shipper is Level 0, master pack is Level 1 and all aggregated serial IDs are under their parent levels.
• For Order and Line, only when the level is item level, the system displays the order and line associated with it for the pre-shipper or shipper.
• For Item Number,
• If the level is pack level, the system displays the pack code.
• If the level is item level, the system displays the item number.
• For Quantity and UM,
• If the level is pack level, the system displays the quantity and the Unit of Measure of the pack at this level.
• If the level is item level, the system displays the quantity and the Unit of Measure of the items picked for the sales order line.
• For Container,
• If the level is pack level, the system displays the pack serial ID.
• If the level is item level, blank is displayed.
If you select the pack level, note the following fields:
Quantity
The system displays the pack quantity of this level.
UM
The system displays the Unit of Measure of this level.
Description
The system displays the pack code description of this level.
Note: When the pre-shipper or shipper has picked packs, in the trailer of Pre-Shipper/Shipper Workbench, you cannot set the Status field to X: Canceled.
Weight Calculation in Pre-Shipper/Shipper Workbench
• Before SO picking,
• For the shipper level, without considering manual changes:
• Net Weight = item net weight * shipper quantity
• Gross Weight = item ship weight * shipper quantity
• Tare Weight = Gross Weight – Net Weight
Only the Gross Weight field is editable, and after you change the gross weight, the system adjusts the tare weight and even the net weight.
• For the item level, without considering manual changes:
• Net Weight = item net weight * shipper quantity
• Gross Weight = item ship weight * shipper quantity
• Tare Weight = Gross Weight – Net Weight
Both Net Weight and Tare Weight are editable. After you change the net weight or the tare weight, the system adjusts the gross weight from the item level up to the shipper level.
• After SO picking,
• For the pending pick lines, the system calculates and displays the weights in the same way as it does before SO picking.
• For the pack level in the Picked section, without considering manual changes:
• Net Weight = item net weight * item quantity in pack
• Tare Weight = sum of the tare weight of all included packs
• Gross Weight = Net Weight + Tare Weight
Only the Tare Weight field is editable. You can change the tare weight, and the system automatically adjusts the gross weight displayed.
• For the item level in the Picked section, without the consideration of manual changes:
• Net Weight = item net weight * Quantity
• Tare Weight = Zero
• Gross Weight = Net Weight
Only the net weight is editable, and the system adjusts the gross weight after you change the net weight.
• For the pre-shipper/shipper level, without considering manual changes:
• Net Weight = item net weight * shipper quantity
• Tare Weight = (item ship weight – item net weight) * pending pick quantity + sum of tare weight of all picked packs
• Gross Weight = Net Weight + Tare Weight
Only the gross weight is editable. If you change the gross weight, the system updates other weights.
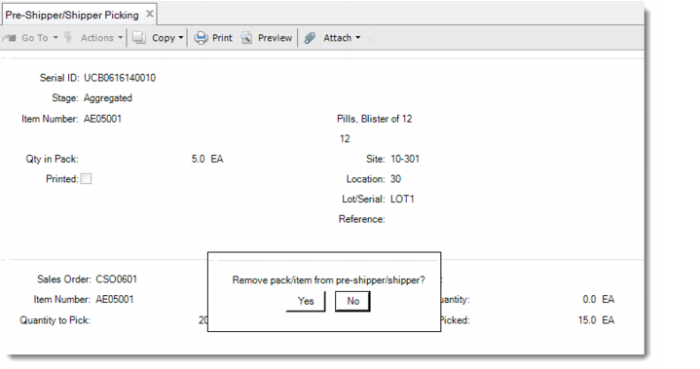
Unpicking Serialized Packs or Items
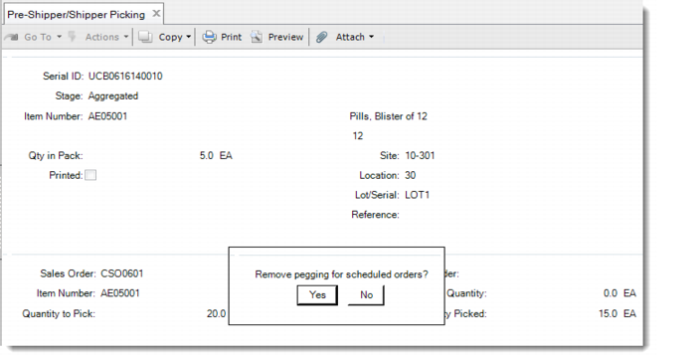
You can also use Pre-Shipper/Shipper Picking to unpick a serialized pack or item from a pre-shipper or shipper. In the Serial ID field, enter the aggregated or picked serial ID and click Yes when prompted to remove pack/item from pre-shipper/shipper. The system reactivates the specified pack or item.
Pre-Shipper/Shipper Picking-Unpick
If this pack or item has a pegged quantity, the system prompts you to remove pegging for scheduled orders. If this pack or item is pegged to a CUM-type order and Automatic Cum Pegging is set to No in Customer Schedules Control,
• When you select Yes, the system returns the pegged quantity of the unpicked pack or item to the open quantity of the schedule requirement.
• When you select No, the system returns the pegged quantity of the unpicked pack or item to the generated pending pick line.
Pre-Shipper/Shipper Picking-Unpick
Note: When picked packs exist for the pre-shipper or shipper, you cannot change the Ship-To value for the pre-shipper or shipper in the following programs:
• Pre-Shipper/Shipper Workbench
• Pre-Shipper/Shipper Picking
• Pre-Shipper/Shipper Pack Build
• Move Pack between (Pre-)Shippers