Moving Packs Between DO (Pre-)Shippers
When the vehicle arrives, it is possible that the vehicle does not have enough capacity to load all the DO goods. To avoid unpicking remaining packs from the DO pre-shipper or shipper and losing track of the goods picked for a specific ship-to/DO request, you can use Move Pack between (Pre‑)Shippers (12.9.12). Use Move Pack between (Pre-)Shippers to transfer the picked inventory from the source DO pre-shipper/shipper to another existing DO pre-shipper/shipper, or a new one.
Note: Non-serialized inventory linked with a DO pre-shipper/shipper cannot be moved.
Make sure that the destination DO pre-shipper/shipper has the same ship-from and ship-to as the source DO pre-shipper/shipper.
1 Enter the destination pre-shipper/shipper information.
This destination pre-shipper or shipper can be an existing pre-shipper/shipper or a newly created one. Leave the Number field blank to let the system automatically produce a new pre-shipper or shipper. Make sure that the destination DO pre-shipper/shipper has the same ship-from and ship-to as the source DO pre-shipper/shipper.
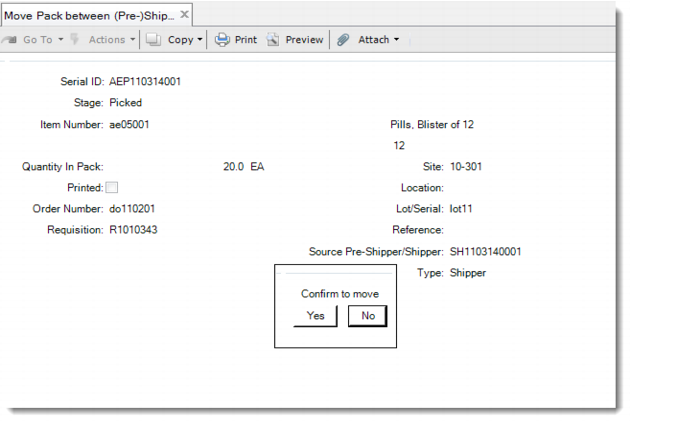
2 In the Serial ID field, specify the serial ID of a picked pack or loose item associated with the source pre-shipper or shipper.
Note: If you specify a serial ID that is already picked for the destination pre-shipper or shipper, the system displays a warning message.
The system then displays information about the pack, linked DO request, and source pre-shipper/shipper, and prompts you to confirm the move.
3 Click Yes to confirm the transfer of the picked inventory from the source DO pre-shipper/shipper to the destination DO pre-shipper/shipper.
Move Pack between (Pre-)Shippers (12.9.12)
4 If you are using the Logistics Accounting functionality, click Back and you come to the Logistics Charges Detail frame. In this frame, logistics charges are updated and displayed for the current pre-shipper or shipper. You can specify the logistics charge code and logistics supplier.
5 Then, if the current is a shipper rather than a pre-shipper, click Back and the system displays the Complementary Data frame. In the Complementary Data frame, provide additional information as required by the legal document and indicate whether you want to print the legal document immediately.
6 Finally, the system displays tax amounts. You can review system-calculated tax amounts by setting View/Edit Tax Detail to Yes. The screen displays the total nontaxable and taxable line item and trailer charge amounts, the tax date, and tax amounts by category.
Ship-From ID
Specify the same Ship-From as the Ship-From of the original pre-shipper or shipper.
Pre-Shipper/Shipper
Specify either a pre-shipper or a shipper. The default is pre-shipper.
Number
Specify an existing pre-shipper or shipper ID that uniquely identifies a shipper record, or leave it blank to let the system automatically generate a pre-shipper or shipper number.
Ship-to ID
This field is display only when you enter the pre-shipper or shipper number. It shows the ship-to site to which this pre-shipper/shipper is delivered.
If you leave the Number field blank, specify the same ship-to as the ship-to of the original pre-shipper or shipper.
Serial ID
Specify the serial ID of a picked master pack or loose item that you want to move from the source pre-shipper or shipper to the specified destination pre-shipper or shipper.
Logistics Charge Code
Enter a logistics charge code.
Logistics Supplier
Enter a supplier.
Driver
Optionally enter the name of the carrier vehicle’s driver. This field is for reference only and appears on some legal documents.
License Number
Optionally enter the license number of the carrier’s vehicle. This field is for reference only and appears on some legal documents.
Print Comments
Specify whether to print shipper comments on the legal document.
Print Legal Document with Shipper
Choose Yes to immediately print the legal document along with the shipper. If you choose No, you can print the legal document later using Legal Document Print (7.10.4). This value defaults from the Print Legal Document option in Legal Document Control (7.10.24).
Number of Copies
Specify how many copies of legal documents you want to print.
Volume
Enter a code indicating the amount of space the inventory occupies.
Volume UM
Enter a unit of measure in which the net weight is expressed, such as CF, SF, CM. This field is validated against predefined values entered in Generalized Codes Maintenance for field pt_size_um, if any.
Legal Document Detail Maint
Choose Yes to review and maintain legal document details.