Creating a New Component
The procedure for creating a new component can be divided into three parts:
• Preparing the component data
• Creating the customized code
• Deploying the new component in the application
Preparing the Component Data
Use the following steps to prepare the data for the new component:
1 Create a new database.
When you create a new component, it is recommended that you create a new database in which to store the data. This avoids data loss or conflict when you upgrade your application. You should ensure that the new database starts and stops at the same time as your application database.
2 Update the server.xml file for the appserver to include an entry for your new database. This ensures that it is automatically connected when you run the application:
<database>
<name>C:\Work\Foundation\mycustomizations\db\mycustom</name>
<parameters></parameters>
</database>
3 Create the necessary tables and fields (and indexes) to store the data in.
For this example, create the following Province table:
Table: Province
FIELD SUMMARY
Flags: <c>ase sensitive, <i>ndex component, <m>andatory, <v>iew component
Order Field Name Data Type Flags
----- ---------------------------- ----------- ----
5 Province_ID inte i
10 ProvinceCode char i
20 ProvinceDescription char
30 CountryCode char
Field Name Format
-------------------------------- -----------------------------
Province_ID ->,>>>,>>9
ProvinceCode x(20)
ProvinceDescription x(40)
CountryCode x(20)
Field Name Initial
----------------------------- -----------------------------
Province_ID 0
ProvinceCode
ProvinceDescription
CountryCode
Field Name Label Column Label
----------------------- ---------- ----------
Province_ID ? ?
ProvinceCode ? ?
ProvinceDescription ? ?
CountryCode ? ?
INDEX SUMMARY
Flags: <p>rimary, <u>nique, <w>ord, <a>bbreviated, <i>nactive, + asc, - desc
Flags Index Name Cnt Field Name
--- ------------------------ --- ------------
u Code 1 + ProvinceCode
pu prim 1 + Province_ID
The Province_ID column is not strictly necessary, but some constructions in the framework depend on having an ID column.
Creating the Customized Code
2 Copy bcustom.p from the template directory to your work directory and rename it bcustom[province].p.
The code name between the square brackets needs to match the name of your user-defined component, which will be created later in the procedure.
The custom component has three tables you can use to contain your data: tCustomTable0, tCustomTable1, and tCustomTable2. You must use at least one of these tables. In this example, only one table is required:
3 Uncomment the BCustom.DefineCustomRelations.before method and add the following code:
create tCustomRelation.
assign tCustomRelation.tcParentTable = ""
tCustomRelation.tcChildTable = "tCustomTable0"
tCustomRelation.tcChildTableDescription = "Province"
tCustomRelation.tlIsOneToOne = true.
Because this is the main table, you do not complete the tcParentTable field.
When creating a component that uses the Create/Modify/Delete/View activities, you require a Select query to run in the browse for the Modify, Delete, and View activities:
4 Uncomment the BCustom.ApiSelectCustom.after method and adding the following code:
define variable vhBuffer as handle no-undo.
define variable vhProvince as handle no-undo.
if not t_Parameter.ilCountOnly
then do:
create temp-table vhProvince.
vhProvince:create-like(buffer Province:handle).
vhProvince:add-new-field("tc_rowid", "character").
vhProvince:add-new-field("tiCustom[Province]_ID", "integer").
vhProvince:temp-table-prepare("tqApiSelectCustom").
vhBuffer = vhProvince:default-buffer-handle.
end.
for each Province no-lock:
if t_Parameter.ilCountOnly
then assign t_Parameter.oiCount = t_Parameter.oiCount + 1.
else do:
vhBuffer:buffer-create().
vhBuffer:buffer-copy(buffer Province:handle).
vhBuffer:buffer-field("tiCustom[Province]_ID"):buffer-value = Province.Province_ID.
vhBuffer:buffer-field("tc_rowid"):buffer-value = string(rowid(Province)).
end.
end.
if not t_Parameter.ilCountOnly
then t_Parameter.ozApiSelectCustom:set-buffers(vhBuffer).
assign t_Parameter.olEndOfQuery = true.
This creates a dynamic temp-table similar to the database table. Two fields are added: tc_rowid (required to make the framework work correctly) and tiCustom[Province]_ID (required to make the browse work correctly). Again, the code name between the square brackets needs to match the name of your custom component.
You also need to ensure that you have business field definitions for the fields used in the query:
5 Uncomment BCustom.GetBusinessFields.after and add the following code:
if t_Parameter.icReference = "ApiSelectCustom"
then do:
create tBusinessFields.
assign tBusinessFields.tcSideLabel = "Province Code"
tBusinessFields.tcColumnLabel = "Province"
tBusinessFields.tcControlType = "TextBox":U
tBusinessFields.tcFcFieldType = "F":U
tBusinessFields.tcDataType = "c":U
tBusinessFields.tcDisplayFormat = "x(20)"
tBusinessFields.tcLookupFilterField = ""
tBusinessFields.tcLookupQuery = ""
tBusinessFields.tcLookupReturnField = ""
tBusinessFields.tcRelatedObject = ""
tBusinessFields.tcFilterOperators = "":U
tBusinessFields.tcFcFieldName = "tCustomTable0.tcCustomShort0".
create tBusinessFields.
assign tBusinessFields.tcSideLabel = "Province Description"
tBusinessFields.tcColumnLabel = "Description"
tBusinessFields.tcControlType = "TextBox":U
tBusinessFields.tcFcFieldType = "F":U
tBusinessFields.tcDataType = "c":U
tBusinessFields.tcDisplayFormat = "x(40)"
tBusinessFields.tcLookupFilterField = ""
tBusinessFields.tcLookupQuery = ""
tBusinessFields.tcLookupReturnField = ""
tBusinessFields.tcRelatedObject = ""
tBusinessFields.tcFilterOperators = "":U
tBusinessFields.tcFcFieldName = "tCustomTable0.tcCustomLong0".
create tBusinessFields.
assign tBusinessFields.tcSideLabel = "Country Code"
tBusinessFields.tcColumnLabel = "Country"
tBusinessFields.tcControlType = "TextBox"
tBusinessFields.tcFcFieldType = "F":U
tBusinessFields.tcDataType = "c":U
tBusinessFields.tcDisplayFormat = "x(3)"
tBusinessFields.tcLookupFilterField = "tCountry.CountryCode"
tBusinessFields.tcLookupQuery ="BCountrySAO.SelectCountry"
tBusinessFields.tcLookupReturnField = "tqSelectCountry.tcCountryCode"
tBusinessFields.tcRelatedObject = ""
tBusinessFields.tcFilterOperators = ""
tBusinessFields.tcFcFieldName = "tCustomTable0.tcCustomShort1".
create tBusinessFields.
assign tBusinessFields.tcSideLabel = "Province Code"
tBusinessFields.tcColumnLabel = "Province"
tBusinessFields.tcControlType = "TextBox"
tBusinessFields.tcFcFieldName = "tqApiSelectCustom.ProvinceCode"
tBusinessFields.tcFcFieldType = "B"
tBusinessFields.tiSequence = 0
tBusinessFields.tcDataType = "c"
tBusinessFields.tcDisplayFormat = "x(20)".
create tBusinessFields.
assign tBusinessFields.tcSideLabel = "Province Description"
tBusinessFields.tcColumnLabel = "Description"
tBusinessFields.tcControlType = "TextBox"
tBusinessFields.tcFcFieldName ="tqApiSelectCustom.ProvinceDescription"
tBusinessFields.tcFcFieldType = "B"
tBusinessFields.tiSequence = 1
tBusinessFields.tcDataType = "c"
tBusinessFields.tcDisplayFormat = "x(40)".
create tBusinessFields.
assign tBusinessFields.tcSideLabel = "Country Code"
tBusinessFields.tcColumnLabel = "Country"
tBusinessFields.tcControlType = "TextBox"
tBusinessFields.tcFcFieldName = "tqApiSelectCustom.CountryCode"
tBusinessFields.tcFcFieldType = "B"
tBusinessFields.tiSequence = 2
tBusinessFields.tcDataType = "c"
tBusinessFields.tcDisplayFormat = "x(3)".
end.
Notice that some business fields have tcFcFieldType set to F. These fields appear in the filter of the browse. It is important to ensure that the tcFcFieldName field matches the name defined for the fields in the custom table you are using. Note also that the lookup fields are completed for the Country Code filter field. Here we reuse the existing lookup for Countries so the user can select a country on which to filter.
You can also notice that some business fields have tcFcFieldType set to B. These fields appear in the results grid of the browse. Use the tiSequence field to define the initial order of the columns in the grid. You can use any value for the tcFcFieldName field, providing it begins with tqApiSelectCustom and does not contain more that one “.”.
You now create code to load data from the new database into the custom table:
6 Uncomment the BCustom.DataLoad.after method and add the following code:
define variable viA as integer no-undo.
if t_Parameter.icPKeys <> "" and
t_Parameter.icPKeys <> ?
then do viA = num-entries(t_Parameter.icPKeys, chr(4)) to 1 by -1:
find Province where
Province.Province_ID = int(entry(viA, t_Parameter.icPKeys, chr(4)))
no-lock no-error.
if not available Province
then do:
run SetMessage(
input "Province with ID $1 not found.",
input entry(viA, t_Parameter.icPKeys, chr(4)),
input "",
input "",
input "E",
input 3,
input "",
input "PROVINCE-6",
input "",
input "",
input "",
output t_Parameter.oiReturnStatus).
assign t_Parameter.oiReturnStatus = -1.
return.
end.
create tCustomTable0.
create t_iCustomTable0.
assign tCustomTable0.tiCustomInteger0 = Province.Province_ID
tCustomTable0.tcCustomShort0 = Province.ProvinceCode
tCustomTable0.tcCustomLong0 = Province.ProvinceDescription
tCustomTable0.tcCustomShort1 = Province.CountryCode
tCustomTable0.tc_Rowid = string(rowid(Province)).
buffer-copy tCustomTable0 to t_iCustomTable0.
end.
if t_Parameter.icRowids <> "" and
t_Parameter.icRowids <> ?
then do viA = num-entries(t_Parameter.icRowids) to 1 by -1:
find Province where
rowid(Province) = to-rowid (entry(viA, t_Parameter.icRowids))
no-lock no-error.
if not available Province
then do:
run SetMessage(
input "Province with RowID $1 not found.",
input entry(viA, t_Parameter.icRowids),
input "",
input "",
input "E",
input 3,
input "",
input "PROVINCE-7",
input "",
input "",
input "",
output t_Parameter.oiReturnStatus).
assign t_Parameter.oiReturnStatus = -1.
return.
end.
create tCustomTable0.
create t_iCustomTable0.
assign tCustomTable0.tiCustomInteger0 = Province.Province_ID
tCustomTable0.tcCustomShort0 = Province.ProvinceCode
tCustomTable0.tcCustomLong0 = Province.ProvinceDescription
tCustomTable0.tcCustomShort1 = Province.CountryCode
tCustomTable0.tc_Rowid = string(rowid(Province)).
buffer-copy tCustomTable0 to t_iCustomTable0.
end.
Note that the fields tiCustomInteger0, tcCustomShort0, tcCustomLong0, and tcCustomShort1 are used to store new data. You later define those fields as user-defined fields for the Province component, in the same way as you define user-defined fields for any component.
You now write the code required to create a new Province.
7 Uncomment the BCustom.DataNew.after method and add the following code:
define variable vhPersistence as handle no-undo.
run AddDetailLine(
"CustomTable0",
"",
output t_Parameter.oiReturnStatus).
run StartPersistence(output vhPersistence, output t_Parameter.oiReturnStatus).
if t_Parameter.oiReturnStatus < 0
then return.
assign tCustomTable0.tiCustomInteger0 = dynamic-function("GetNextValue" in vhPersistence, "ObjectNumber").
The standard mechanism is used to assign a new value to the Province_ID (tiCustomInteger0) field.
You now write the code required to validate the data entered by the user:
8 Uncomment the BCustom.ValidateComponent.after method and add the following code:
for each t_sCustomTable0 where
t_sCustomTable0.tc_Status = "N" or
t_sCustomTable0.tc_Status = "C":
if t_sCustomTable0.tc_Status = "C"
then do:
find t_iCustomTable0 where
t_iCustomTable0.tc_Rowid = t_sCustomTable0.tc_Rowid
no-error.
if not available t_iCustomTable0
then do:
run SetMessage(
input "t_iCustomTable0 with rowid " + t_sCustomTable0.tc_Rowid + " not found.",
input "",
input "",
input "",
input "E",
input 3,
input t_sCustomTable0.tc_Rowid,
input "PROVINCE-1",
input "",
input "",
input "",
output t_Parameter.oiReturnStatus).
assign t_Parameter.oiReturnStatus = -3.
return.
end.
if t_sCustomTable0.tcCustomShort0 <> t_iCustomTable0.tcCustomShort0
then do:
run SetMessage(
input "It is not allowed to change the Province Code of an existing Province.",
input "",
input "tCustomTable0.tcCustomShort0",
input t_sCustomTable0.tcCustomShort0,
input "E",
input 3,
input t_sCustomTable0.tc_Rowid,
input "PROVINCE-2",
input "",
input "",
input "",
output t_Parameter.oiReturnStatus).
assign t_Parameter.oiReturnStatus = -1.
end.
end.
else
if can-find(first Province where
Province.ProvinceCode = t_sCustomTable0.tcCustomShort0)
then do:
run SetMessage(
input "Province already exists.",
input "",
input "tCustomTable0.tcCustomShort0",
input t_sCustomTable0.tcCustomShort0,
input "E",
input 3,
input t_sCustomTable0.tc_Rowid,
input "PROVINCE-3",
input "",
input "",
input "",
output t_Parameter.oiReturnStatus).
assign t_Parameter.oiReturnStatus = -1.
end.
if t_sCustomTable0.tcCustomShort1 <> "" and
(t_sCustomTable0.tc_Status = "N" or
t_sCustomTable0.tc_Status = "C" and
t_sCustomTable0.tcCustomShort1 <> t_iCustomTable0.tcCustomShort1)
then do:
if not can-find(first Country where Country.CountryCode = t_sCustomTable0.tcCustomShort1)
then do:
run SetMessage(
input "Invalid country code.",
input "",
input "tCustomTable0.tcCustomShort1",
input t_sCustomTable0.tcCustomShort1,
input "E",
input 3,
input t_sCustomTable0.tc_Rowid,
input "PROVINCE-4",
input "",
input "",
input "",
output t_Parameter.oiReturnStatus).
assign t_Parameter.oiReturnStatus = -1.
end.
end.
end.
You finally require code to store the new and modified data in the database.
9 Uncomment the BCustom.DataSave.after method and add the following code:
for each tCustomTable0 where
tCustomTable0.tc_Status <> "":
if tCustomTable0.tc_Status = "C" or
tCustomTable0.tc_Status = "D"
then do:
find Province where
Province.Province_ID = tCustomTable0.tiCustomInteger0
exclusive-lock no-error.
if not available Province
then do:
run SetMessage(
input "Province $1 not found.",
input tCustomTable0.tcCustomShort0,
input "",
input "",
input "E",
input 3,
input "",
input "PROVINCE-5",
input "",
input "",
input "",
output t_Parameter.oiReturnStatus).
assign t_Parameter.oiReturnStatus = -1.
return.
end.
if tCustomTable0.tc_Status = "D"
then do:
delete Province.
next.
end.
end.
else do:
create Province.
assign Province.Province_ID = tCustomTable0.tiCustomInteger0.
end.
assign Province.ProvinceCode = tCustomTable0.tcCustomShort0
Province.ProvinceDescription = tCustomTable0.tcCustomLong0
Province.CountryCode = tCustomTable0.tcCustomShort1.
end.
Important: In order to compile this code, the application database and your custom database (if you created one) must be connected.
10 Compile the custom code by executing the build.p.
Make sure the build.p contains the following line:
compile value("bcustom[province].p") save into C:\Work\Foundation\mycustomizations\customcode.
The folder you save the code into must be the folder where your custom compiled code is located.
11 Trim the Financials appserver to make sure the customization controller picks up the changed file.
Deploying the New Component in the Application.
1 Run the application.
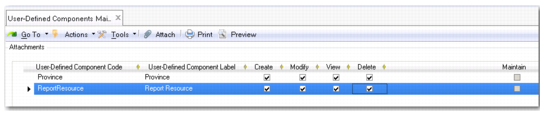
2 Run the User-Defined Components Maintain menu option and do the following:
a Insert a new row in the grid.
c Click on the Save button to save the definition of your user-defined component.
User-Defined Components Maintain
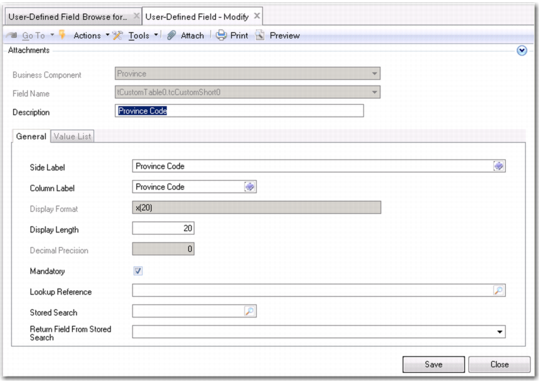
3 Use User-Defined Field Create to create a user-defined field for each field you used in your custom code.
In this example, you need a field for tCustomTable0.tcCustomShort0, tCustomTable0.tcCustomLong0 and tCustomTable0.tcCustomShort1.
Note: You do not define a field for tCustomTable.tiCustomInteger0. This field in the code contains the Province_ID, which should not be visible in the interface.
User-Defined Field, Province
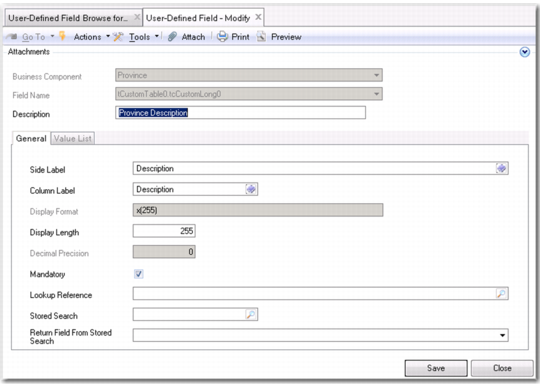
User-Defined Field, Province Description
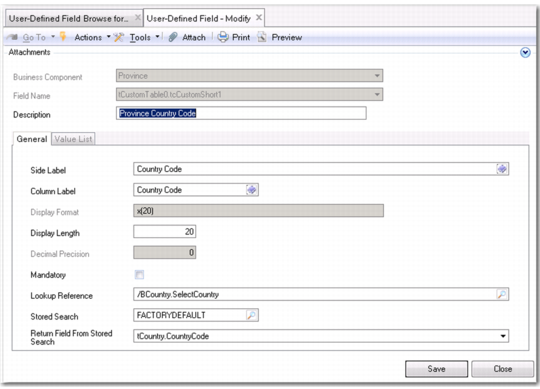
User-Defined Field, Province Country
Because the existing country lookup is linked to the country code field, the user can select a country instead of typing an existing country code.
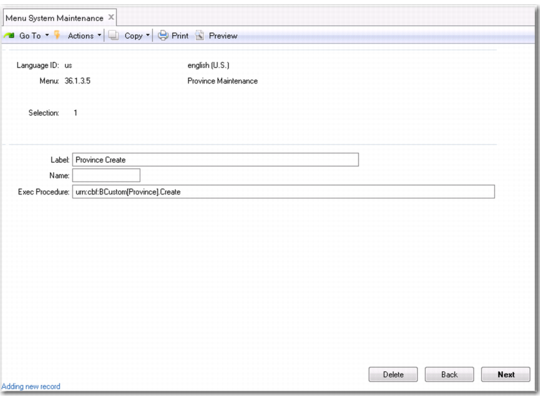
4 Create menu items for the activities using Menu System Maintenance.
Menu System Maintenance
Again, the code name between the square brackets in the Exec Procedure field must match the code of your custom component exactly.
Do the same for the Modify, View and Delete activities.
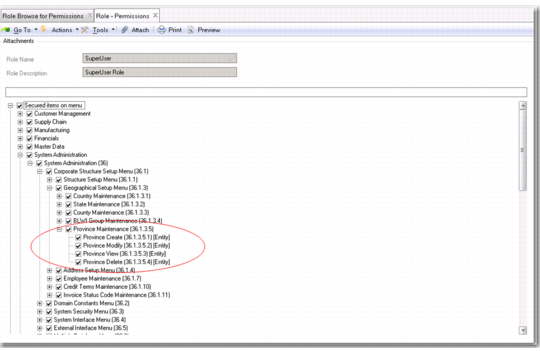
5 In Role Permissions Maintain, double-click on each role that requires permissions for the Province activities and link those activities to the role.
Role Permissions Maintain
6 Log out of the application and back in again to ensure the new menu items are deployed.
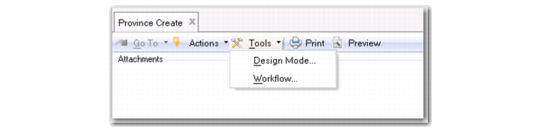
7 Run Province Create.
Province Create
An empty form is displayed. You must still design the layout of the form.
8 Click on Tools/Design Mode.
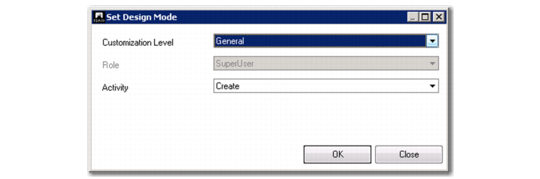
Design Mode, Customization Level
9 Select General as the Customization Level.
This ensures that your design can be used by all users that have rights to execute Province Create.
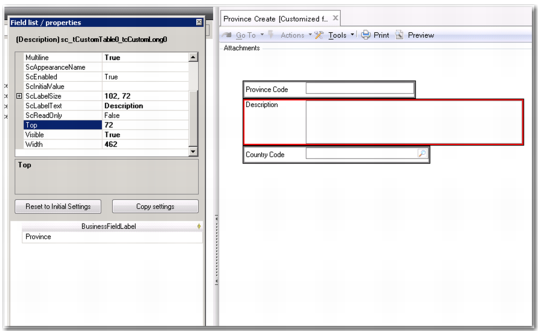
The Field List/Properties dialog is displayed. Collapse or expand the fields of the Province table by clicking the icon.
Field List/Properties Dialog
You can choose to drag and drop the entire Province table to your form. However, this results in a grid, which is more normally used in maintenance components. Because you are using the Create/Modify/View/Delete activities, you drag and drop each field individually to your form.
Customized Province Form
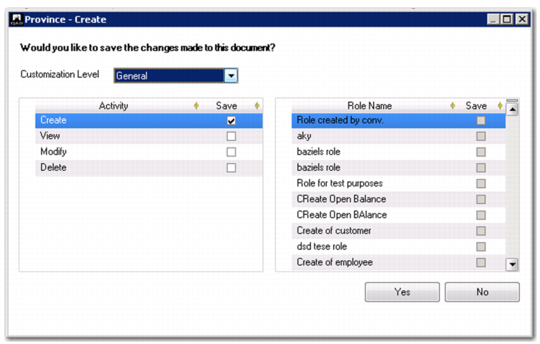
When you close the design form, you are prompted to save your changes.
Province Form Save Changes
You normally use the same form layout for the View, Modify, and Delete activities.
10 Select the Save field for these activities and click to save the new form design.
11 Test all activities for the Province program in the application.