Designing Data Integration Worksheet Templates
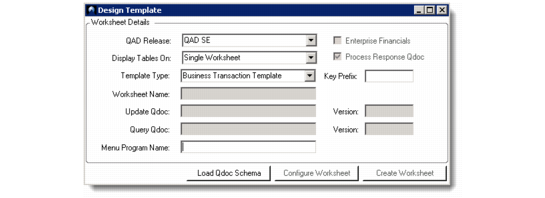
1 Under the Developer tab in the Ribbon, click Design Template. The pop-up window displays worksheet details settings.
Design Template
2 In the QAD Release field, select the version of the source and target QAD Enterprise Applications.
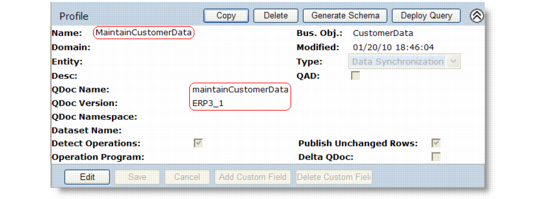
The Query QDoc name and version in the screen map to a corresponding profile defined in QXtend Outbound. For example, a worksheet has been designed to work with the Customer Data QDoc. It means that the maintainCustomerData QDoc API has been imported to the worksheet. In QXtend Outbound, there is a corresponding profile defined called MaintainCustomerData.
Profile in QXO
After the MaintainCustomerData profile has been deployed as a query to QXtend Inbound, it is available for use with the worksheet.
The version of the query QDoc depends on what QAD release has been selected, as follows:
QAD Enterprise Applications Release | Default Version |
QAD EE | ERP2_1 |
QAD SE | eB21_1 |
eB2.1 | eB21_1 |
eB2 | eB2_1 |
eB | eB_1 |
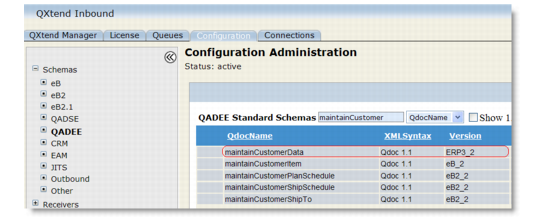
The versions for QAD EE QDocs are displayed in QXtend Inbound as follows:
QAD EE QDoc Versions
3 In the Display Tables On field, specify whether you want to display all data in a single worksheet or create a separate worksheet for each table.
Note: When custom add-ins are deployed in your Excel, the application may become unstable and unresponsive when the number of worksheets in the file exceeds three. When this situation occurs, use the Single Worksheet option or uninstall the custom add-ins.
4 From the Template Type list, select a worksheet template type. This defaults from the QAD QXtend Excelerator settings. See
Template Type.
If you select the business transaction template type, specify the Key Prefix value and the Process Response QDoc option. These default from the QAD QXtend Excelerator settings. See
Key Prefix and
Process Response QDoc.
5 Click Load QDoc Schema, and then locate a QDoc file to load into the worksheet.
Only QDoc 1.1 syntax schemas are compatible with Excelerator.
The schemas are located in the WEB-INF/schemas directory of the QXtend Inbound application. To identify the correct version of the schema to import, view the schema information displayed in the Schema View in Configuration Manager in QXtend Inbound.
For example, for the QAD EE maintainCustomerData QDoc, the Schema View shows that its version number is ERP3_2, so you need to retrieve maintainCustomerData-ERP3_2.xsd from the TOMCAT_HOME/webapps/<QXI webapp>/WEB-INF/schemas/QADEE directory.
Schema View
The tool processes the QDoc schema, imports all the tables and fields into the worksheet, and automatically fills the appropriate values into the Worksheet Name, Update QDoc, and Query QDoc fields based on the QDoc data.
The Menu Program Name field displays the menu program the QDoc API relates to. This information is also used when retrieving menu-specific column labels and authenticating Query QAD requests (QAD SE and QAD EE only).
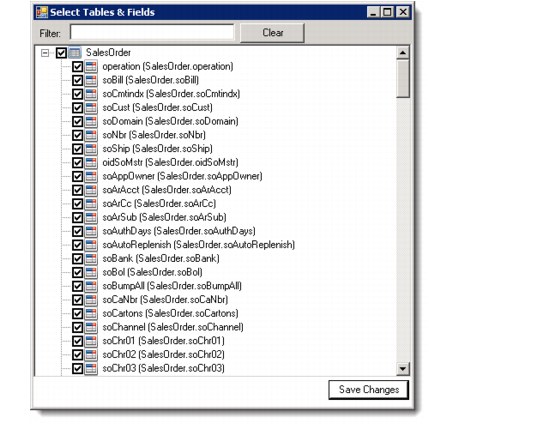
6 Optionally, click Configure Worksheet to customize the schema in the worksheet. In the Select Tables and Fields window, select the tables and fields you want in the worksheet. You can use the Filter to quick search for fields.The tool automatically select table primary keys.
Note: Column labels are only retrieved for 2009 and later releases of QAD EE and QAD SE.
To enable this functionality, configure a connection pool of type SIAPI in QXtend Outbound. The name of the connection pool must be same as the Update Receiver specified in the Excelerator Settings panel.
For details on configuring connection pools, see User Guide: QAD QXtend.
Select Tables and Fields
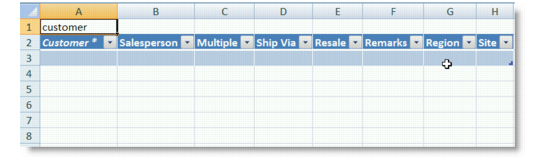
7 Click Create Worksheet. If you chose to create a single worksheet, the tool creates a worksheet with tables and fields from the schema translated into rows and columns. If you chose to create multiple worksheets, the tool creates a separate worksheet for each table from the schema. Primary keys in tables are marked with an asterisk (*). In the worksheet, operation and index fields are displayed in the same sequence as in the QDoc; all other fields are sorted in alphabetical order.
Worksheet with Schema
8 Save the Excel file. You can now use the blank worksheets for entering data, querying data from the QAD application, and updating data to the QAD application.