Migrating QXtend
Select the Host and Modules to Migrate
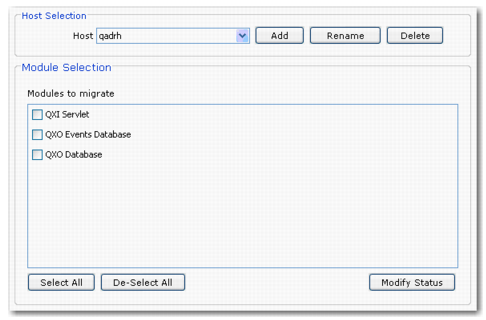
Choose Host and Install Set
1 In the Host Selection panel, enter the host on which to install the components.
2 Use the Add and Delete buttons to create and delete hosts as required.
3 In the Module Selection panel, select the components to migrate on the specified host.
4 Click Next to display the Module Copy Selection screen.
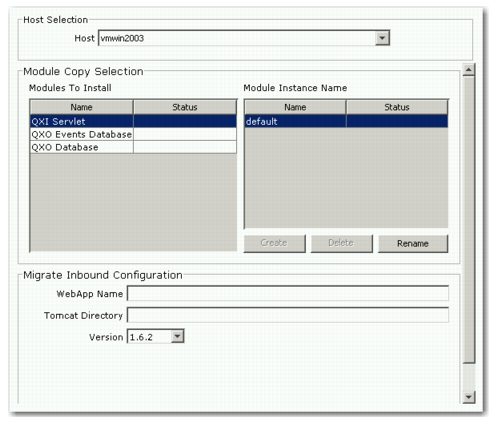
Module Copy Selection
The component list on the left shows the components available for installation. The Status column to the right indicates the installation status of each component. The first time the installer is run, the Status column is blank. After a migration, the Status column shows Incomplete, indicating the component was not migrated successfully, or Complete, indicating the component was migrated successfully.
5 For each selected component, do the following as required:
a Create, rename, or delete instances.
Note:
• New instances are enabled only for the QXO Events database.
• If you select QXO Database, a warning appears that says “PLEASE NOTE: The destination QXODB will lose any existing configuration.”
b Assign the required components to an instance. Select the check box for a component when its corresponding instance is highlighted.
c For each selected component for that instance, enter all of the required parameter settings as described in the following sections.
Note: You cannot select a different component until you have entered all of the required configuration information for the currently selected component. The required fields are highlighted in orange.
Configure the QXI Servlet
6 In the Migrate Inbound Configuration panel, complete the required fields.
WebApp Name
Enter the application name known to the Tomcat application server.
Tomcat Directory
Enter the location of the home directory where Tomcat is installed.
Version
Select the version being migrated from the drop-down list.
7 If necessary, select the next component to configure.
Configure the QXO Events Database
8 In the Migrate QXEvents Configuration panel, complete the required fields.
Physical Name
Enter the physical name of the qxevents database.
Connection type
Select Local or Network.
Multi-User
Select this option if your database is operating in multi-user mode. If you use this option, you may not have to shut down your database before you install QAD QXtend. However, QAD recommends that you shut down your qxevents database.
Database Directory
Enter the location of the database directory where the source qxevents database is installed.
Host
Enter the name of the host where the QAD Enterprise Applications database is installed.
Service Name
Enter the network service the QAD Enterprise Applications database uses.
Version
Select the version being migrated from the drop-down list.
9 If necessary, select the next component to configure.
Configure the QXO Database
10 In the Migrate QXODB Configuration panel, complete the required fields.
Physical Name
Enter the physical name of the QXO database
Connection Type
Select Local or Network.
Multi-user
Select this option if your database is operating in multi-user mode. If you use this option, you may not have to shut down your database before you install QAD QXtend. However, QAD recommends that you shut down your qxevents database.
Database Directory
Enter the location of the database directory where the source QXO database is installed.
Host
Enter the name of the host on which the QAD Enterprise Applications database is installed.
Service Name
Enter the network service the QAD Enterprise Applications database uses.
Version
Use the drop-down list to select the version being migrated.