Installing QXtend
QXtend Installation Settings
QXtend installation involves the automatic or manual population of fields on one or more screens. During installation, hovering over a field label displays the corresponding parameter name. Likewise, hovering over the field displays the fully resolved parameter as a tool tip. For more information on dynamic parameter referencing, see
Tokens.
QXtend Installation Settings
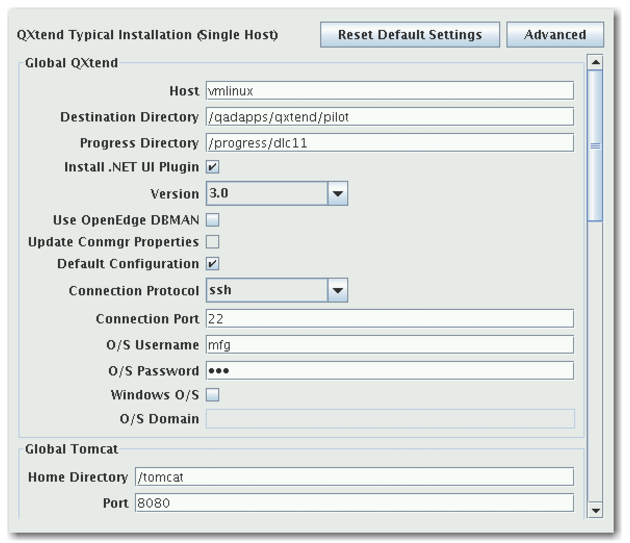
1 Enter the necessary information in the QXtend Typical Installation (Single Host) screen:
Host
Enter the name of the host where the QAD Enterprise Edition qaddb is installed.
Destination Directory
Enter the directory where the QXtend adapter is located.
Install .NET UI Plugin
Select this check box if you want to install the .NET UI plug-in.
Version
Select the .NET UI version from the drop-down list.
Use OpenEdge DBMAN
Select this check box to use DBMAN to manage the QXO and qxevent databases. This box is enabled only if you specify QAD EE 2011.1 or later.
Update Conmgr Properties
Select this check box to update the $DLC/properties /conmgr.properties file using the installer. Not selecting this box allows you to update the file manually. This box is only enabled if Use OpenEdge DBMAN is selected.
Default Configuration
Select this check box to load QXtend with an initial set of default configuration parameters. See
Default Configuration for more information.
Connection Protocol
The connection protocol for the UI connection pool. The options are telnet and ssh.
Connection Port
The connection port for the UI connection pool. The default values are 23 for telnet and 22 for ssh.
O/S Username
The user name for the destination host operating system.
O/S Password
The password for the destination host operating system.
Windows O/S
Select this box if the destination host uses the Windows operating system.
O/S Domain
The name of the domain to which the destination host belongs. The field is only enabled if the destination host operating system is Windows.
If the QAD Enterprise Application is running on an Oracle database, and you select Oracle as the Database Type in the MFG/PRO panel, a new panel (shown in the following figure) appears at the bottom of Typical Installation.
Oracle Settings
Enter the necessary information in the Oracle screen:
Home Directory
The home directory for the Oracle database.
System ID (SID)
The system ID for the Oracle database.
NLS_LANG.
The NLS_LANG environment variable setting for the Oracle database.
Logical Name
The logical name of the Oracle database.
Connection Parameters
Additional Oracle database connection parameters.
QXtend Net Service Name
The Oracle net service name for QXtend.
QXO Oracle User Name
The Oracle user name for the QXO database.
QXO Oracle User Password
The Oracle user password for the QXO database.
QXEvents Oracle User Name
The Oracle user name for the QXEvents database.
QXEvents Oracle User Password
The Oracle user password for the QXEvents database.
2 QXtend provides two installation methods: Typical and Advanced.
Typical Installation is a simplified install process that automatically fills the QXtend installer fields with parameters for a default QXtend installation. For detailed information regarding default installation parameters, see
Typical Installation Parameters.
Advanced Installation allows you to individually enter the parameters to create a custom QXtend configuration. You are also able to add additional QXtend adapters and QXO Events Databases according to the number of QAD Enterprise Application installations. Finally, if you want to modify any of the default configuration parameters, use QXtend’s advanced installation mode.
To continue with a typical installation, click Next and go to
Review the Pre-installation Summary.
To perform a custom installation, click Advanced and go to
Advanced Installation.