Profiles
Profiles are views of business objects tailored for the requirements of specific subscribers.
To select which components of a business object are sent to which subscribers, QXO lets you define profiles. The way you define a profile is nearly identical to the way you define a business object.
Business objects and profiles are closely linked. When you create or copy a business object, a default profile with the same name is automatically created for it. Default profile cannot be modified by user since it should be always consistent with the business object. When you add or delete tables or fields from a business object, the change is automatically reflected in the associated profiles as well. If you change the name of a business object, a new default profile with the same name as the new business object name is created for it. Any existing profiles associated with the business object remain unchanged.
Profiles are the means you use to select which components of a business object are sent to subscribers. The method of defining a profile is nearly identical to the method of defining a business object; however, unlike business objects, profiles always start as a copy of a default profile.
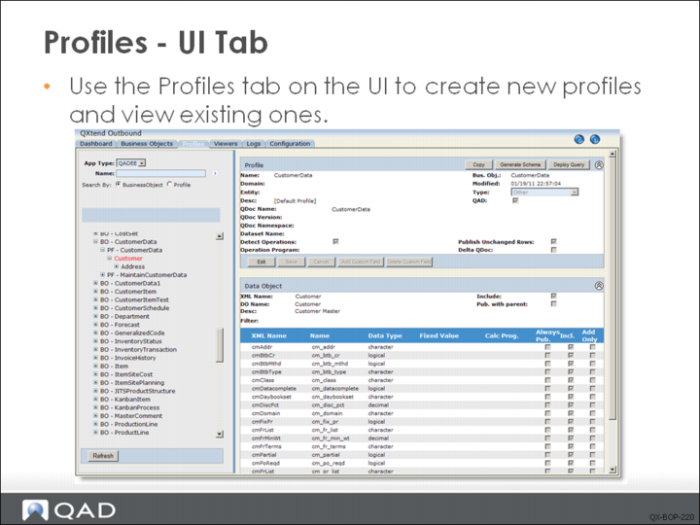
When you click the Profiles tab, the Profiles screen displays.
Creating Profiles
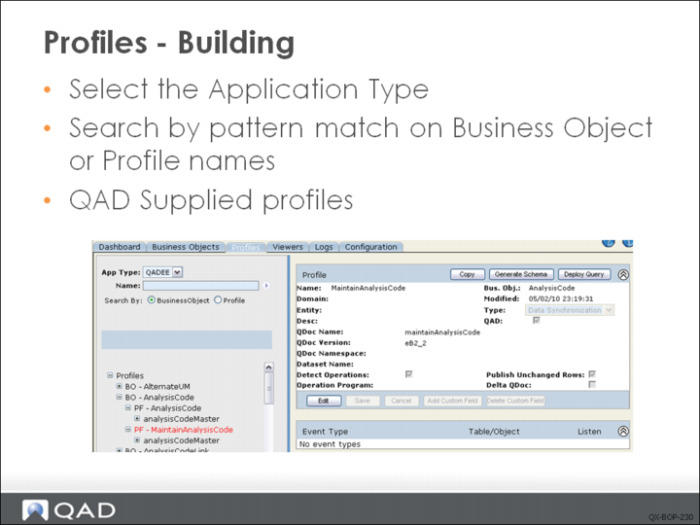
Since you cannot edit the QAD-supplied profiles or create a new one, you must copy an existing profile and modify it. Select the application type, and then search by pattern match on business object or profile name.
For a QAD-defined business object, usually you can see following QAD-supplied profiles.
• Default profile. Every business object has a default profile which has the same name with the BO. If the BO is defined by QAD, then the default profile is also supplied by QAD.
• Data synchronization profile. This profile is used to synchronize data between different QAD enterprise application instances (or different domains). The profile’s Qdoc Name and Qdoc Data match corresponding API in QXI.
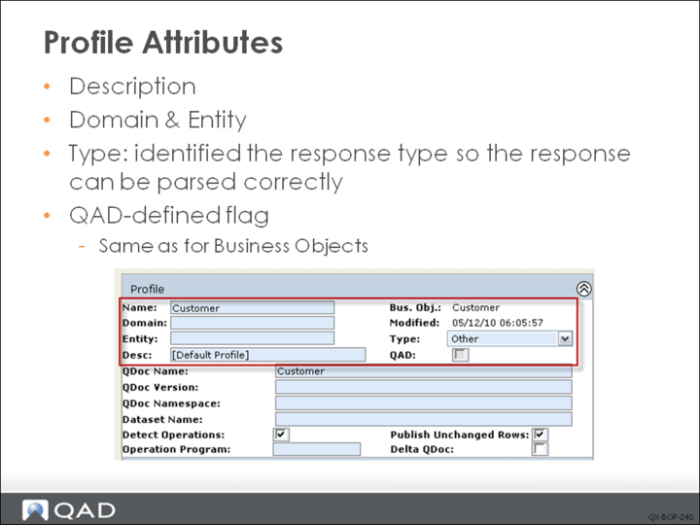
Define the required attributes, as shown in the slide.
Name
Only alphanumeric characters, dash, and underscore are allowed in profile QDoc names.
Domain & Entity
For eB2.1 or above databases, specify the domain and entity associated with the profile. If you leave this field blank, the profile applies to all domains in the database. If a domain value and/or entity is specified, the profile only sends QDocs for events extracted from the specified domain/entity. For other application types, you can use domain according to your own business requirements or leave it blank.
Type
There are following types available:
• Data Synchronization: The subscriber of the profile is another instance of QAD Enterprise Applications or an add-on application. You normally use this profile type for data synchronization.
• QAD Alerts: The subscriber of the profile is QAD Alerts.
• QAD BPM: The subscriber of the profile is QAD BPM.
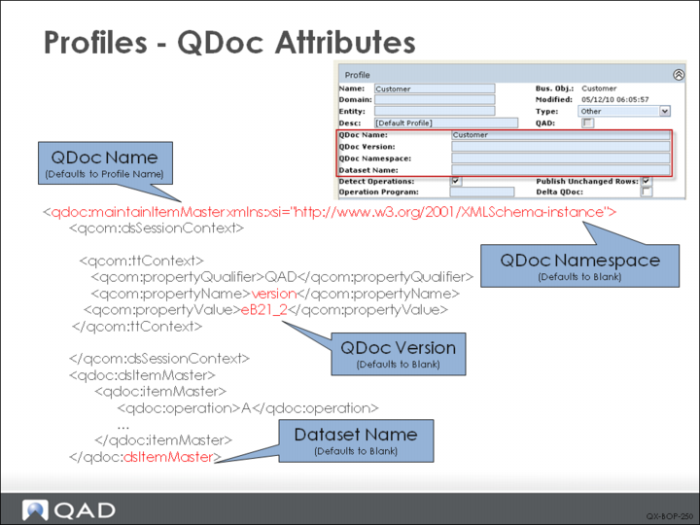
The QDoc name is the top level node name of the body of the request. The version of the QDoc is stored in the session context section. Look for the session context node where the propertyName is “version”. The “propertyValue” node contains the version of the QDoc.
In the case of a QXtend Web Service subscriber, the QDoc name and version are used as part of the validation in the QXtend Inbound web service. An incoming QDoc must have a valid QDoc name and version before being passed through to the target receiver.
The Dataset Name specifies the name of the root node in the QDoc XML.
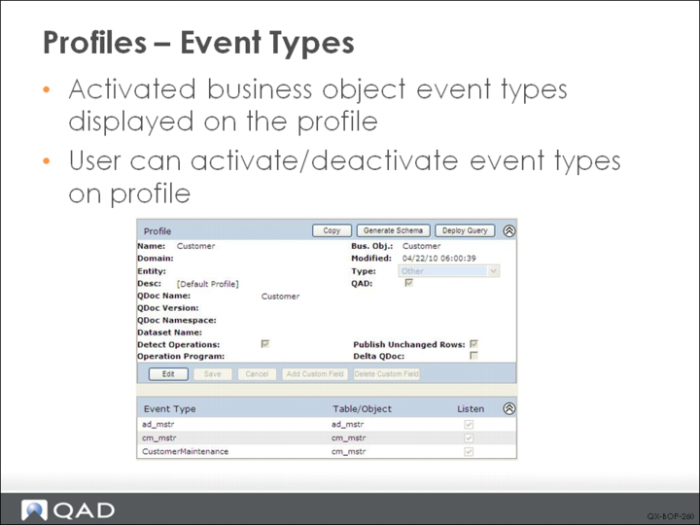
You can now specify which events must occur in order for a profile to be published by enabling the Listen check box for selected events. By default the Listen check box is enabled for all event types for the profile.
The event types that are available are the activated event types for all data objects in the business object related to the profile. Hence these event types are related to the profile as a whole, not to a specific data object. The profile event types do not appear when editing a data object for the profile.
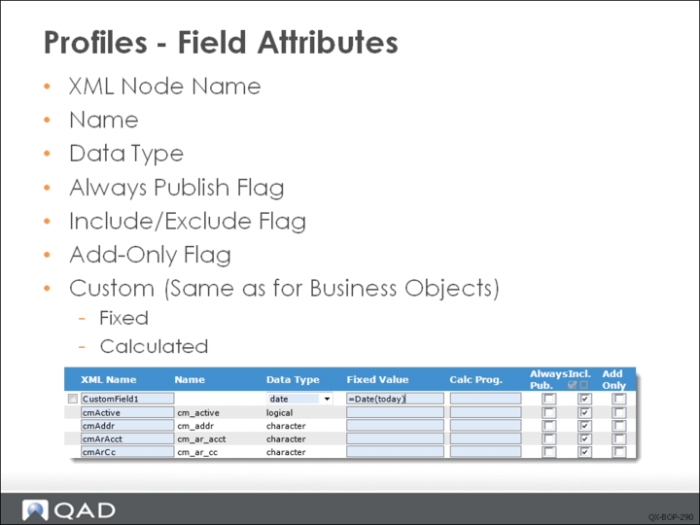
The following data object attributes are required:
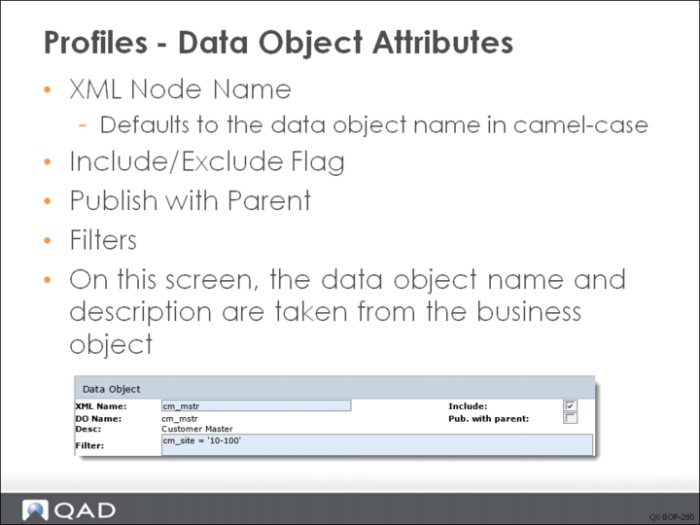
• XML Node Name: The name of the XML element or node for the data object in published QDocs. Defaults to the data object name in camel-case.
• Include: Select the check box if you want this data object to be included in QDocs generated based on this profile. This setting applies to all of the fields in the object. When you include the object, you can also determine on a field-by-field basis which fields to include.
• Publish with Parent: Indicate if you want the fields in this data object to be published automatically whenever data in the business object’ parent is published. For example, when a field associated with a sold-to customer changes, you may always want to publish the sold-to customer address.
• Filter: Optionally, enter filter criteria to limit the data extracted from the application. The filter uses Progress 4GL expressions. Profiles can even filter on values that are derived from fixed values and calculated programs.
XML Node Name
It is the name that appears in the XML document for the element representing this field. Defaults to database field name converted to camel-case.
Name and Data Type
They are not editable, taken from the Business Object.
Always Publish Flag
It applies only to Delta QDocs. Indicates that the field is displayed even if unmodified.
Include/Exclude Flag
Whether this field is included in profile.
Add Only
Indicate if you want to include this field in the resulting QDoc if the operation is an ADD operation.
By using the Add Only check box, you can define the fields that are locally owned by the target application, and update transactions in the target application without overwriting locally owned data. Selecting the Add Only check box automatically selects the Include check box.
Any field that is specified as Add Only must have its Always Publish check box disabled and the Default Operations check box selected. On saving the data object, the system displays an error message for fields that have incorrect check box selections. An error also displays if Add Only is selected for a key field.
Fixed value fields can contain Progress expressions and perform built-in Progress calculations; for example, =today+2. Fields from the current buffer can be referenced in this calculation by including the XML node name surrounded by dollar ($) characters. The expression must start with an equals (=) character; for example, =substring($ptDesc1$,1,12).
QDoc Operations
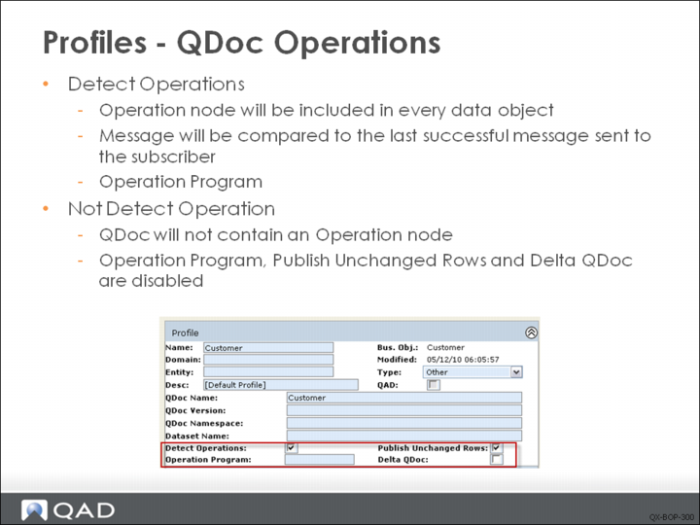
Detect Operations
If you select this field without specifying an operation program, an operation node will be included in every data object in the QDoc, and the message will be compared to the last successful message sent to the subscriber to determine the operation of each data object. If you select the field and specify an operation program, the program must determine what the operation is and enter the result into a field on each data object in the profile.
If you leave the field blank, the QDoc will not contain an Operation node and will create a subscriber message based entirely on the current raw message.
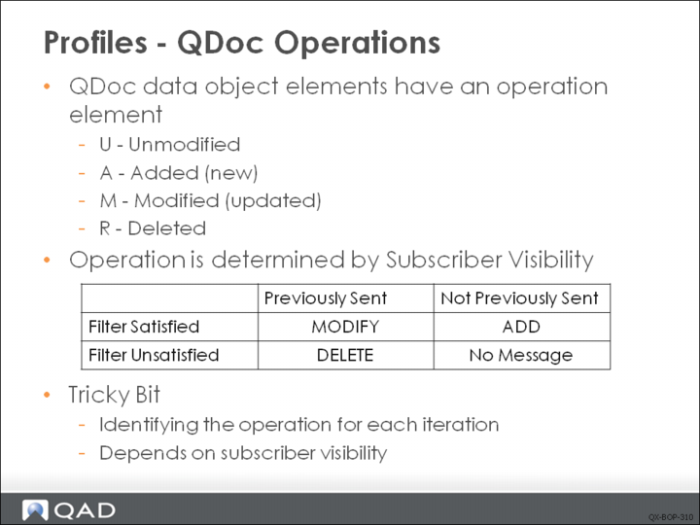
Some planning and consideration are needed when applying filters to profiles and business objects. Depending on what filters you define in the business objects or, more typically, in the profiles, a subscriber may have interrupted visibility to some data changes.
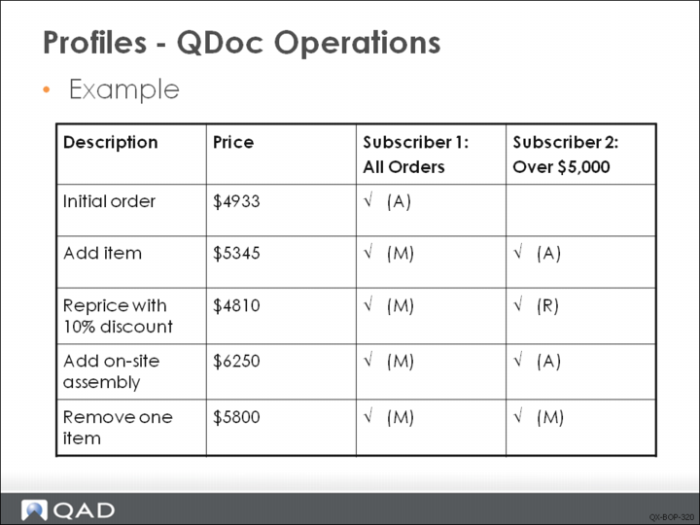
The table shows the QDocs generated for one sales order for two different profiles; one receives all sales orders and the other filters only for sales orders over $5,000.
Subscriber 1 sees all the changes, while Subscriber 2 only sees some of the changes.
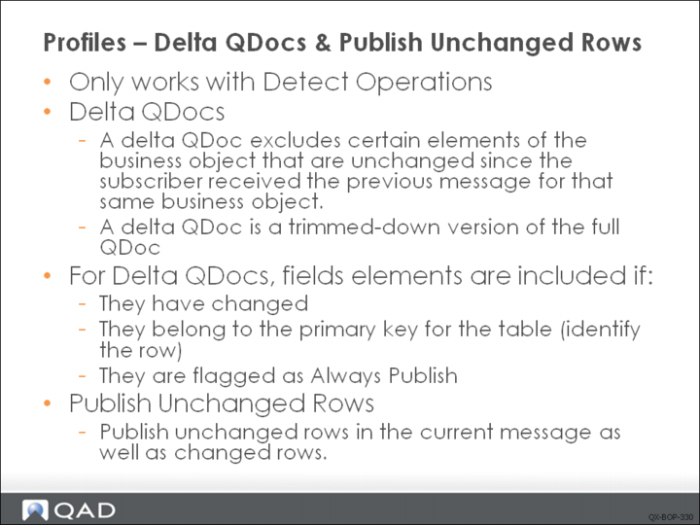
Delta QDocs
Delta Qdoc
Indicates whether this profile will send delta QDocs or complete QDocs. A delta QDoc excludes non-primary elements of the business object that have not changed since the last update. If a field is tagged Always Publish in the business object, it overrides the delta setting here.
Publish Unchanged Rows
Select the field if you want to publish unchanged rows in the current message as well as changed rows. To publish changed rows only, clear the check box.
Publish Unchanged Rows only works with Detect Operations and operates in a similar way to delta QDocs, except at the table level rather than the field level.
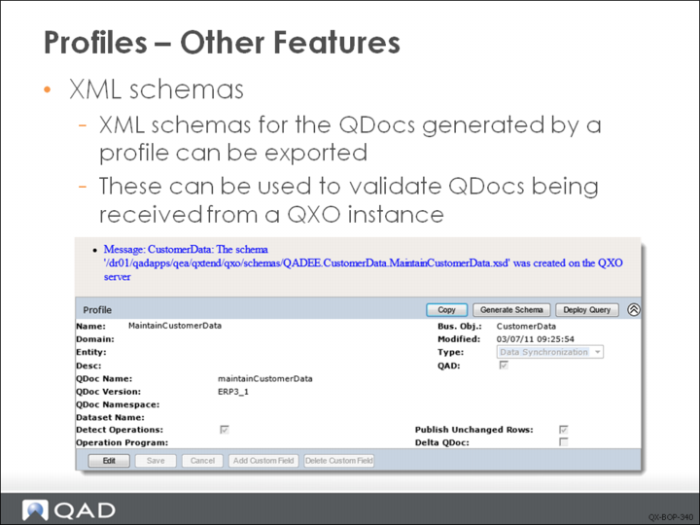
XML Schemas
Exercise: Profiles
The following list shows a number of key concepts used in the profiles in QXO. In each statement below, fill in the correct term from the list.
message publisher | fields |
add-only | always publish |
tables | profiles |
qxodb | QDoc |
delta QDoc | A |
M | R |
publish unchanged rows | |
1 You use ______ to tailor a view of a business object for a specific subscriber.
2 If you add or delete ______ and/or ______ from a business object, these changes are automatically reflected in the associated profile.
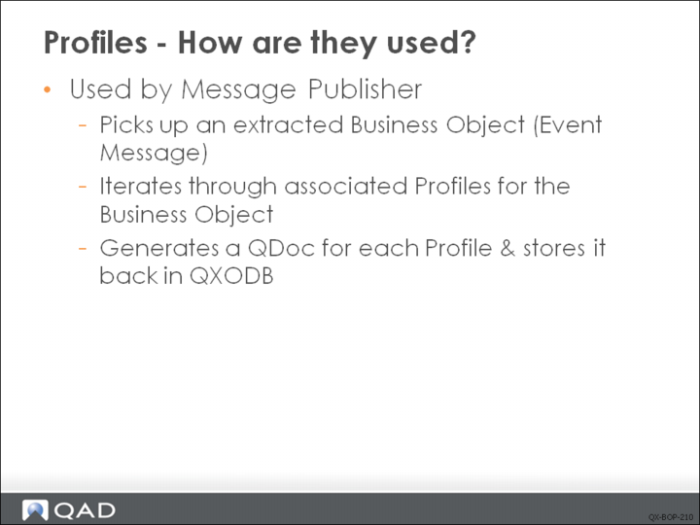
3 Profiles are used by the ______.
4 The message publisher picks up the extracted business object and iterates through the profiles associated with the business object. It then generates a ______ for each profile and stores the QDoc in the ______ database.
5 A ______ excludes non-primary elements of the business object that have not changed since the last update.
6 When Detect Operation is set to true, and no previous subscriber message of a particular Item data has been sent to target application, then, if you update this item, QXO will deliver a subscriber message with operation ______; Then, if you change this item, QXO will deliver a subscriber message with operation ______; finally, when you delete the item, QXO will deliver a subscriber message with operation ______.
7 If you want to synchronize data to target application but don not want to overwrite locally owned data in target application, you set those locally owned data fields as ______.
8 When delta Qdoc is set to true, if you want to publish a child data object even it has not been changed, you set ______ to true; if you want to publish a field even it has not been changed, you set ______ to true.
Lab: Business Objects and Profiles
QAD QXtend 1.8.4 has been installed with both QXI and QXO components. In the previous labs you performed the basic configuration that is required to enable requests to be processed by QXI and QXO. In the following lab exercises you will build your own business objects and profiles that can be used to pass data to QXI.
In the QXO Configuration lab you learned how to synchronize Generalized Code data from a master domain to several target domains using the standard business objects and profiles that were shipped with QAD QXtend. The tools provide by QXO allow you to build complex business objects that reflect the data structures in the source application. The profiles then map the business object into the format required by the subscribing applications. The QXO toolset provides a powerful, flexible mechanism for accessing data in QAD EA.
1. Generalized Code Data Synchronization
In the QXO Configuration lab exercises you have already performed the synchronization of Generalized Code data between domains in QADEE. However, in the QGen lab you created a new schema for Generalize Codes Maintenance and you need to use this new schema for the synchronization of the data. Normally you would modify the business object if necessary, create a new profile, and change the necessary details including the version number. For this lab you will create a new business object and profile, and then configure QXO to synchronize the data using your new business object and profile.
The Generalized Code API is a good example to start with.
1.1 Create New Business Object
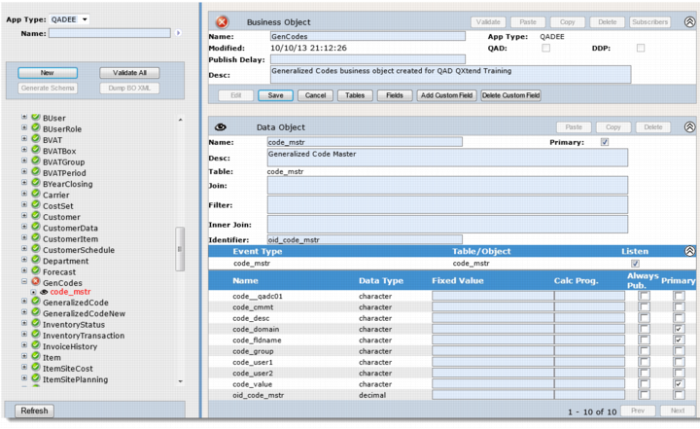
First create a new business object that specifies the data that needs to be extracted in order to create a QXI QDoc that can be processed successfully:
1 Open the QXO Web application in Internet Explorer: http://qaddemo:8080/qxo.
2 Select the Business Objects tab.
3 Ensure that the App Type is set to QADEE.
4 Click the New button.
5 Click the No button for “Create a direct data publish business object?”
6 Enter the following details for the business object:
a Name = GenCodes
b Description = Generalized Codes business object created for QAD QXtend training
7 Click the Save button.
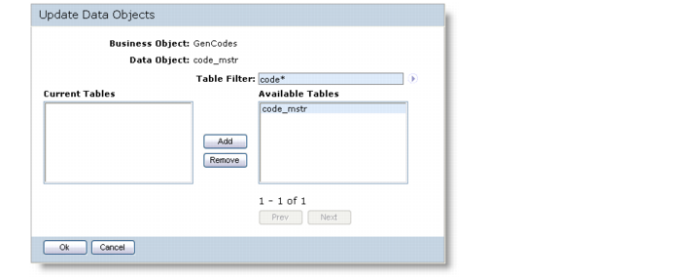
Add Tables to the Business Object
1 Select the GenCodes business object from the Business Objects menu.
2 Click the Edit button.
3 Click the Tables button.
4 Enter code* into the Table Filter and click the Fetch button.
5 Select the code_mstr table and click the Add button.
6 Click the OK button.
7 Click the Save button.
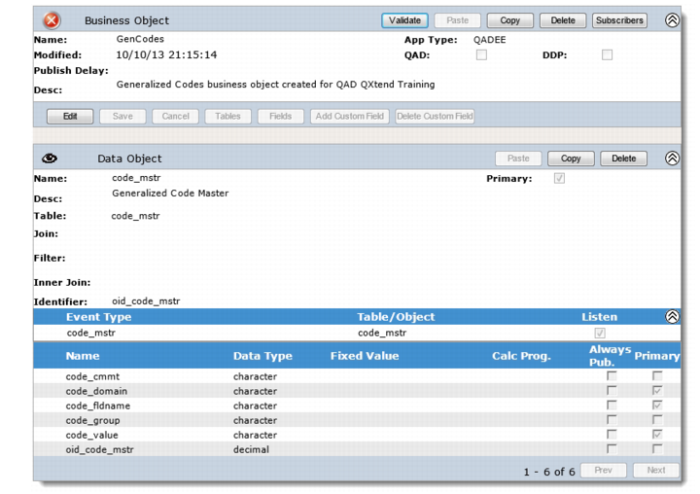
Edit the Fields
1 Select the GenCodes business object from the Business Objects menu.
2 Drill down to the code_mstr data object.
3 Click the Edit button.
4 Click the Fields button.
5 Ensure that only the following fields are included:
• code_cmmt
• code_domain
• code_fldname
• code_group
• code_value
• oid_code_mstr
6 Click OK.
7 Click the Save button.
You have now created the business object. Now validate it by clicking the Validate button.
1.2 Create QAD QXtend Inbound Profile
Once the business object has been created, you must create a profile that can be used to update the target system/domains in the data synchronization process. This requires a new profile and mapping of the names that are used to create the XML passed to QXI.
When you create a business object in QXO it creates a default profile. You should never make changes to the default profile as each time the business object changes it regenerates the profile and you will lose all of your changes. The first thing you should do is copy the profile to create a new one that you can make changes to.
Create the New Profile
1 Open the QXO Web application in Internet Explorer http://qaddemo:8080/qxo
2 Select the Profiles tab.
3 Ensure that the App Type is set to QADEE.
4 Click the fetch button to get all profiles.
5 Select the GenCodes profile under the GenCodes business object.
6 Click the Copy button.
7 Enter the following details:
• Name = maintainGeneralizedCode
• Type = Data Synchronization
• QDoc Name = maintainGeneralizedCode
• QDoc Version = ERP3_2
8 Click the Save button.
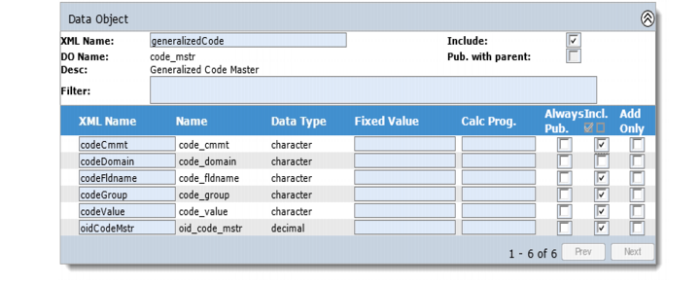
Map the Business Object Name to the QXI QDoc Names
1 The profile is used to map the business object to the QXI QDoc structure and names. The following steps will walk you through this process.
2 Drill down to the code_mstr data object on the profile menu.
3 Click the Edit button.
4 Change the following values:
a Data Object XML Name = generalizedCode
b Do not include code_domain, so clear the Include check box.
5 Click the Save button.
1.3 Configure QAD QXtend Outbound Services
The QXO services are currently configured to use the standard Generalized Code business object that is shipped with QAD QXtend. You need to change the configuration of these services and the subscribers so that they use the business object and profile created in the previous steps.
1.3.1 Message Publisher
1 Open the QXO Web application in Internet Explorer: http://qaddemo:8080/qxo.
2 Select the Configuration tab.
3 Select the Message Publisher menu item.
4 Select the MP1 menu item in the menu tree.
5 Click the Lookup button for the Registered Business Objects.
6 Ensure that the App Type is set to QADEE.
7 Click the fetch button to get all business objects.
8 Remove the QADEE/GeneralizedCodeNew business object.
9 Add the QADEE/GenCodes business object.
10 Click the OK button.
11 Click the Save button.
1.3.2 Subscribers
For each of the subscribers defined in QXO you need to remove the GeneralizedCode Sync profile and replace it with the maintainGeneralizedCode profile.
1 Open the QXO Web application in Internet Explorer: http://qaddemo:8080/qxo.
2 Select the Configuration tab.
3 Select the Subscribers menu item.
4 Select the subscriber to update from the menu. (You will update each subscriber in turn.)
5 Click the Register Profiles button.
6 Ensure that the App Type is set to QADEE.
7 Click the fetch button to get all profiles.
8 Remove the QADEE/GeneralizedCodeNew/MaintainGeneralizedCode profile.
9 Add the QADEE/GenCodes/maintainGeneralizedCode profile.
10 Click the OK button.
11 Click the Save button.
12 Repeat Steps Select the subscriber to update from the menu. (You will update each subscriber in turn.)—Click the Save button for each of the profiles.
1.4 Process Transactions
The configuration of QXO is now complete for the new Generalized Code business object and profile. You don't have to stop and start the services before you process some transactions from the master domain.
Log in to the QAD EE application on the Windows client and process some Generalized Code transactions in the 10USA domain. Check in QXO that messages are being created for the target domains and that the requests are being processed correctly. Also verify that the target domains are updated.
2. Sales Order File Generation
The business objects in QXO allow you to build complex objects that have many levels and relationships. In this lab exercise you will build a Sales Order business object and then write it out to an XML file. The Sales Order object will need to contain information from the Sales Order master and detail tables.
2.1 Create New Business Object
First create a new business object that specifies the data that needs to be extracted.
1 Open the QXO Web application in Internet Explorer: http://qaddemo:8080/qxo.
2 Select the Business Objects tab.
3 Ensure that the App Type is set to QADEE.
4 Click the New button.
5 Click the No button for “Create a direct data publish business object?”
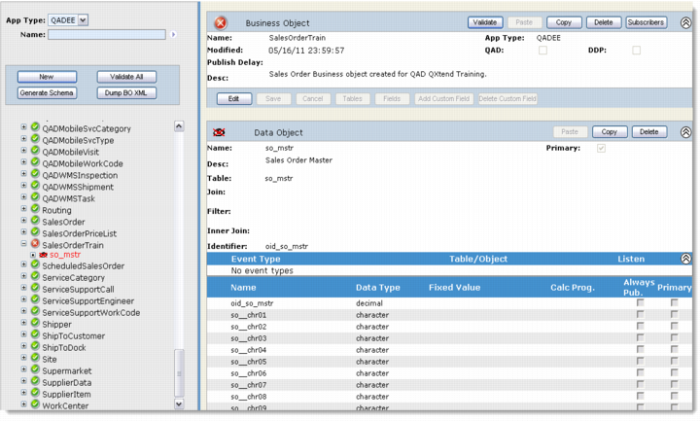
6 Enter the following details for the Business Object: Name = SalesOrderTrain and Description = Sales Order Business object created for QAD QXtend Training.
7 Click the Save button.
Add Tables to the Business Object
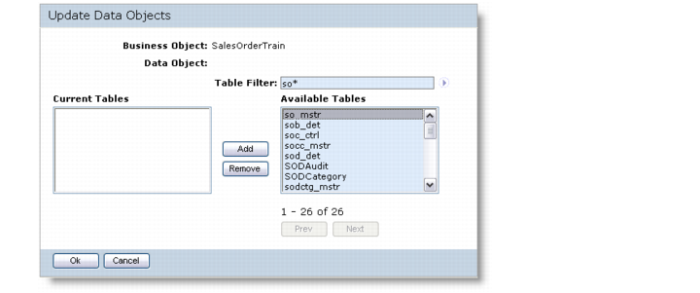
1 Select the SalesOrderTrain business object from the Business Objects menu.
2 Click the Edit button.
3 Click the Tables button.
4 Enter so* into the Table Filter and click the Fetch button.
5 Select the so_mstr table and click the Add button.
6 Click the OK button.
7 Click the Save button.
Edit the Fields
1 Select the SalesOrderTrain business object from the Business Objects menu.
2 Drill down to the so_mstr data object.
3 Click the Edit button.
4 Click the Fields button.
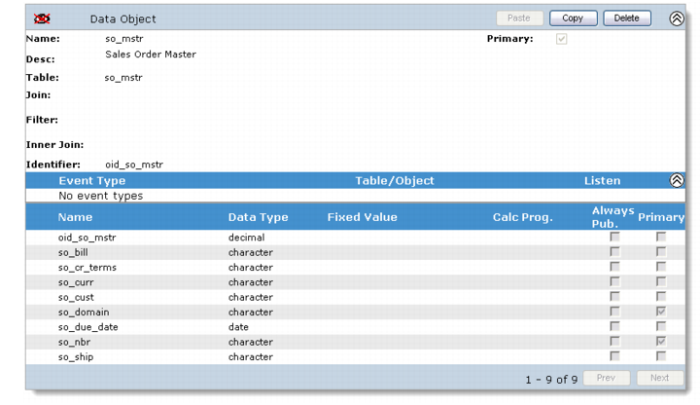
5 Ensure that only the following fields are included:
• oid_so_mstr
• so_bill
• so_cr_terms
• so_curr
• so_cust
• so_domain
• so_due_date
• so_nbr
• so_ship
6 Click the Save button.
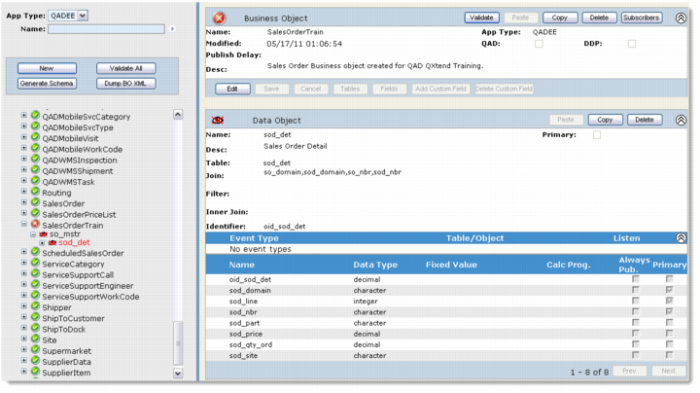
Add the Sales Order Detail as a Child to the Sales Order Master Table
1 Select the SalesOrderTrain business object from the Business Objects menu.
2 Drill down to the so_mstr data object.
3 Click the Edit button.
4 Click the Tables button.
5 In the Table Filter field, enter so* and click the Fetch button.
6 Add the sod_det table. This will add sod_det as a child of the so_mstr table.
7 Click the OK button.
8 Click the Save button.
Edit the Join between so_mstr and sod_det and the Fields Included from the sod_det Table
1 Select the SalesOrderTrain business object from the Business Objects menu.
2 Drill down to the sod_det data object.
3 Click the Edit button.
4 Set Join = so_domain,sod_domain,so_nbr,sod_nbr.
5 Click the Fields button.
6 Ensure that only the following fields are included
• oid_sod_det
• sod_domain
• sod_line
• sod_nbr
• sod_part
• sod_price
• sod_qty_ord
• sod_site
7 Click the Save button.
8 You have created the business object. Now validate the business object by clicking the Validate button.
2.2 Configure QAD QXtend Outbound Services
You need to change the configuration of the services and the subscribers so that they publish the new Sales Order object created in the previous section.
2.2.1 Message Publisher
1 Open the QXO Web application in Internet Explorer: http://qaddemo:8080/qxo.
2 Select the Configuration tab.
3 Select the Message Publisher menu item.
4 Select the MP1 menu item from the menu tree.
5 Click the Lookup button for the Registered Business Objects.
6 Ensure that the App Type is set to QADEE.
7 Click the fetch button to get all business objects.
8 Add the QADEE/SalesOrderTrain business object.
9 Click the OK button.
10 Click the Save button.
2.2.2 Subscribers
You want to create an XML file that contains the profile data. To do this you need to change the configuration of the FileDrop subscriber.
1 Open the QXO Web application in Internet Explorer: http://qaddemo:8080/qxo.
2 Select the Configuration tab.
3 Select the Subscribers menu item.
4 Select FileDrop from the menu.
5 Click the Register Profiles button.
6 Ensure that the App Type is set to QADEE.
7 Click the fetch button to get all Profiles.
8 Add the QADEE/SalesOrderTrain/SalesOrderTrain profile.
9 Click the OK button.
10 Click the Save button.
2.3 Enable so_mstr Events in QXO
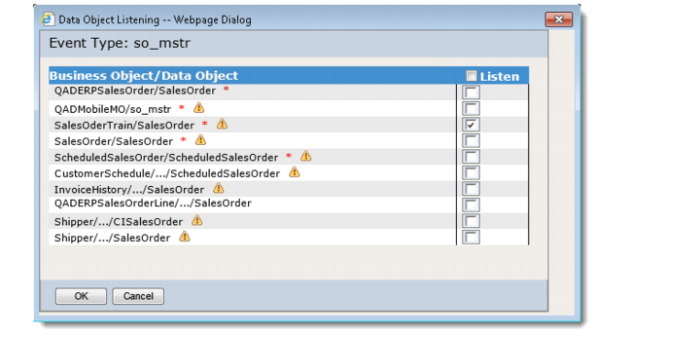
The configuration of QXO requires that the event types for tables being replicated must be enabled. In the current configuration the database trigger is not enabled for so_mstr; you need to enable the event type before testing the synchronization process.
1 Open the QXO Web application in Internet Explorer: http://qaddemo:8080/qxo.
2 Select the Configuration tab.
3 Select the Source Applications menu item.
4 Select QADEE from the menu.
5 Select QADERP from the menu.
6 Click Event Types from the menu.
7 Find the so_mstr event type and select the Active check box.
8 In the Data Object Listening dialog, select the Listen check box for SalesOrderTrain/so_mstr.
9 Click the OK button.
10 Click the Save button.
2.4 Process Transactions
The configuration of QXO is now complete for the new Sales Order business object and profile. Now we will process some transactions from the master domain.
Log in to the QAD EE application on the Windows client, update an existing order, and create a new order in the 10USA domain. Check in QXO that messages are being created for the FileDrop subscriber. Check the directory configured for the subscriber to see that the files are being created.
3. Synchronize Item Master Data
In the first part of this lab, you created a data synchronization configuration, creating a new business object and profile. This section describes using the business objects and profiles that are shipped as part of the standard product.
In this scenario we want to synchronize Item Master data from the 10USA domain into the 11CAN domain. QXO comes with an Item business object that has a MaintainItemMaster profile that is built to be used with QXI. This means that you do not need to create any business objects for this lab. However, we cannot use the existing MaintainItemMaster profile because it is for SIAPI (we will learn SIAPI later). In this lab we create a copy of the MaintainItemMaster profile to load item data into the target domain through UIAPI.
3.1 Create Profile
1 Open the QXO Web application in Internet Explorer: http://qaddemo:8080/qxo
2 Select the Profiles tab.
3 Select the Item business object.
4 Select the MaintainItemMaster menu item.
5 Click the Copy button.
6 Set the following values: Name = ItemSyncUIAPI and QDoc Version = ERP3_7.
7 Click the Save button.
3.2 Configure QAD QXtend Outbound Services
You need to change the configuration of the services and the subscribers so that they publish the Item data.
3.2.1 Message Publisher
1 Open the QXO web application in Internet Explorer http://qaddemo:8080/qxo
2 Select the Configuration tab.
3 Select the Message Publisher menu item.
4 Select the MP1 menu item from the menu tree.
5 Click the Lookup button for the Registered Business Objects.
6 Ensure that the App Type is set to QADEE.
7 Click the fetch button to get all business objects.
8 Add the QADEE/Item business object.
9 Click the OK button.
10 Click the Save button.
3.2.2 Subscribers
You want to synchronize data from the 10USA domain to the 11CAN domain. To do this you need to add the profile to the relevant subscriber.
Update the 11CAN Subscriber
1 Open the QXO Web application in Internet Explorer: http://qaddemo:8080/qxo.
2 Select the Configuration tab.
3 Select the Subscribers menu item.
4 Select 11CAN from the menu.
5 Click the Register Profiles button.
6 Ensure that the App Type is set to QADEE.
7 Click the fetch button to get all Profiles.
8 Add the QADEE/Item/ItemSyncUIAPI profile.
9 Click the OK button.
10 Click the Save button.
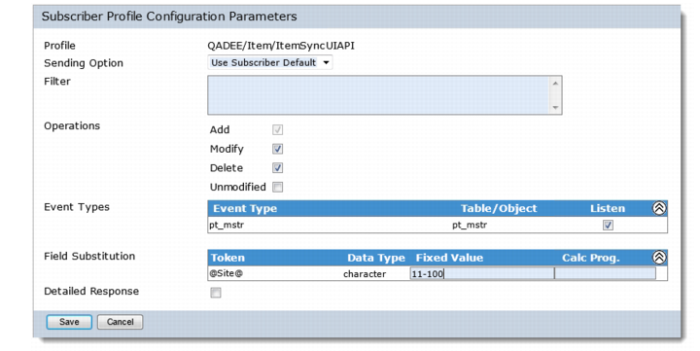
Set the Fixed Value for Site field
1 In the left panel, select the ItemSyncUIAPI profile under subscriber 11CAN.
2 In Subscrber Profile Configuration Parameters panel, set the Fixed Value for @Site@ to 11-100.
3 Click the Save button.
3.3 Enable ItemMaintenance Events in QXO
The configuration of QXO requires that the database triggers for tables being replicated or business events for a maintenance program must be enabled. In the current configuration they are not enabled for item master; you need to enable an event before testing the synchronization process.
1 Open the QXO Web application in Internet Explorer: http://qaddemo:8080/qxo.
2 Select the Configuration tab.
3 Select the Source Applications menu item.
4 Select QADEE from the menu.
5 Select QADERP from the menu.
6 Click Event Types from the menu.
7 Find the ItemMaintenance event type in Business Events and select the Active check box.
8 In the Data Object Listening dialog, select the Listen check box for Item/Item.
9 Click the OK button.
10 Click the Save button.
3.4 Process Transactions
The configuration of QXO is now complete for the Item business object and profile and all that remains is for you to process some transactions from the master domain.
3.4.1 Create New Item
1 Log in to the QAD EE Application on the Windows Client.
2 Create a new Item and ensure you set the following values:
• Product Line = 10
• Status = ACTIVE
• ABC Class = A
• Location = 010
Validate that the item has been processed by checking the subscriber messages in QXO. The item will have been loaded into target domain and should have a DLV status.
3.4.2 Modify Item
Modify the Item you just created and ensure you set the following values:
• ABC Class = B
Validate that the item has been processed by checking the subscriber messages in QXO. The item will have been changed in target domain and should have a DLV status.
3.4.3 Delete Item
Delete the Item you just modified. Validate that the item has been processed by checking the subscriber messages in QXO. The item will have been deleted in target domain and should have a DLV status.