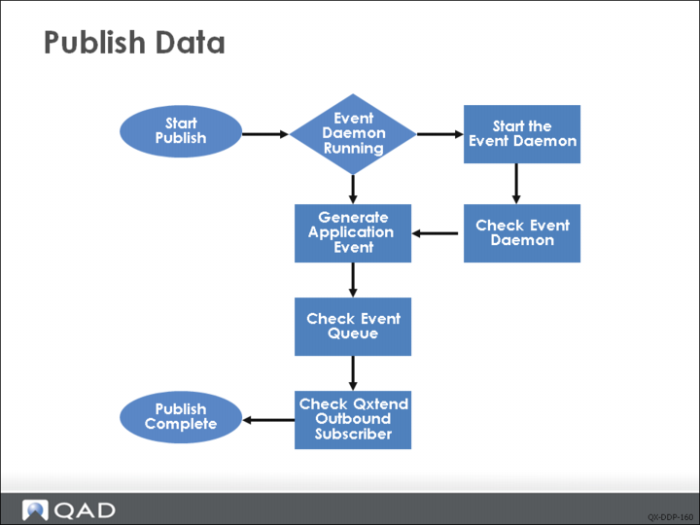
Publishing the Data
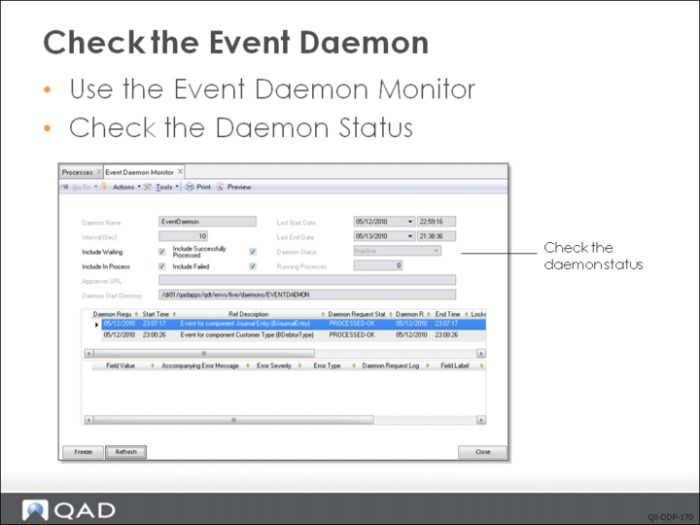
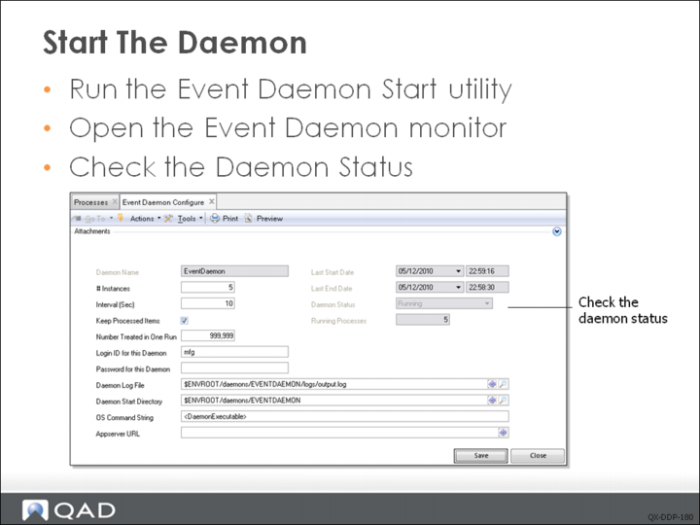
To publish data from QAD Enterprise Financials, a transaction must be processed against one of the business components that has been configured to send data to QXO. However, before creating the transaction, make sure that the event daemon is running. To check the event daemon, use the Event Daemon Monitor function. If the daemon is not running, start it by using Event Daemon Start.
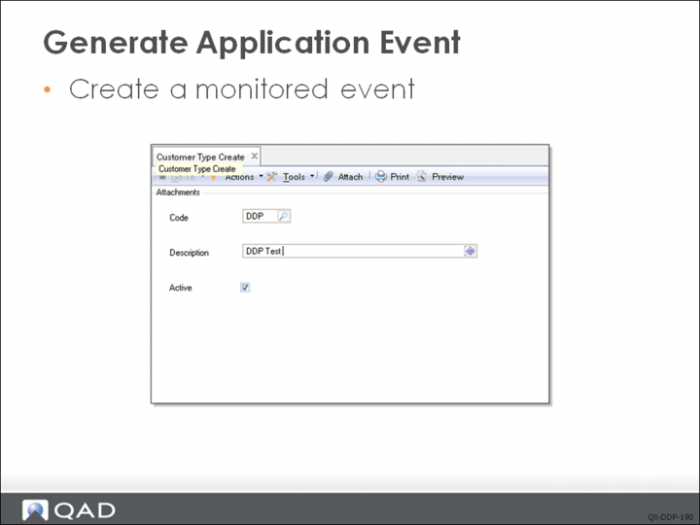
Create a new entry in the business component configured to publish data to QXO; this will generate an event message.
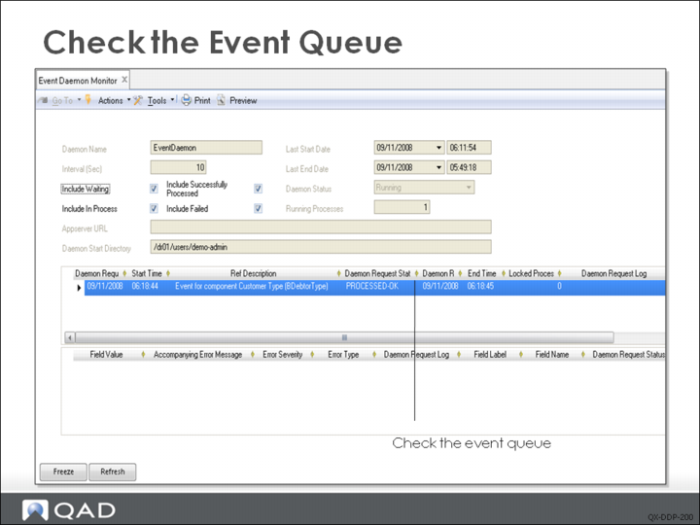
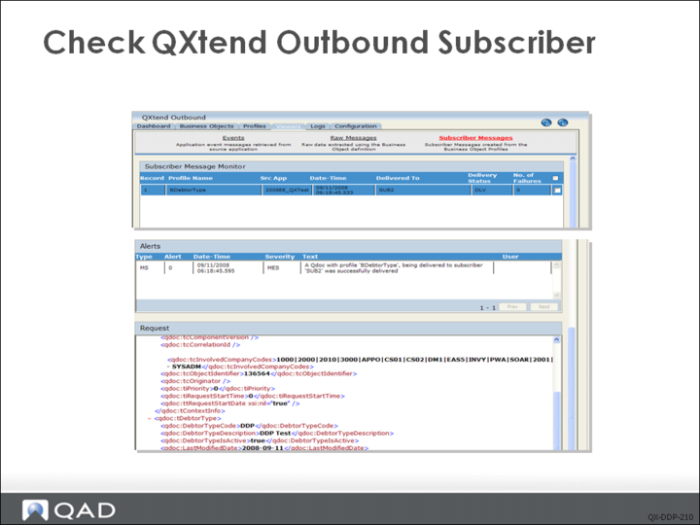
Using the Event Monitor function, check the event queue. You will see the message that was raised by the application and published to QXO. Then go to QXO and look in the Subscriber Messages viewer. You will see a new message that contains the data that has been published by Financials.
Checking the Event Daemon
Starting the Daemon
You can use Event Daemon Start to start the daemon, and use Event Daemon Stop or Event Daemon Unconditional Stop to stop the daemon. You can also use Event Daemon Clear Queue to remove the messages in queue.
The Event Daemon must be in Running status in order to process event.
Generating an Application Event
In this example, we are creating a Customer Type called DDP. Since we have created event configuration for component Customer Type, when a new customer type is created, the event data is published to the QXO destination.
Checking the Event Queue
Checking QXtend Outbound Subscriber
Exercise: Direct Data Publish
The following list shows a number of key terms and concepts for DDP. In each statement below, fill in the correct term from the list. Some terms are used more than once.
event service | Direct Data Publish (DDP) |
event service | timelag |
Data Extraction(DE) | source application |
event destination | event configuration |
database connections | business event |
Application ID | source application |
1 QXO supports two modes of operation for a source application: ______ and ______.
2 In data extraction mode QXO extracts business object data after a ______ has occurred; extraction is orchestrated by an ______. In DDP mode, the ______ is responsible for getting business object data related to a business event to QXO for processing. Consequently you do not have to configure an ______ when using DPP.
3 You do not have to define a set of ______ for DDP source applications because DDP does not use an event service.
4 One of the advantages of using DDP is that there is no ______ between when an event occurred and when the business object is published and delivered.
5 When configuring QAD EE for use with DPP, you use the System Maintain program to enter the ______, which identifies the source of the data. This must be set to the same value as the name of the corresponding ______ in QXO.
6 ______ defines the target to which financial data will be sent; while ______ link events raised against the Financials business components to the ______ .
Lab: Direct Data Publish
QAD QXtend 1.8.4 has been installed with both QXI and QXO components. In the previous labs you performed the basic configuration that is required to enable requests to be processed by QXI and QXO. In the following lab exercises you will see how to publish data direct from a source application using Direct Data Publish. The QAD EE Financials module supports DDP and you will use it in this exercise to publish data to QXO.
The configuration for the publishing of data from the QAD Financials module is a two-step process:
1 Configure QXO so that it is ready to receive data.
2 Set up QAD EE so that it knows to publish to QXO.
This lab describes both configuration steps.
1. Configure QXO for Financials DDP
The following step must be followed to configure QXO so that it is ready to receive data published to it directly from the QAD Financials module.
1.1 Create Source Application
It has been done in QXO Configuration. The Source Application QADERP has been created.
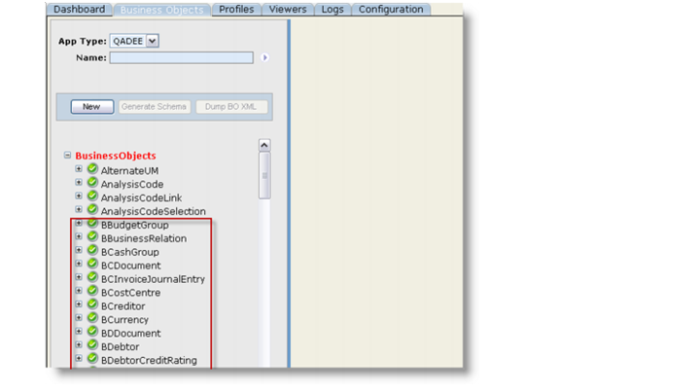
1.2 Load Business Object Definitions
Business Object Definitions have been loaded in the lab for QXO Configuration. All Financials Business Objects start with ‘B’.
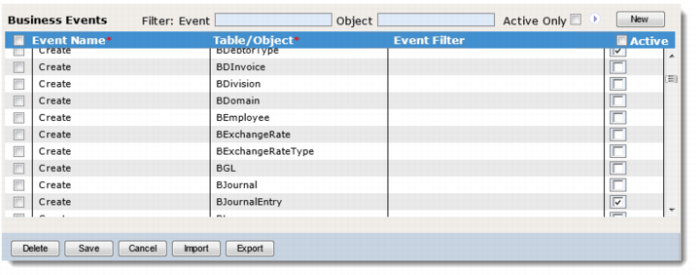
1.3 Activate Event Types
1 Open the QXO Web application in Internet Explorer: http://qaddemo:8080/qxo
2 Select the Configuration tab.
3 Select the Source Applications\QADEE\QADERP\Event Types menu option.
4 Under Business Events, click the Active check box of Create event of BDebtorType and BJournalEntry. When Data Object Listening window pops up, click the Listen check box and then click OK.
5 Click the Save button.
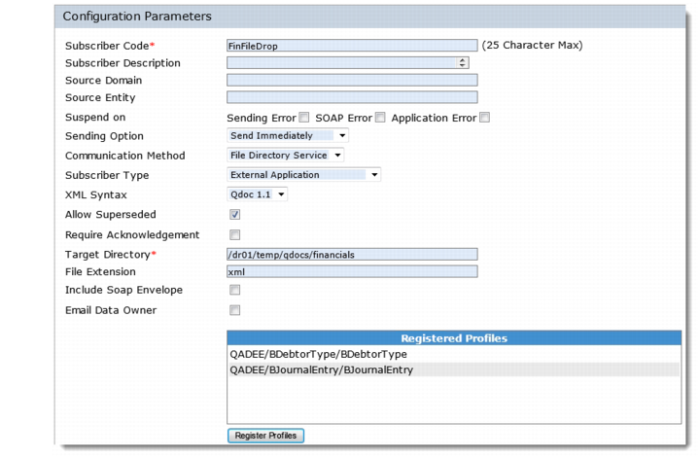
1.4 Create QXO Subscriber
QXO can publish the DDP data sent to it from a source application to any of the supported delivery methods. In this lab we are going to create a new subscriber that subscribes to the data published from QAD EE, and then delivers that data using a file drop to a directory on the server running QXO.
To create the Subscriber:
1 Open the QXO Web application in Internet Explorer: http://qaddemo:8080/qxo
2 Select the Configuration tab.
3 Select the Subscribers menu option.
4 Click the New button.
5 Set the following values:
• Subscriber Code = FinFileDrop
• Communication Method = File Directory Service
• XML Syntax = QDoc 1.1
• Select the Allow Superseded check box.
• Target Directory = /dr01/temp/qdocs/financials (make sure the directory exists and writable).
• Register the BDebtorType and BJournalEntry profiles with the subscriber
6 Click the Save button.
1.5 Configure QXO Services
Now that you have created a subscriber for the data, we want to publish from QAD EE. We now have to configure the services in QXO to make sure that any data sent to QXO is published and delivered. The QAD EE Financials module uses DDP to publish data direct to QXO, so we do not need to change the event service as this process is bypassed when using DDP. You must change the message publisher and message sender services to ensure that data from the Financials module flows through QXO.
1.5.1 Update the Message Publisher
The configured message publisher within QXO needs to be updated to publish data for the two business objects.
1 Open the QXO Web application in Internet Explorer: http://qaddemo:8080/qxo
2 Select the Configuration tab.
3 Select the Message Publisher menu option.
4 Select the MP1 menu option.
5 Add the BDebtorType and BJournalEntry business objects from the QADEE source application type to the list of registered business objects for the message publisher.
6 Click the Save button.
1.5.2 Update the Message Sender
Two message senders are configured in QXO. For messages to be delivered to the FinFileDrop subscriber created in Step 1.3, we need to add it to one of these message sender services.
1 Open the QXO Web application in Internet Explorer: http://qaddemo:8080/qxo
2 Select the Configuration tab.
3 Select the Message Sender menu option.
4 Select the MS2 menu option.
5 Register the FinFileDrop subscriber with the Message Sender.
6 Click the Save button.
2. Configure QAD Enterprise Applications
Completing the configuration of DDP requires the setup of the source application so that it connects to QXO and delivers the data that QAD QXtend expects. Several configuration steps are required for QAD EE.
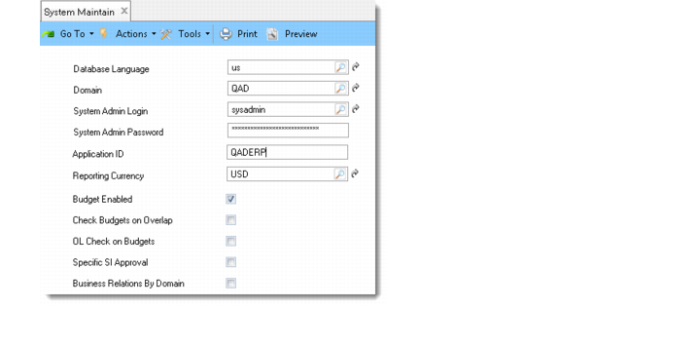
2.1 Set Application Instance Name
When QAD EE directly publishes to QXO it needs to know where to deliver the data. This identity/name must match one of the source applications configured in QXO.
Set the Instance Name
1 Open the QAD Enterprise Applications from the Windows Desktop.
2 Log in with User ID = demo, password = qad.
3 Open the System Maintain (36.24.3.1) function.
4 Set the Application ID to QADERP to match the source application name in QXO.
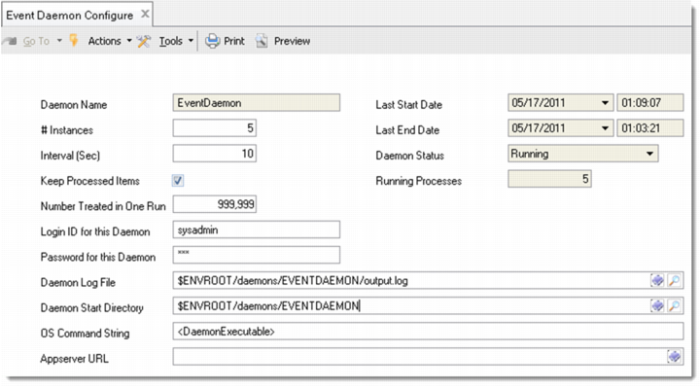
2.2 Verify the Event Daemon Configuration
The event daemon in the Financials module is used to publish data from business events and is required to publish data to QXO. Verify that it has been configured.
1 Open the Event Daemon Configure function.
2 Verify the configuration and the location of the log files.
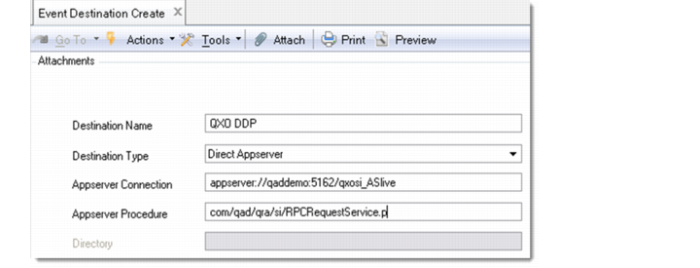
2.3 Create Event Destination
The event daemon delivers business events to destinations that are configured in QAD EE. The destination identifies where the data should be delivered, and the way the data should be delivered. When configuring QAD EE to send data to QXO, you have to create a destination that sends data the QXO AppServer.
1 Open the Event Destination Create function.
2 Create the Event Destination with the following values:
a Destination Name = QXO DDP
b Destination Type = Direct Appserver
c Appserver Connection = appserver://qaddemo:5162/qxosi_ASlive
This AppServer has been configured with the QAD QXtend Service Interface startup procedure enabled and is ready to receive requests.
d Appserver Procedure = com/qad/qra/si/RPCRequestService.p
3 Click the Save and Create button.
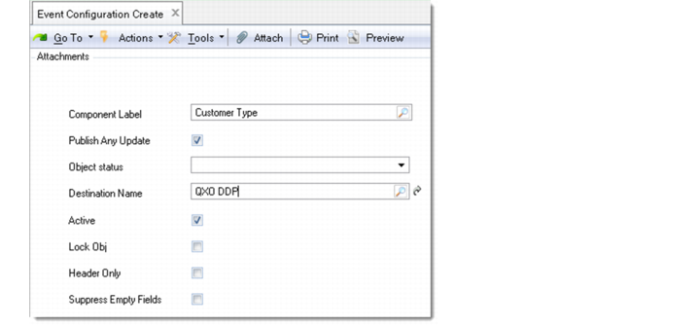
2.4 Create Event Configuration
The final step in the configuration is to identify the components that you want to publish data from QAD EE to QXO. Once you have the list of components, you create an event configuration record for each component. The event configuration record links the component events to a specific event destination, in this case QXO.
1 Open the Event Configuration Create function.
2 Create the event configuration with the following values:
a Component = Customer Type (this is the DebtorType component).
b Select the Publish Any Update check box.
c Destination Name = QXO DDP
d Select the Active check box.
3 Click the Save and Create button.
Create another event configuration for the Journal Entry component.
1 Open the Event Configuration Create function.
2 Create the event configuration with the following values:
a Component = Journal Entry
b Select the Publish Any Update check box.
c Destination Name = QXO DDP
d Select the Active check box.
3 Click the Save and Create button.
3. Publish Data from QAD EE to QXO
You have now configured QXO and the data source QAD EE. Now we will process some transactions in the Financials module to test that the data is published to QXO and processed correctly.
3.1 Start Event Daemon
The event daemon is a background process that processes events that are raised by the application; this must be running for data to be published.
1 Launch the Event Daemon Start function.
2 You will get a message confirming that it has started.
3 To check that it is running, open the Event Daemon Monitor function. The daemon status should be running.
3.2 Create Debtor Type
1 Open the Customer Type Create function.
2 Enter Code = DT01 and Description = Debtor Type Test 01.
3 Click the Save and Create button.
4 Verify that the message has been delivered to QXO:
a Click the Subscriber Messages link on the Viewers tab.
b Verify that the data in the message matches what was entered.
c Review the data that is exported from QAD EE.
3.3 Create a Journal Entry
The Financials module in QAD EE contains some complicated business components and the APIs contain many fields. When first attempting to process data into QAD EE via QXI, you should create the transaction manually and publish the data to QXO where you can review what data needs to go into which fields. This will help you to understand what and where data has to go in the XML when loading it through QXI.
The Journal Entry is a fairly complex component. Once the data has been entered, it is published to QAD QXtend and there it can be reviewed and analyzed.
1 Open the Journal Entry Create function.
2 Enter the following details for the header: Daybook Code = JE and Description = QXtend Training.
3 Enter the following details for the first line: GL Account = 1100 and TC Debit = 100.
4 Enter the following details for the second line: GL Account = 1090, TC Credit = 100.
5 Click the Save and Create button.
Verify that the message has been delivered to QXO by using the Subscriber Messages view on the Viewers tab.
Verify that the data in the message matches what was entered.
Review the data that is exported from QAD EE.