Modify Client Browser Settings
Make the following changes to your Internet Explorer settings.
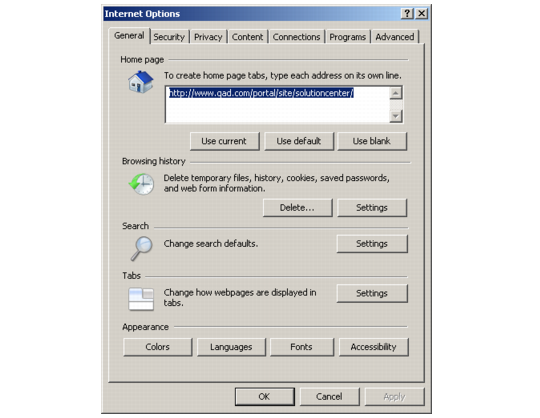
1 Open an Internet Explorer browser and choose Internet Options from the Tools menu.
On Internet Explorer 7, the Internet Options menu is as follows:
If you are using Internet Explorer 7, under the Advanced tab, choose Restore Advanced Settings and then choose OK.
2 Open Internet Options again.
If using Internet Explorer 7, select the General tab and in the Browsing History section, choose Settings.
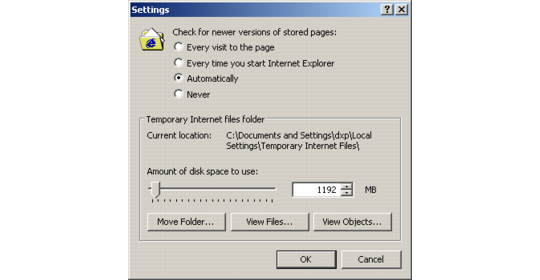
Make the following changes:
• Click on Automatically under Check for newer version of stored pages.
• Set the Amount of disk space to use to greater than 100 MB.
Choose OK to continue.
Temporary Internet Files Settings
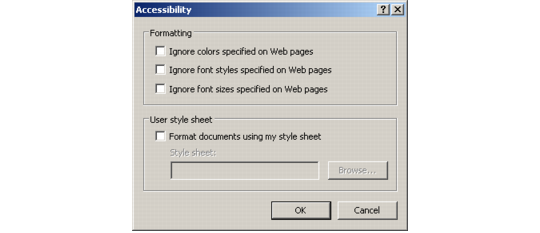
3 Under the General tab, choose Accessibility.
QAD user interfaces use colors and fonts to distinguish various screen elements such as menus and input frames. Uncheck all accessibility options.
Internet Accessibility Options
Choose OK to continue.
4 Under the Security tab, choose Custom Level. Scroll down to make the following changes.
• Under ActiveX controls and plug-ins, scroll to Run ActiveX controls and plug-ins and choose Enable.
• Under Miscellaneous, scroll to Non-encrypted form data and select Enable.
• Under Scripting set all three types—Active scripting, Allow paste operations via script, and Scripting of Java applets—to Enable.
Choose OK to continue.
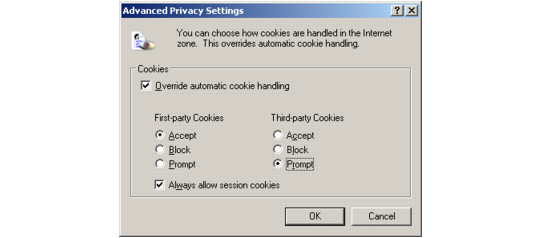
5 Under the Privacy tab, choose Advanced. Make the following changes:
• Select Override automatic cookie handling.
• Under First-party Cookies, select Accept.
• Under Third-part Cookies, select Prompt.
• Select Always allow session cookies.
Cookies Settings
Choose OK to continue.
6 Choose OK to exit Internet Options.
Windows XP Service Pack 2 Settings
If your client PC is running Windows XP Service Pack 2, you must add the QAD UI launch point as a trusted site in Internet Explorer in order to use the browse output-to-spreadsheet option.
1 In Internet Explorer, choose Tools|Internet Options.
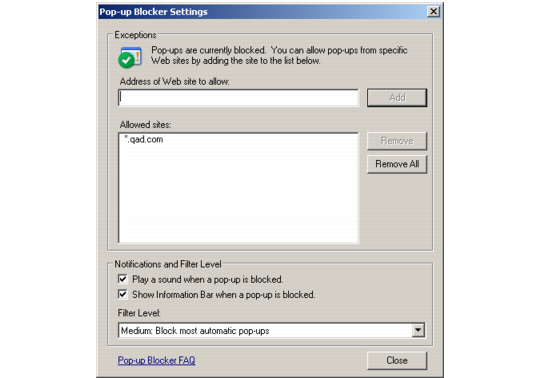
2 Under the Privacy tab in the Pop-Up Blocker section, choose Settings.
3 Enter the QAD UI server domain name in Address of Web site to allow; for example, corpname.com. Choose Add to save the name.
Pop-Up Blocker Settings
4 Choose Close to continue.
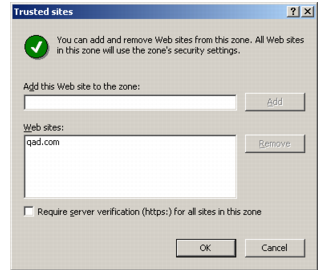
5 Under the Security tab, click Trusted Sites and then choose Sites.
6 In the Trusted Sites screen, uncheck Require server authentication (https:) for all sites. Then enter the same domain name again and choose Add. Choose OK to continue.
Adding a Trusted Site
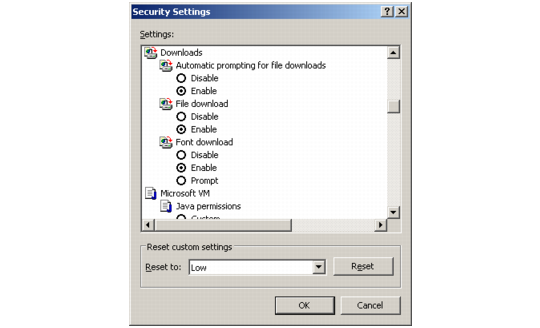
7 Under the Security tab, choose Custom Level. Scroll to Downloads. Enable the following settings and choose OK.
• Automatic prompting for file downloads
• File download
Setting Download Options
8 Choose OK to exit Internet Options.