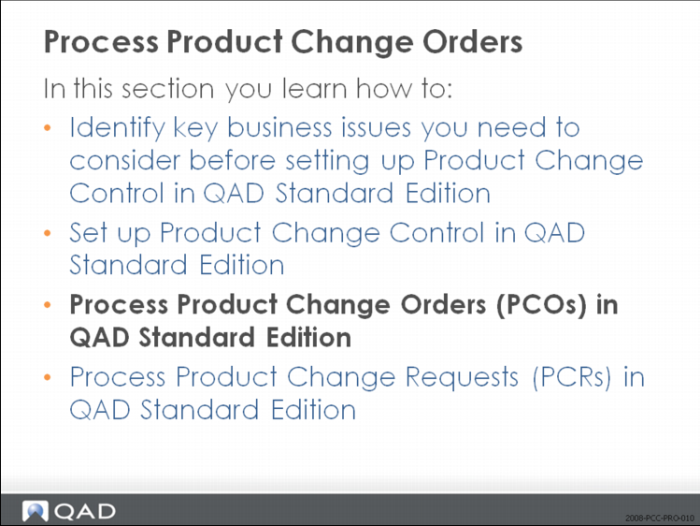
Process Product Change Orders
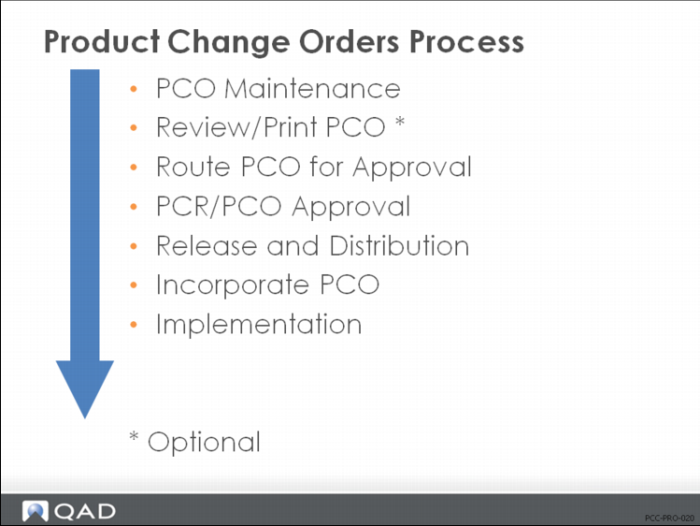
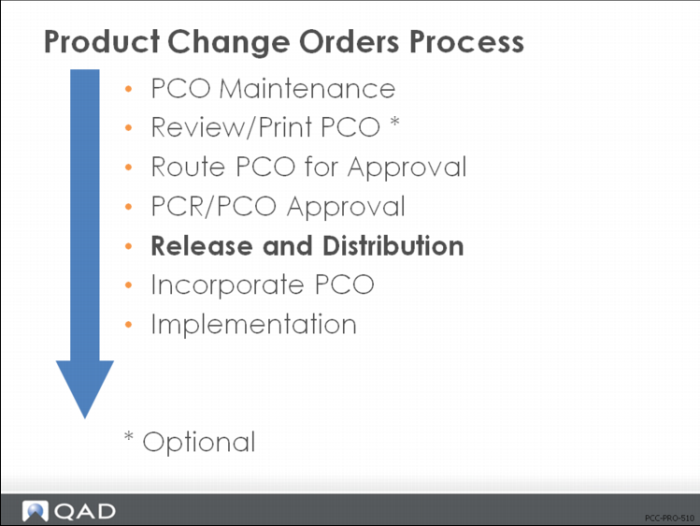
Product Change Orders Process
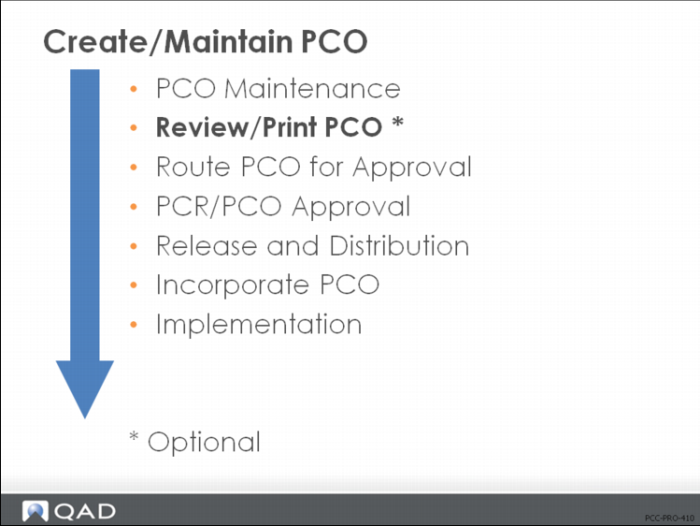
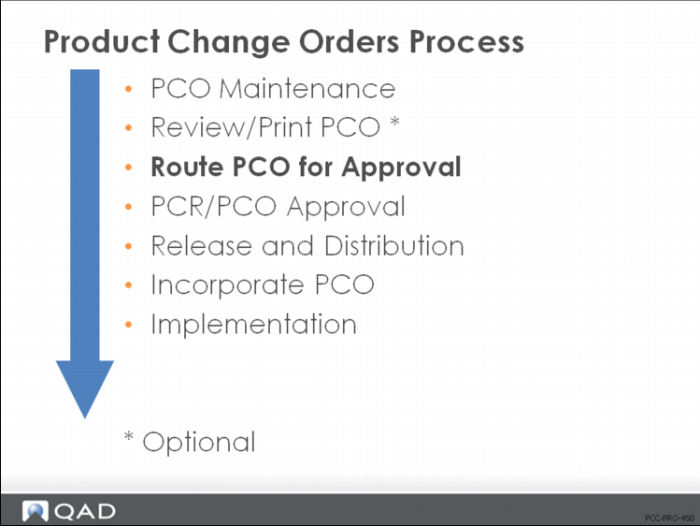
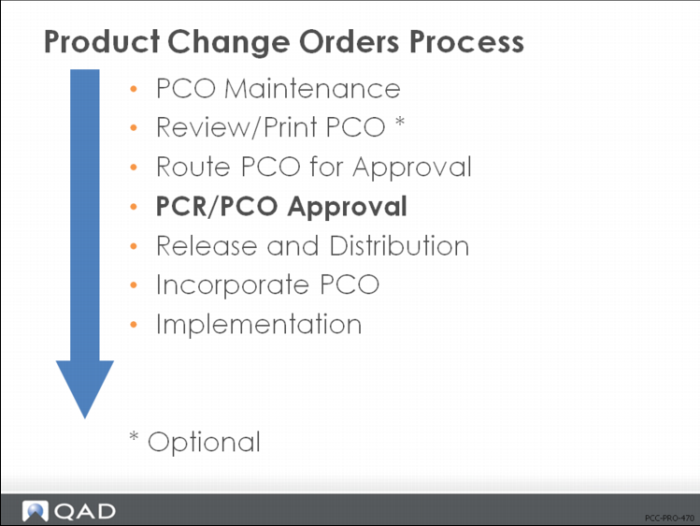
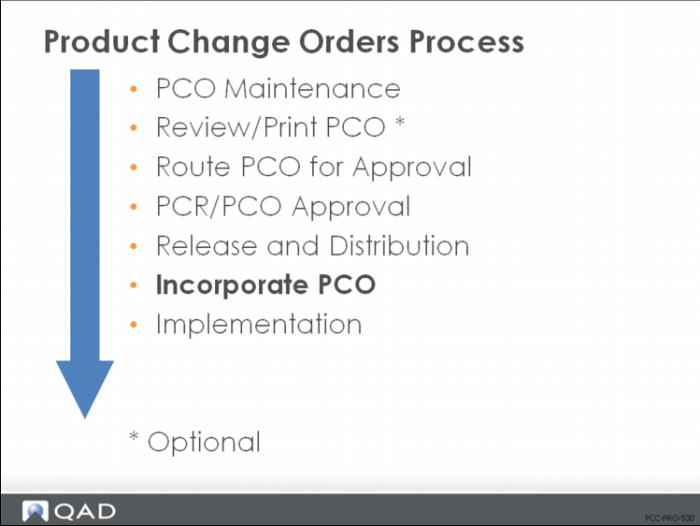
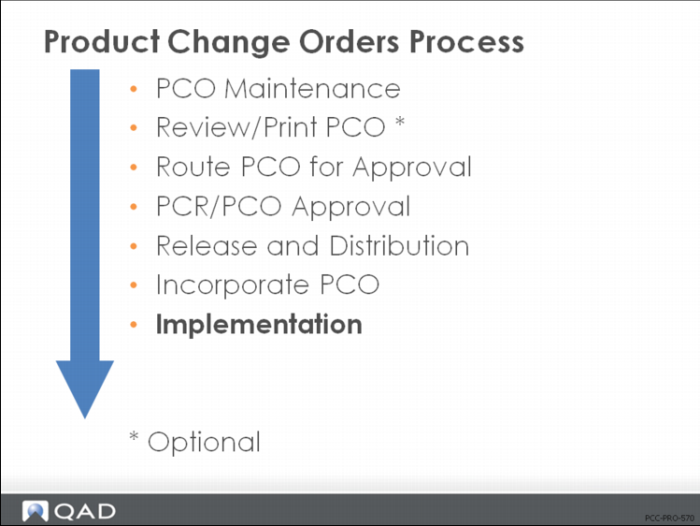
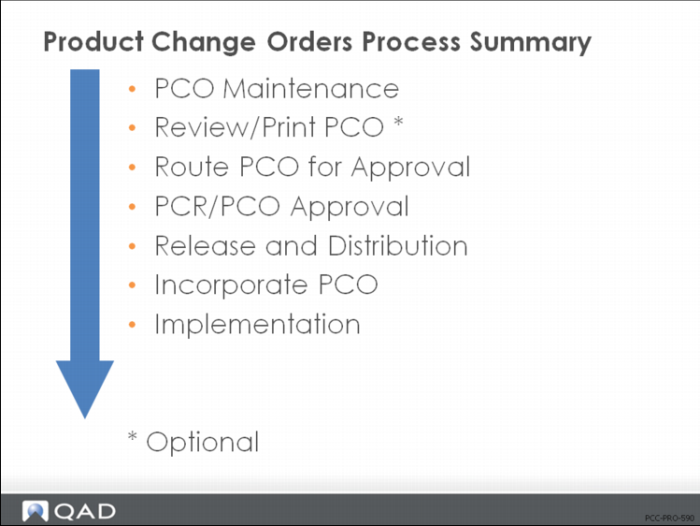
This illustration is a suggested process sequence of master files for the Product Change Control module, for Product Change Orders, which is based on information that flows from one master file to another and prerequisites that need to be accomplished.
What is the procedure? | Who is responsible? |
Create/Maintain PCO | Document Control |
Review/Print PCO | Document Control |
Route PCO | End User |
Approve PCO | Approval Group |
Release and Distribute PCO | Document Control |
Incorporate PCO | Document Control |
Implement PCO | Document Control |
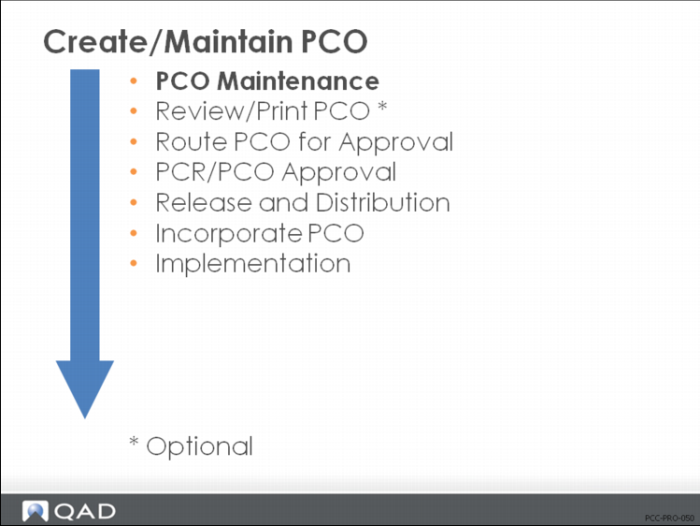
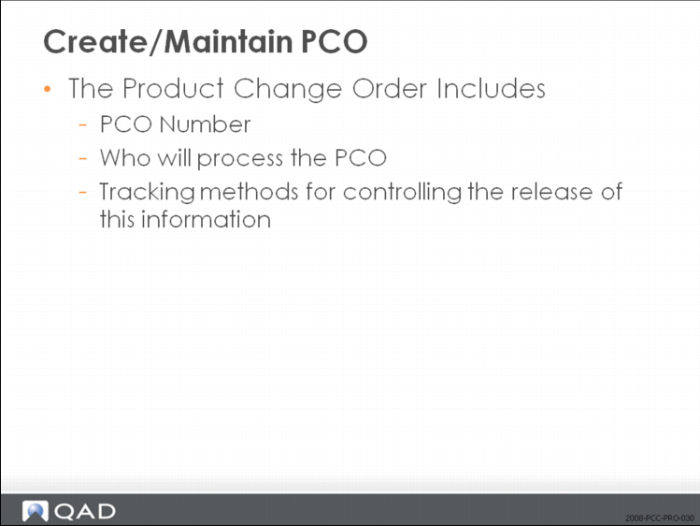
Create/Maintain PCO
• Creating and maintaining PCOs is done in PCO Maintenance (1.9.2.13)
• After completing the first screen, a menu will appear that gives you access to functions which allow detail modification of the product change order
• Use your arrow keys to select a menu option
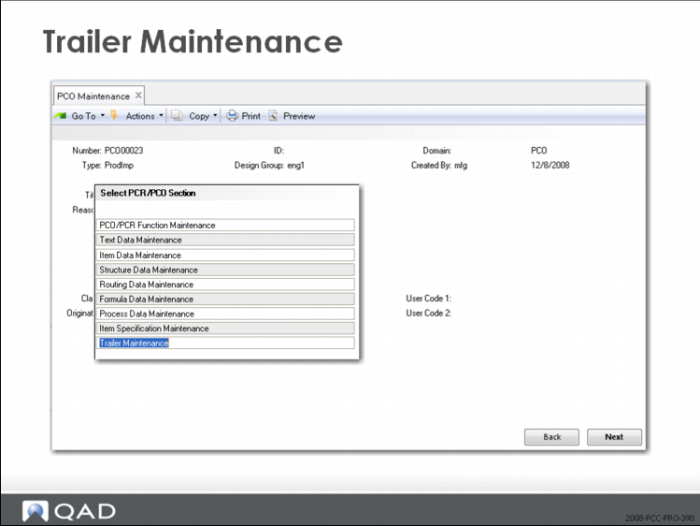
• Each menu item (except Trailer Maintenance) leads to another menu
• Select from the menu to bring up a screen to perform a function
Create/Maintain PCO
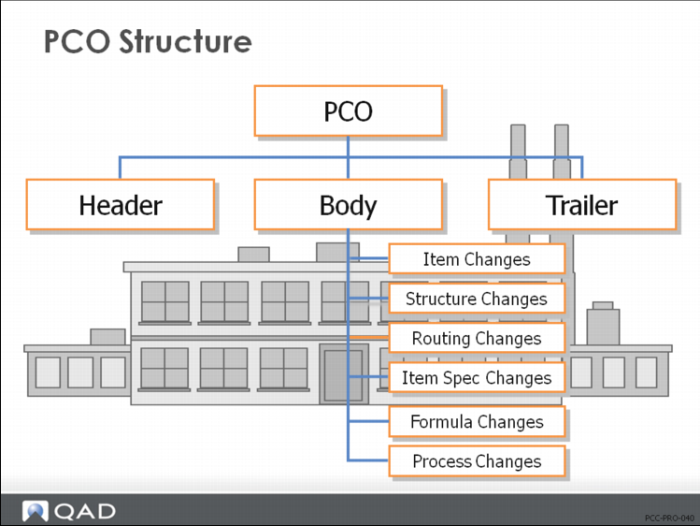
Product Change Order Structure
• PCOs have three main parts
• Header
• Body (optional text)
• Trailer
• Changes are specified in the Body
• We will discuss Item, Product Structure, Routing, and Item Spec changes
Formula and Process changes are optional to this discussion
PCO Maintenance
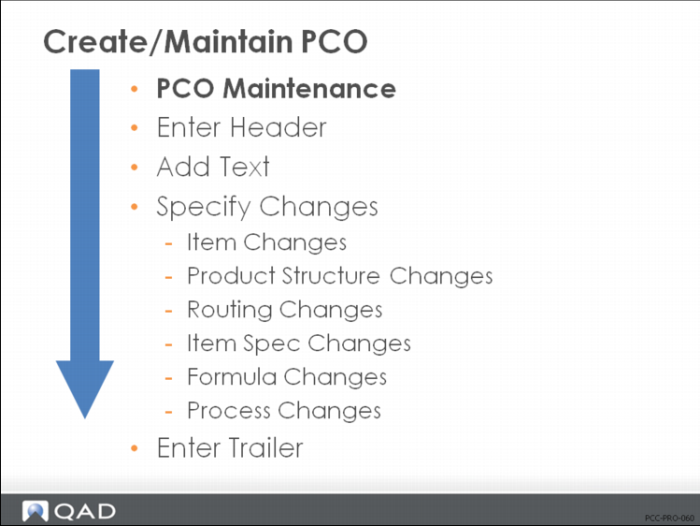
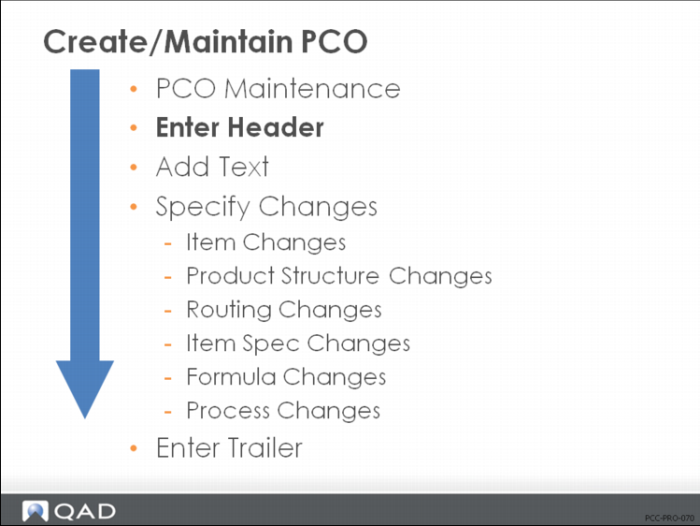
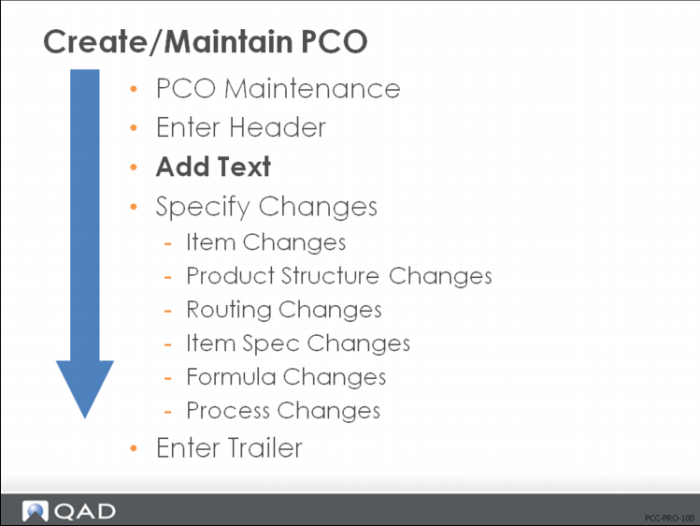
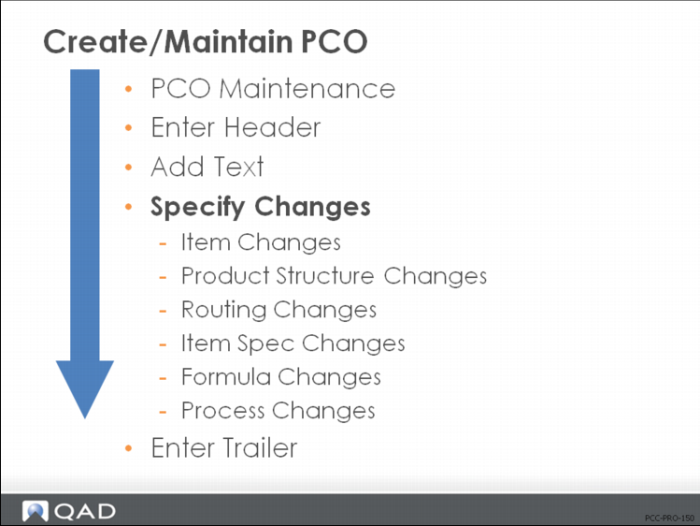
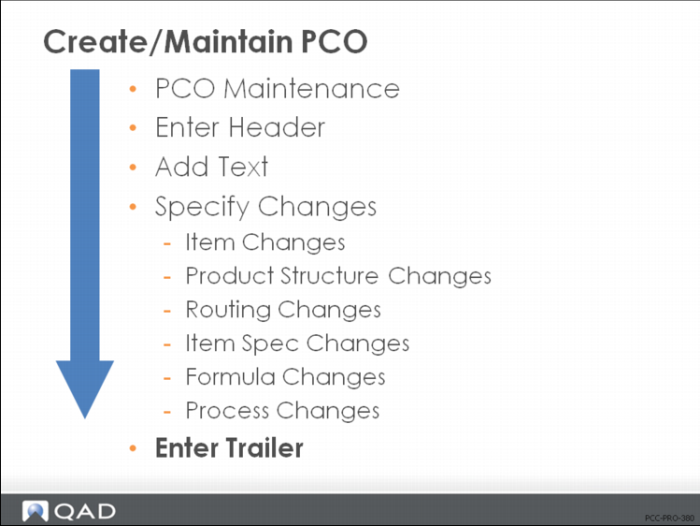
• PCO creation can be broken down into the following steps:
• Enter Header
• Add Text (optional)
• Specify Changes
• Enter Trailer
Direct Item Master Access, a function under the Item File Maintenance Menu, gives you access to all items in the database. The modifications you perform using Direct Item Master Access take place in the item master files, not in the PCO.
Important: This function is the only function in PCO Maintenance that directly affects QAD SE production files.
Enter Header
• Number the PCO document
• Identify type and design group
• Add any user-specific information
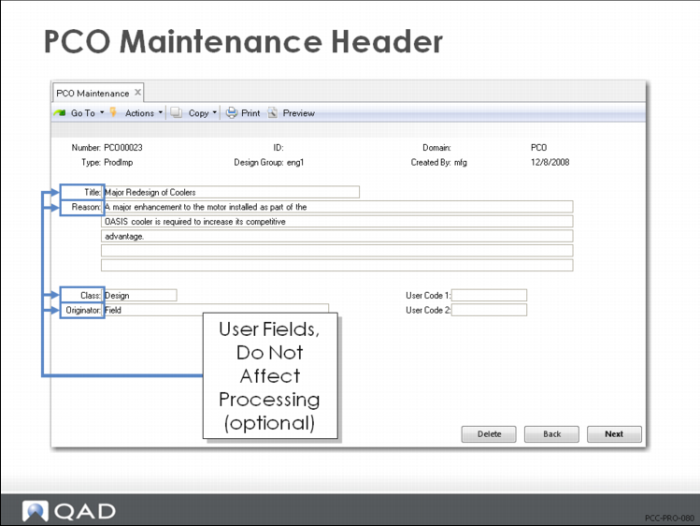
PCO Maintenance (1.9.2.13)
• Number is filled in automatically if PCC Control (1.9.24) is set for Autonumbering
• Break up large PCOs by assigning multiple PCOs with the same number and different IDs
• Type and Design Group will determine approval cycle, distribution group, and autonumbering for the PCO number (if applicable)
• The user-defined fields (highlighted in the picture above) do not affect processing and are optional fields
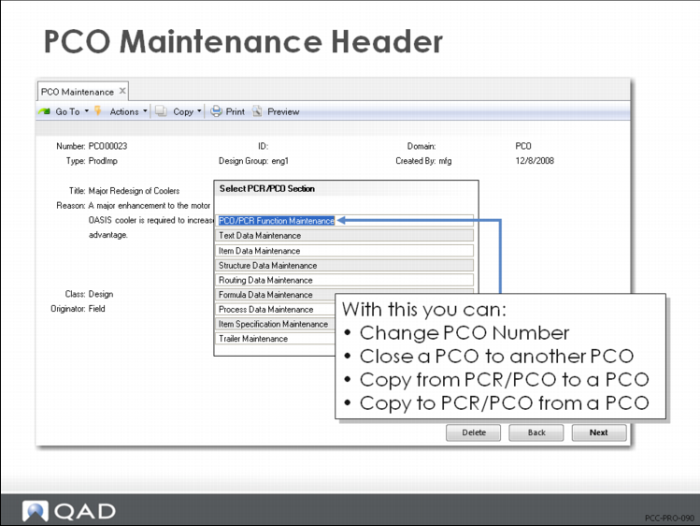
Select PCR/PCO Function Maintenance
• A section menu allows you to complete other parts of the PCO
• Only enabled processes appear on the section menu
• Accessing PCO/PCR Function Maintenance allows you to
• Change a PCO Number
• Close a PCO to another PCO
• Copy either to or from PCR/PCO to or from another PCO
Add Text
• Adding text is optional
• Manually enter or modify transaction comments
• Copy Master Comments to PCO
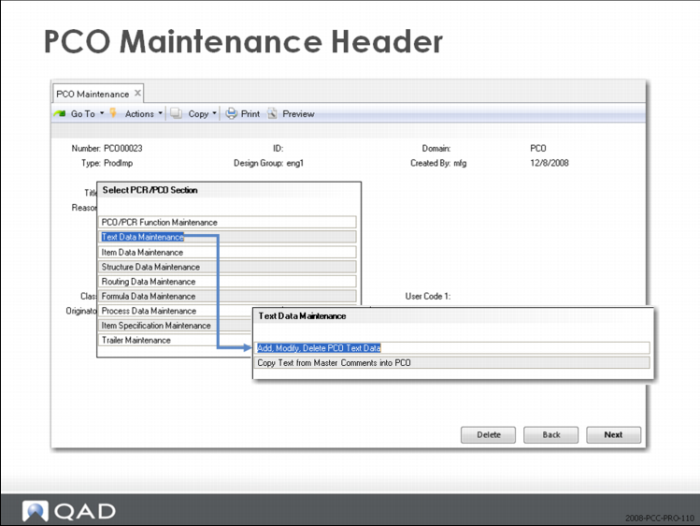
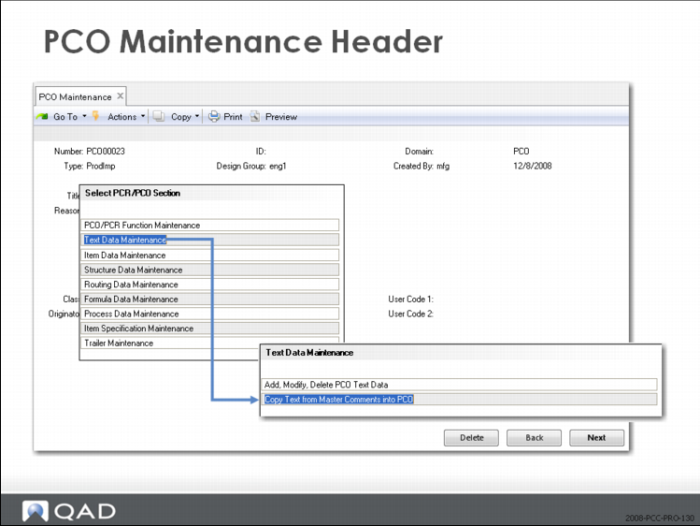
Text Data Maintenance
• Add, Modify, Delete PCO Text Files
• Selection menu moves you to Text File Maintenance menu
• Choose to create a new text file or modify or delete an existing text file
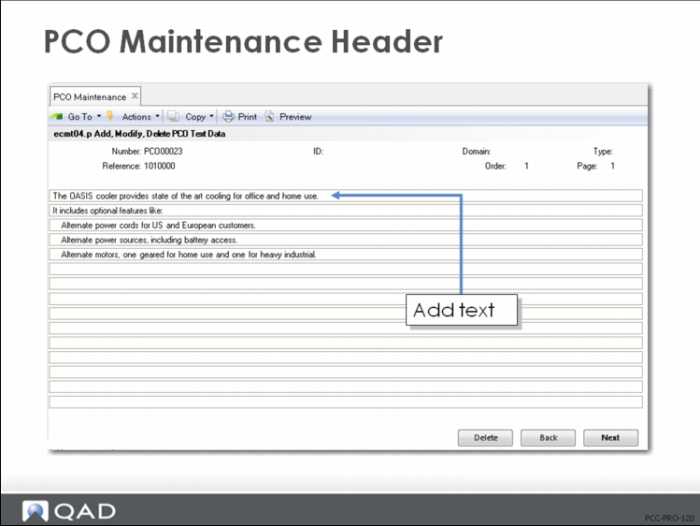
Add, Modify, Delete PCO Text Files
Works the same way as other transaction comments in QAD Standard Edition.
Copy Text from Master Comments into PCO
• Selection menu moves you to Text File Maintenance menu
• Choose to copy text from Master Comments
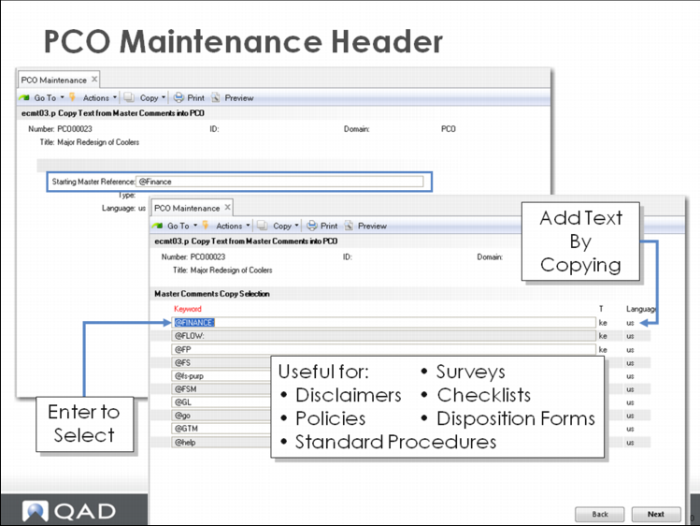
Master Comments Copy Selection
Enter master reference and type in a pop-up frame, or select from a list of comments.
Specify Changes
Identify the proposed changes considered on this PCO.
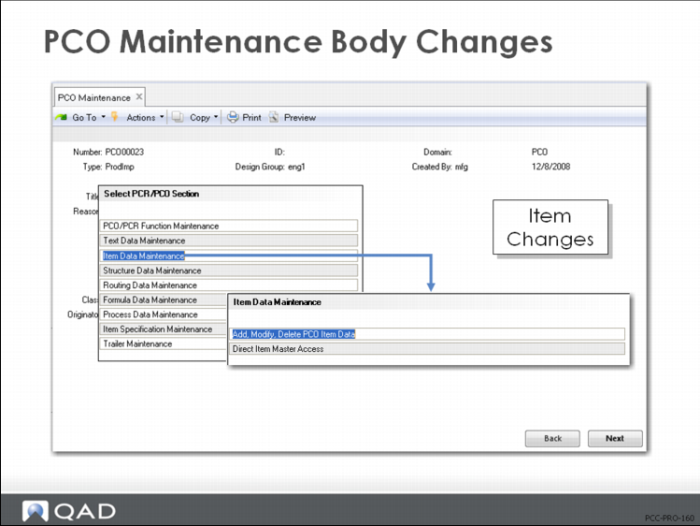
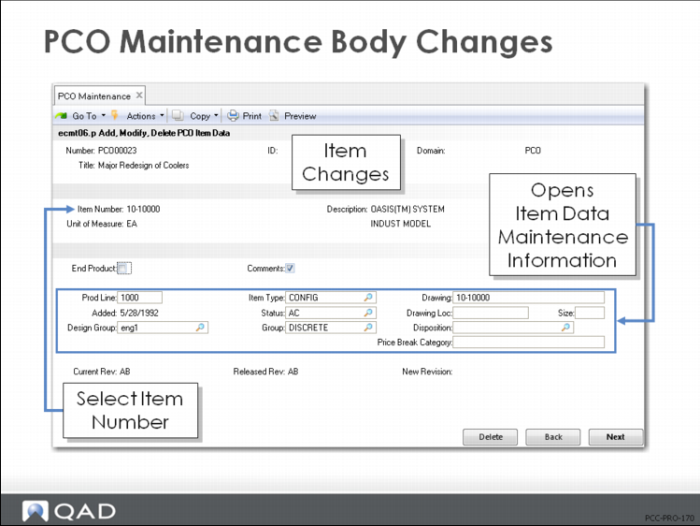
Item Data Maintenance
• Proposed Item Master changes
• Directly affects Production files
• Possibly to enter new item numbers with Direct Item Master Access, rather than Item Data Maintenance (1.4.3), as part of a PCO
Note: Some companies require all Item Data Maintenance to be maintained through the PCC function, not through Item Data Maintenance (1.4.3).
Item Data Maintenance — Add, Modify, Delete PCO Data Files
• Change existing items
• Only one PCO per item
• Does not support
• Item-Site data
• Item Planning data
• Inventory data
• Cost and price data
Exercise: Create a PCO with Item Changes
Important: The data used in these exercises may not be the same as the data shown in the screen captures in this lesson. You must have completed all the setup exercises before you can work on the processing exercises.
In the Item Master there are three types of Batteries, 30-100, 30-1000, and 30-10000. They are in product line 2000, Electronic Products. Your company procedures require you to route the changes through a PCO.
1 Use PCO Maintenance (1.9.2.13) to create a new PCO to route these proposed changes to the Item Master.
Let QAD SE assign the PCO number. The number will be assigned when you complete the Type and Design group fields and click Next.
2 Advance to the Type field and enter the following:
Field | Data |
Type | PCO |
Design Group | DESIGN |
3 Write down the PCO number assigned for later reference: ____________________
4 Title and Reason fields are optional. Leave them blank, or create a simple description for this PCO:
Field | Data |
Title | Change Product Line |
Reason | All Batteries moving to Component Materials |
5 Select Item Data Maintenance and then choose Add, Modify, Delete PCO Item Data.
a Add items:
30-100 | RevB |
30-1000 | RevB |
30-10000 | RevB |
b For each, set Comments to No.
c Change the Product Line on each to 6000.
d Verify the Item Type for each is = ELEC, and Group = ELECTRON.
6 Click Back, choose Trailer Maintenance.
a Using the Mandatory field, assign an implementation date no later than the last day of next month.
b Disposition: UAI; click Next, click Back.
7 Use PCR/PCO Detail Inquiry (1.9.2.8) to review your PCO to verify that your changes were all included.
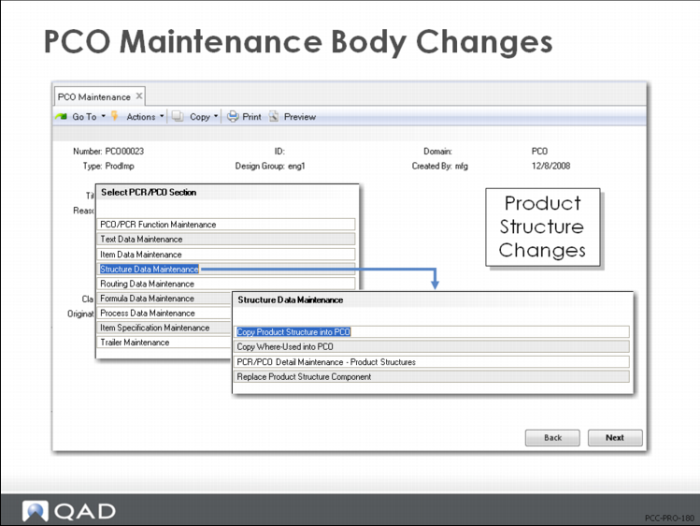
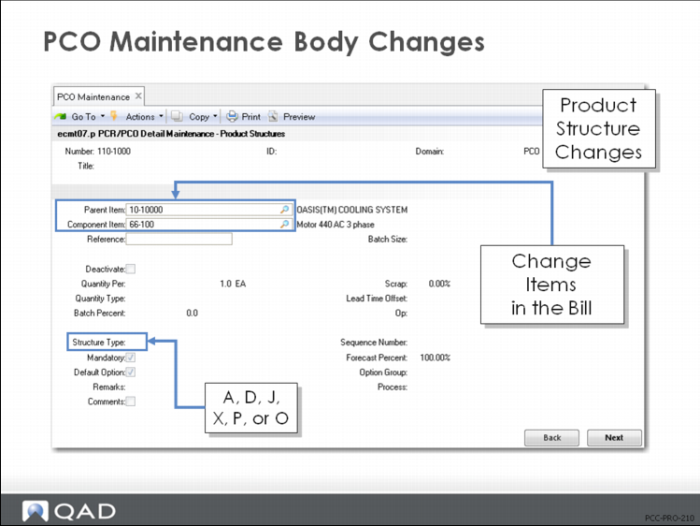
Structure Data Maintenance
• Copy product structures or where-used to the PCO to propose changes
• Maintain changes with Detail Maintenance
• Proposed component replacements throughout multiple bills
Note: You cannot delete a product structure from within PCO Maintenance since structures can contain “as of” information. Instead, deactivate the structure by entering an end-effective date. Because delete is not available, structure add and structure edit functions are separate. This distinguishes the structure maintenance functions in PCO Maintenance from all other maintenance programs.
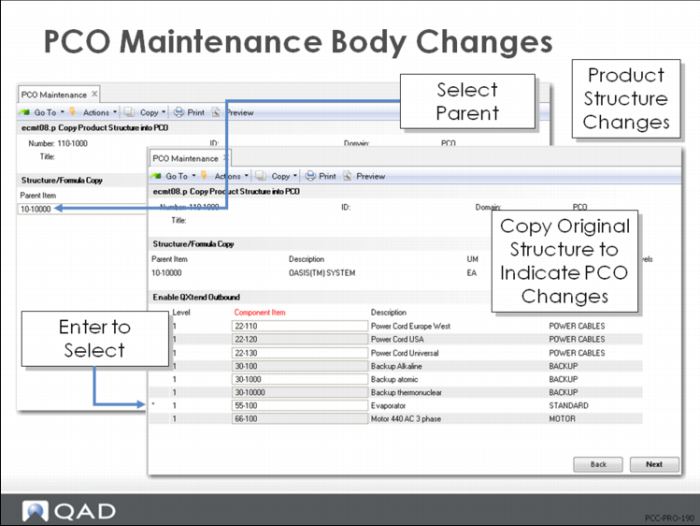
Copy Product Structure into PCO
• Specify Parent Item
• Current Bill of Materials displays
• Select or de-select items from the bill to copy into the PCO
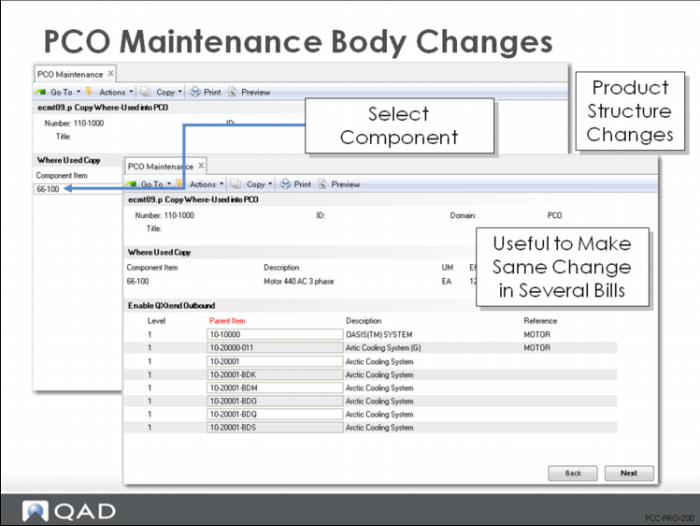
Copy Where Used into PCO
• Works the same as Copy Product Structure into PCO except:
• Displays bill of material as indented where-used bill of material
• Useful for making the same change to several product structures
PCR/PCO Detail Maintenance - Product Structures
• Add items to product structures
• Delete product structure records
• Sets an end effective date when PCO is incorporated
• Edit product structure changes
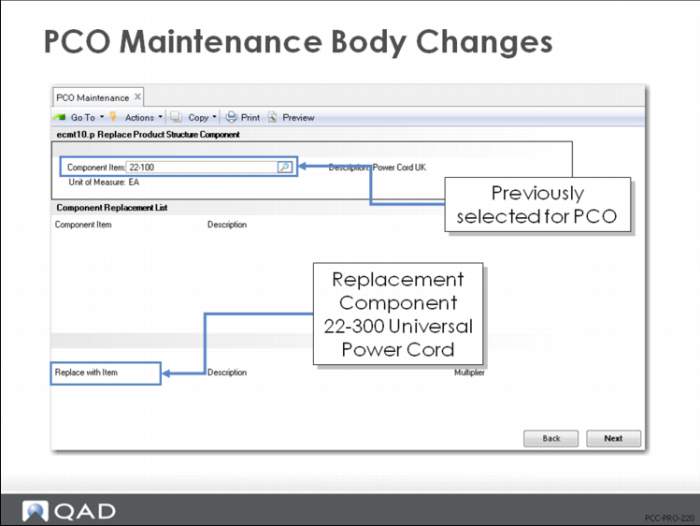
Replace Product Structure Component
• Replaces one component item with another across multiple bills of material
• Select the component in any previous Structure File Maintenance step
• Searches product structure records already included in the PCO and sets end effective dates for replacements
• Adds additional product structures to the PCO with the substitution
• Other detailed product structure data is copied from the existing record
Exercise: Create a PCO with Product Structure Changes
The Magic Box assembly, 12-101 uses switch 12-105.The current product structure assumes that there is no scrap involved in the switch unit. Your recent experience shows a 5% scrap involved.
1 In this exercise, use PCO Maintenance (1.9.2.13) to create a new PCO to make this change.
Let QAD SE assign the PCO number.
Field | Data |
Assign Type | PCO |
Design Group | DESIGN |
Write down the PCO number assigned for later reference: ____________________
Field | Data |
Title | Add Scrap |
Reason | 12-101 to be modified: Component 12-105 shows 5% Scrap |
2 Continue past the header. Choose Structure Data Maintenance. From this menu select Copy Product Structure into PCO.
a Parent Item = 12-101. Click Next.
b select 12-105 by clicking on the item number.
An asterisk appears when the component is selected.
Click Next then Back to complete the transaction.
3 From the menu choose Structure Data Maintenance and then PCR/PCO Detail Maintenance - Product Structures.
a When you arrow down, you should see that one record was copied into the PCO
(Parent Item = 12-101 and Component Item = 12-105). If you do not see this record, repeat step three above until the component is copied successfully.
b Deactivate should remain = No (Do not delete the component).
c Specify a 5% scrap. Accept all the remaining default fields. Click Next.
d Click Back, choose Trailer Maintenance.
a Using the Mandatory field, assign an implementation date no later than one month from today.
b Disposition: UAI, click Next, click Back.
4 Use PCR/PCO Detail Inquiry (1.9.2.8) to review your PCO to be certain your changes were all included.
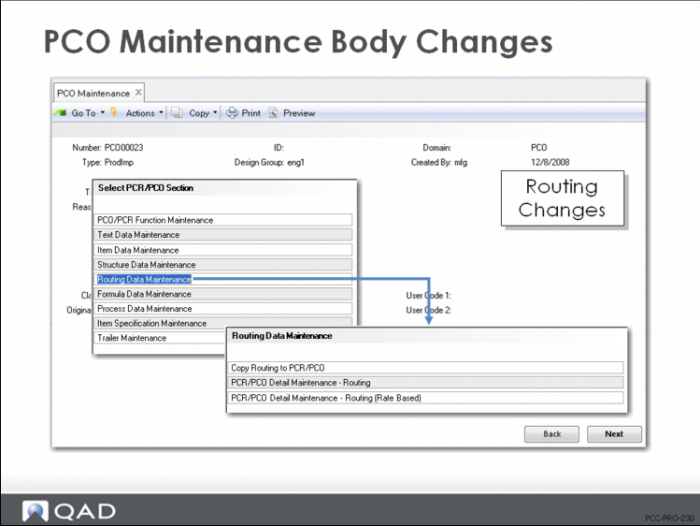
Routing Data Maintenance
• For both standard and rate-based routing
• Copy routings to the PCO
• Edit routings with Detail Maintenance
• Both standard routings and routings that are rate based
Note: Processes are not maintained with this function
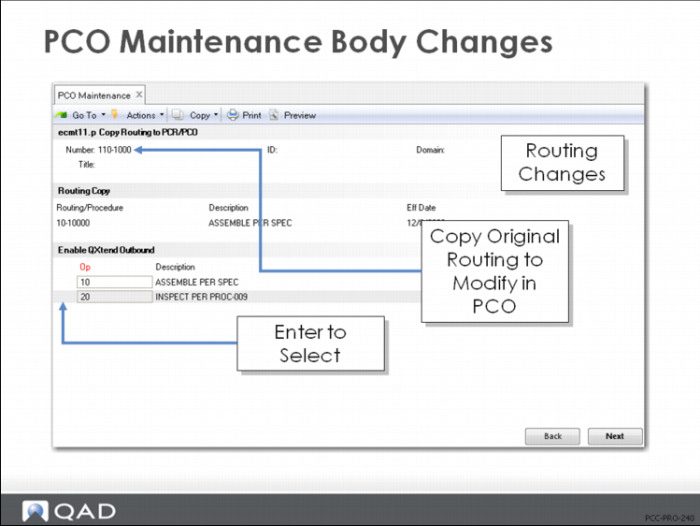
Copy Routing to PCR/PCO
• Start with a copy of existing routing to simplify editing
• Bring routing records into PCO for modification
• Displays the operation for a routing to select which steps to include
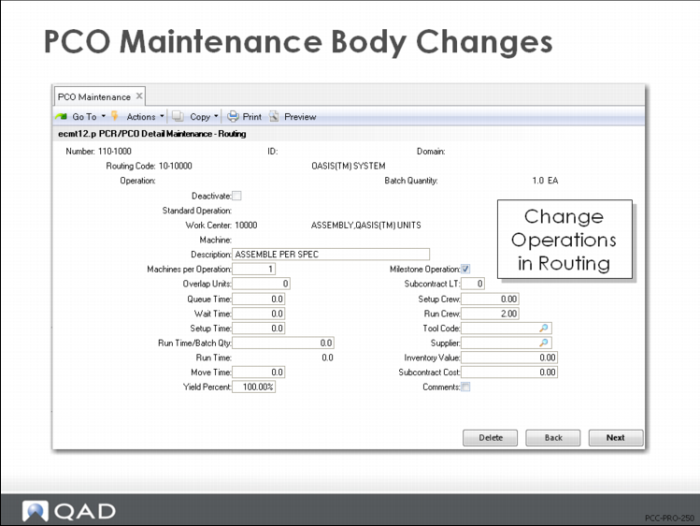
PCR/PCO Detail Maintenance - Routing
• Operations to a routing
• Delete operation steps
• Sets an end effective date when the PCO is incorporated
• Edit routing changes
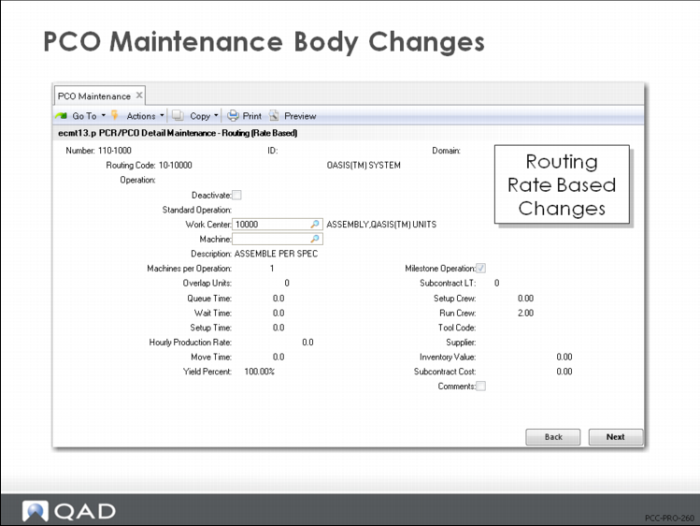
PCR/PCO Detail Maintenance - Routing (Rate Based)
Same differences as between standard Routing Maintenance (14.13.1) and Routing Maintenance (Rate Based) (14.13.2).
Exercise: Create a PCO with Routing Changes
1 In this exercise, use PCO Maintenance (1.9.2.13) to modify the routing for the 12-101 Magic Box Assembly to add a standard rework step.
Let QAD SE assign the PCO number.
Field | Data |
Assign Type | PCO |
Design Group | DESIGN |
Write down the PCO number assigned for later reference: ____________________
2 Title and Reason fields are optional. Leave them blank, or create a simple description for this PCO:
Field | Data |
Title | Adding Rework |
Reason | 12-101: Adding rework routing |
Continue past the header.
3 Select Routing Data Maintenance, then enter the following in PCR/PCO Detail Maintenance - Routing:
Field | Data |
Routing Code | 12-101 |
Operation | 30 |
Work Center | 1010 |
Description | Rework as required |
Milestone Operation | No |
Comments | No |
4 Save the record without adding any information to the trailer. Click Back, then Back.
5 Use PCR/PCO Detail Inquiry (1.9.2.8) to review your PCO and verify that the changes were all included.
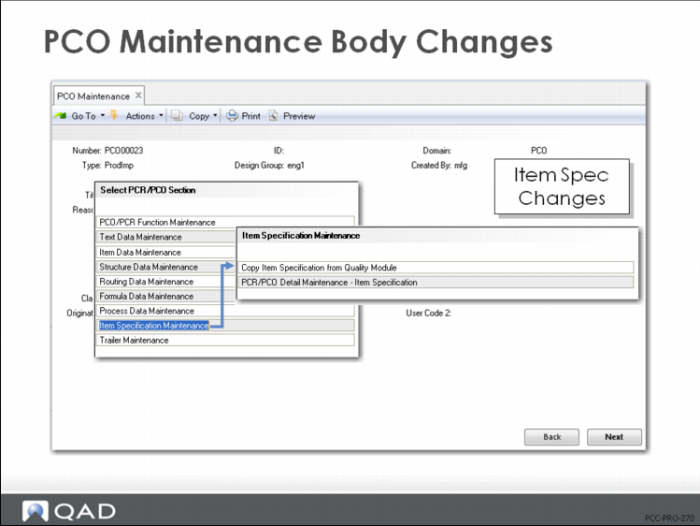
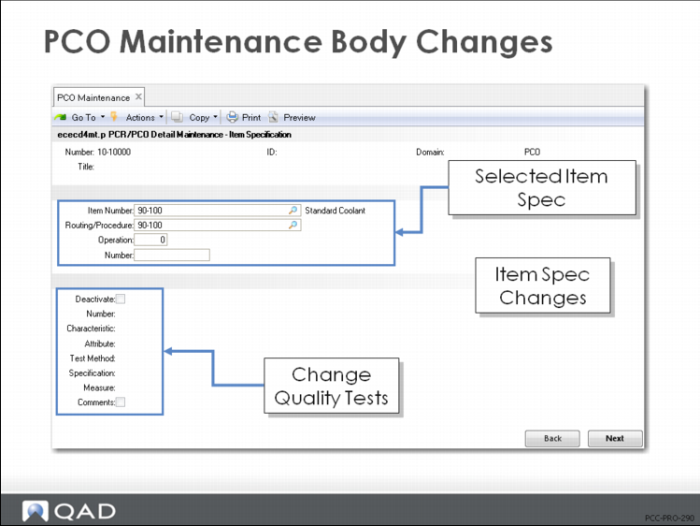
Item Specification Maintenance
• Copy quality records to PCO
• Manage changes to the quality tests associated with an item
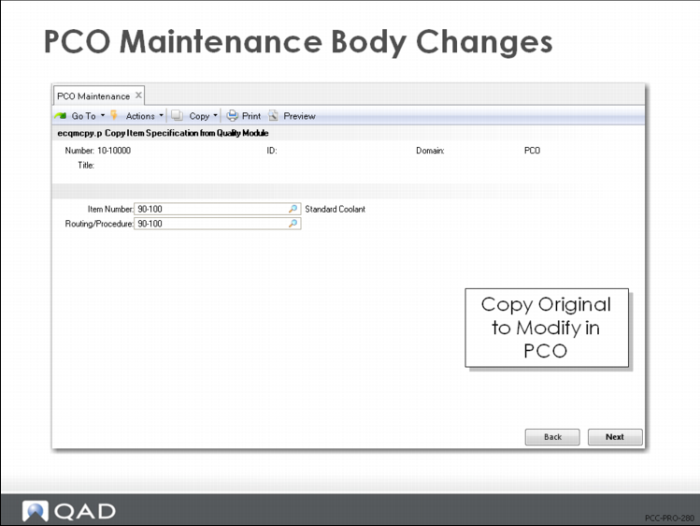
Copy Item Specification From Quality Module
• Bring item specification records into PCO for modification
• Select from current sequence of steps for a given parent item and routing
• Once records are copied, use PCR/PCO Detail Maintenance - Item Specification to modify
• Start with a copy of existing routing to simplify editing
PCR/PCO Detail Maintenance - Item Specification
• Add test steps
• Deactivate test steps
• Sets an end effective date when PCO is incorporated
• Modify existing test steps
Exercise: Create a PCO with Item Spec Changes
Engineering has found that the test procedure for 12-101 is not strict enough.
1 Use PCO Maintenance (1.9.2.13) to modify the Quality Management specifications to make the inspection use stricter standards.
Let QAD SE assign the PCO number.
Field | Data |
Assign Type | PCO |
Design Group | DESIGN |
Write down the PCO number assigned for later reference: ____________________
2 Title and Reason fields are optional. Leave them blank, or create a simple description for this PCO:
Field | Data |
Title | Test Spec |
Reason | Modifying Item Specs for 12-101 |
3 Continue past the header. Choose Item Specification Maintenance. From this menu select Copy Item Specification from Quality Module.
a Item Number = 12-101; Routing Code = 12-101
b Click in the number field (an asterisk should appear next to the sequence). click Next to continue.
4 Click Back and choose Item Specification Maintenance, then PCR/PCO Detail Maintenance - Item Specification. Tab down to modify each of the records copied in the last step.
a For Test Sequence 1, Voltage, change the specifications to a range of 9.4<= Voltage =<9.6.
5 Save the record without adding any information to the trailer. Click Next, Back and Back.
6 Use PCR/PCO Detail Inquiry (1.9.2.8) to review your PCO and verify that your changes were all included.
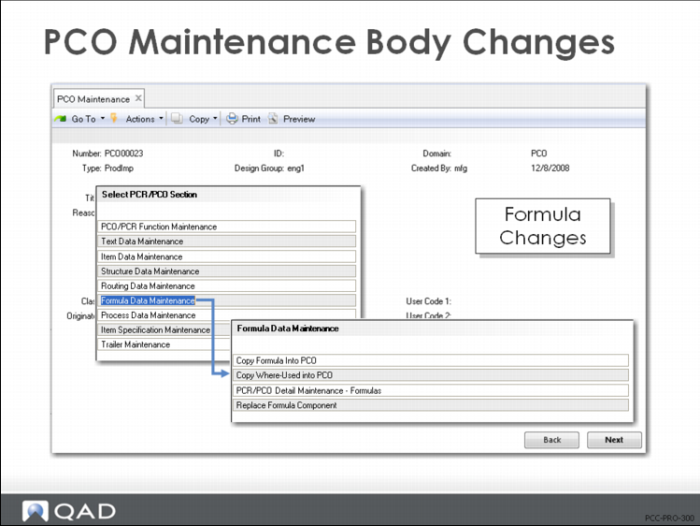
Formula File Maintenance
• Use Enable PCC Formula Maintenance (15.22) to access formula options
• Use Formula File Maintenance to
• Copy processes to the PCO
• Copy where used
• Maintain process records with Detail Maintenance
• Replace components in multiple bills
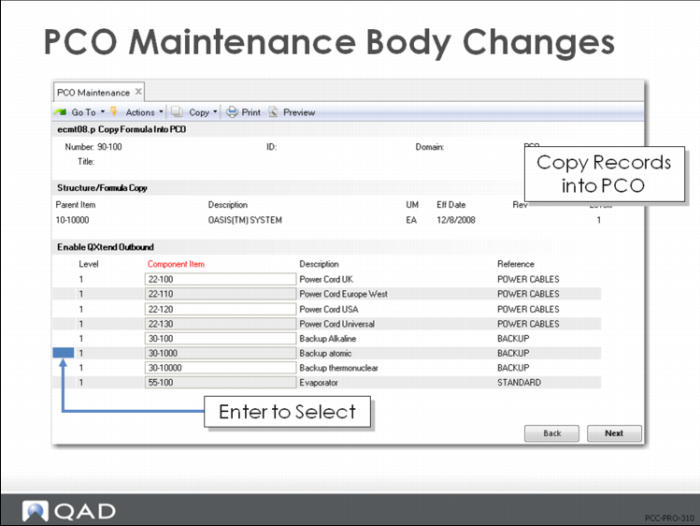
Copy Formula into PCO
• Specify Parent Item
• Displays current bill of material
• You select records to copy into PCO
• Modify any selected records with PCR/PCO Detail Maintenance - Formulas
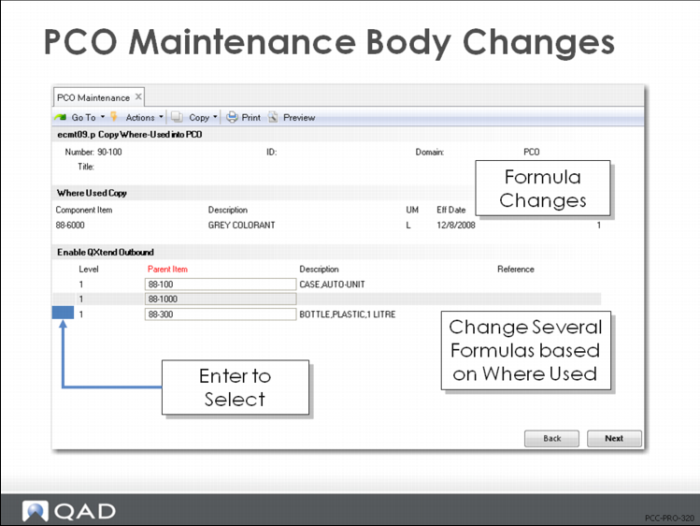
Copy Where Used into PCO
• Works the same as Copy Formula into PCO except
• Displays bill of material as indented where-used bill of material
• Useful to make the same change to several formulas
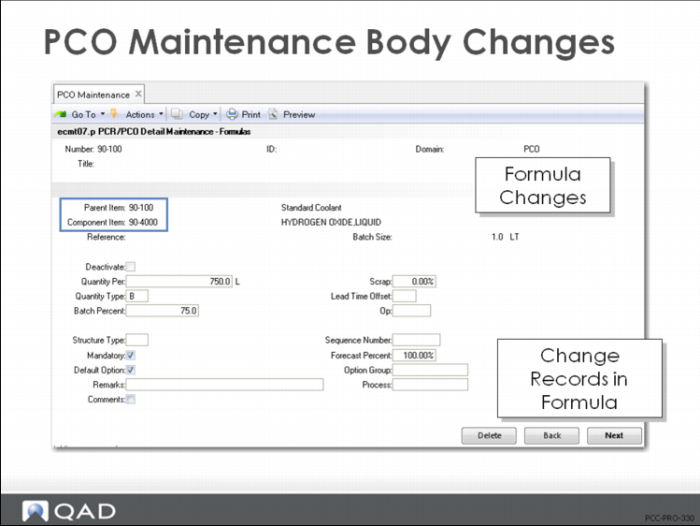
PCR/PCO Detail Maintenance - Formulas
• Add items to formulas
• Delete formula records
• Sets end effective date when PCO is incorporated
• Edit formula changes
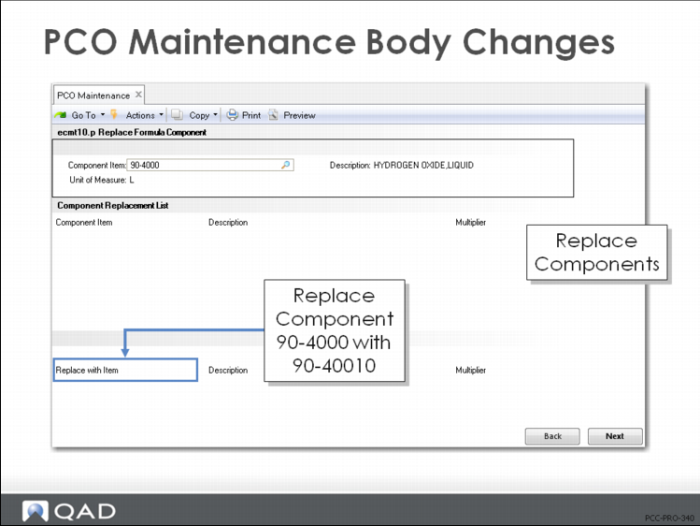
Replace Formula Component
• Replace one component with another across multiple bills of material
• Searches formula records already included in the PCO and marks the formulas as deactivated
• Adds new formulas with the new component in place of the old component
• Modified quantities are multiplied against the Multiplier value
• Other detailed formula data is copied from the existing record
Exercise: Create a PCO with Formula Changes (optional)
Koolaire (TM) Coolant Standard, Scented (90-100) needs to have the perfume reduced in the formula because the supplier has started making the perfume in stronger concentration.
1 Use Formula Maintenance (15.5) to delete the existing formula for (Parent) 90-100, (Component) 90-2000.
a Rebuild the formula with Quantity Type P, and Batch Percent 10.
2 Use Formula Maintenance (15.5) to delete the existing formula for (Parent) 90-100, (Component) 90-4000.
b Rebuild the formula with Quantity per Batch <blank>, Quantity Type P, Batch Percent 75.
3 Use PCO Maintenance (1.9.2.13) to create a PCO to indicate the reduction of one component and the increase of other components by percentage.
Let QAD SE assign the PCO number.
Field | Data |
Assign Type | PCO |
Design Group | DESIGN |
Write down the PCO number assigned for later reference: ____________________
4 Title and Reason fields are optional. Leave them blank, or create a simple description for this PCO:
Field | Data |
Title | Formula Change |
Reason | Modifying 90-100 to use less 90-2000 Concentration strength from supplier increased. |
5 Continue past the header. Choose Formula File Maintenance. From this menu select Copy Formula into PCO.
a Parent Item = 90-100.
b Select components 90-2000 and 90-4000 (an asterisk should appear next to each sequence).
6 Choose Formula Data Maintenance, then PCR/PCO Detail Maintenance - Formulas. Arrow down to access both records copied in the previous step.
a For 90-2000, change the Batch Percent from 10 to 8. click Next. The Quantity Per changes automatically.
b For 90-4000, change the Batch Percent from 75 to 77. Click Next. The Quantity Per changes automatically.
7 Save the record without adding any information to the trailer.
8 Use PCR/PCO Detail Inquiry (1.9.2.8) to review your PCO and verify that your changes were all included.
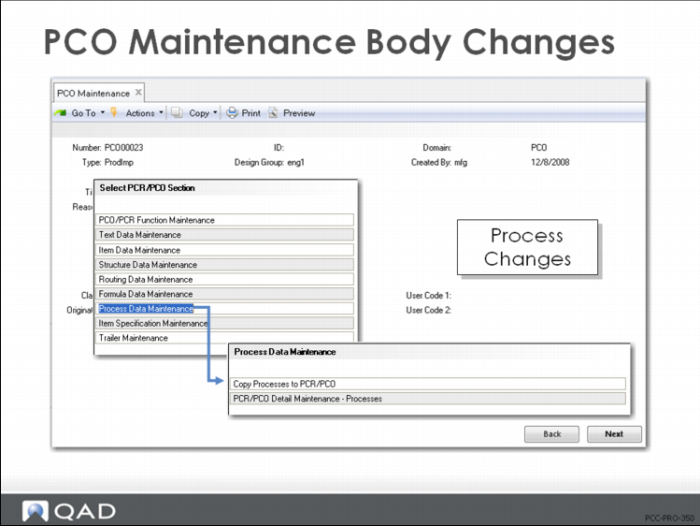
Copy Processes to PCR/PCO
• Copy processes
• Modify existing processes with Detail Maintenance
Note: Routings cannot be maintained with this function
• Use Routing File Maintenance for routing processes
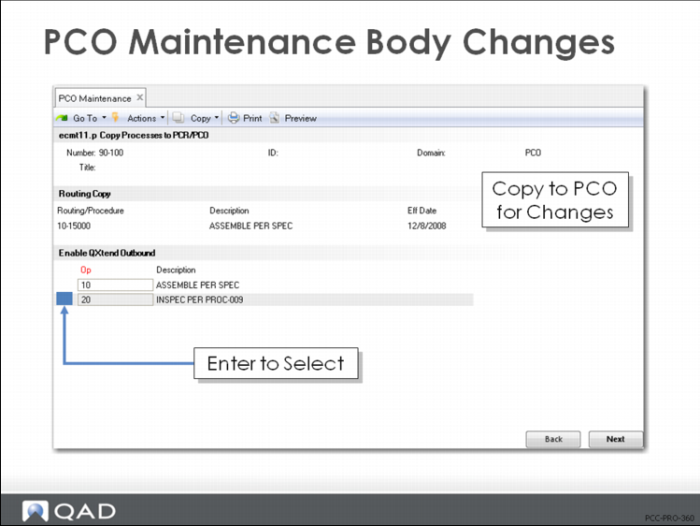
Copy Processes to PCR/PCO
• Copy process records to PCO for modification
• Displays operations and lets you select which steps to include
• Once the records are copied, use PCR/PCO Detail Maintenance - Processes to modify
• Start with a copy of existing processes to simplify editing
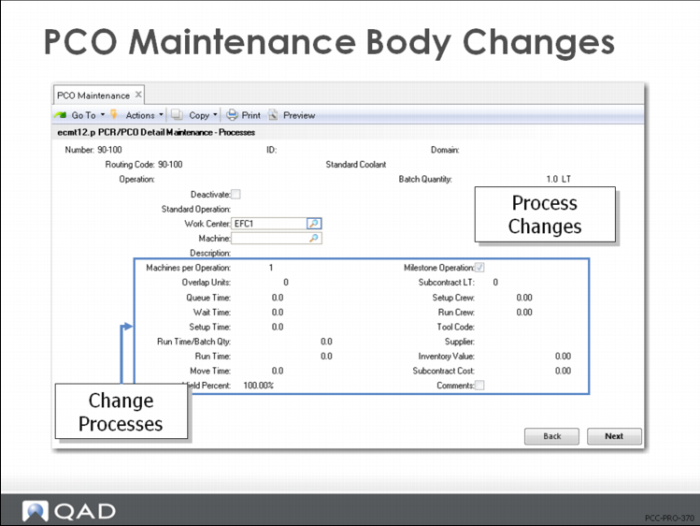
PCR/PCO Detail Maintenance - Processes
• Add operations to a process
• Deactivate operation steps
• Sets an end effective date when PCO is incorporated
• Edit process changes
Exercise: Create a PCO with Process Changes (optional)
1 The pencil molding process has a scrap factor that has never been figured into the process. Select the process operation for the pencil, 04-0005, and use PCO Maintenance (1.9.2.13) to create a PCO for a yield of only 98%.
Let QAD SE assign the PCO number.
Field | Data |
Assign Type | PCO |
Design Group | DESIGN |
Write down the PCO number assigned for later reference: ____________________
2 Title and Reason fields are optional. Leave them blank, or create a simple description for this PCO:
Field | Data |
Title | Process Change |
Reason | Modifying 04-0005 to change yield scrap factor of 2% |
3 Continue past the header. Choose Process Data Maintenance, then Copy Processes to PCR/PCO.
a Routing Code = 04-0005.
b Select process 10 (an asterisk should appear next to the process).
4 Return and choose Process File Maintenance, then PCR/PCO Detail Maintenance - Processes. Arrow down to modify the record copies in the previous step.
a For 04-0005 operation 10, change the Yield Percent to 98%.
5 Save the record without adding any information to the trailer.
6 Use PCR/PCO Detail Inquiry (1.9.2.8) to review your PCO and verify that your changes were all included.
Enter Trailer
Trailer Maintenance (1.9.25.9)
• Can be used to close or reopen a PCO (before it is distributed)
• Displays information for the release process:
• Routing slip
• Distribution group
• Date submitted
• Date approved
• The only option that appears in the PCO maintenance section menu for closed, but undistributed, PCOs
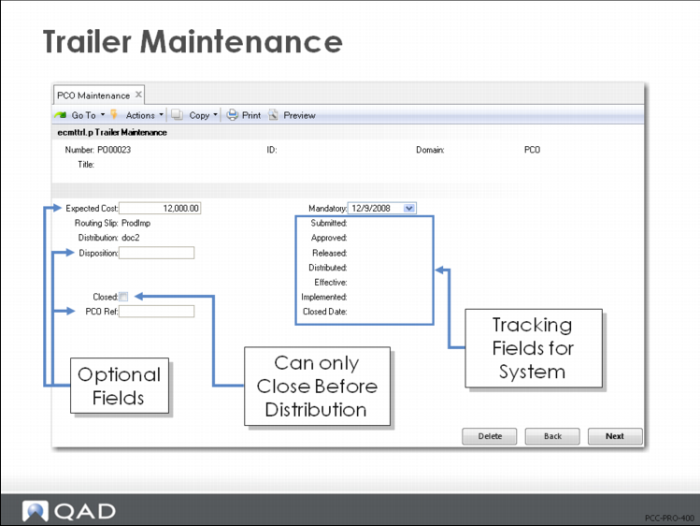
Trailer Maintenance
• Closed = Yes closes the PCO
• A PCO cannot be reopened after it is distributed
• Disposition is an optional user-defined code for describing arrangement, grouping, and urgency of PCO
• Generalized codes validated against ecm_ecr_dspn
• Mandatory is optional, indicating the latest day by which the PCO must be implemented
Review/Print PCO
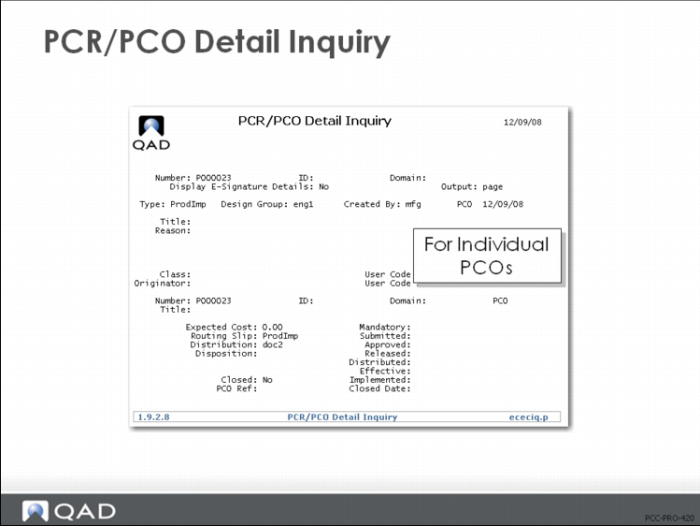
PCR/PCO Detail Inquiry (1.9.2.8)
Prints similar to Print PCR/PCO (1.9.9.1) but designed for just a single inquiry.
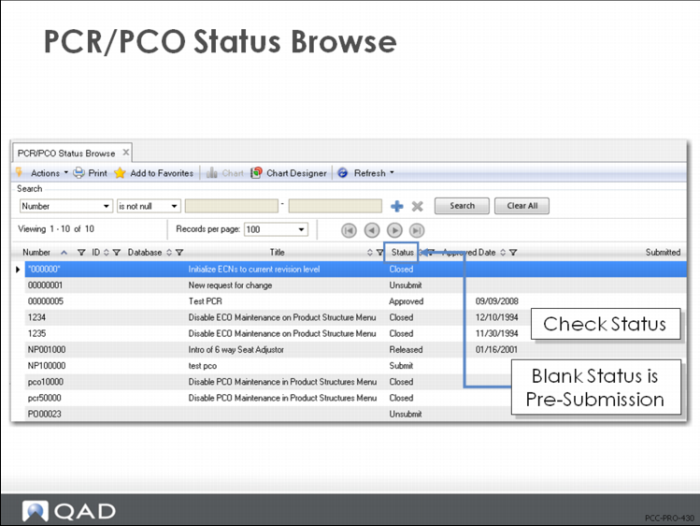
PCR/PCO Status Browse (1.9.11)
• Status shown as a column in the browse
• Blank status is Pre-submission
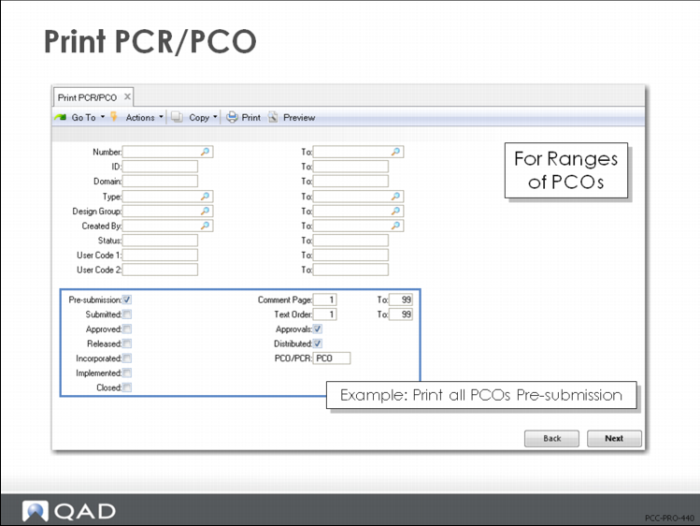
Print PCR/PCO (1.9.9.1)
• Provides a complete printout of all PCO/PCR information for ranges of PCOs/PCRs
• Prints header and status information, then (as appropriate) the approval group detail, item master detail, BOM detail in indented format, routing, process, and formula information, item specification data, and all text comments
• Bill of materials section of the report prints only the PCO bill and includes the current Qty Per from the product structure or formula record and the PCO Qty Per
• If a component has been deactivated, DEACTIVATED prints in the PCO Qty Per column
Exercise: Check Status and Print PCOs
In each of the exercises above you reviewed individual PCOs with a Detail Inquiry.
1 In this exercise, use PCR/PCO Status Browse (1.9.11) to review the status of all the PCOs created in the exercises above.
2 Use Print PCR/PCO (1.9.9.1) to print the PCOs you created. Leave the PCO Number field blank and enter the following:
Field | Data |
Pre-submission | Yes |
All other status fields | No |
PCO/PCR | PCO |
Output device | PAGE |
Route PCO for Approval
• Send the PCO to members of the Approval group for their consideration, approval, comment, rejection, or reapproval
• Once the PCO has been routed, QAD SE restricts any changes to the document to ensure that the approved version is the most current version
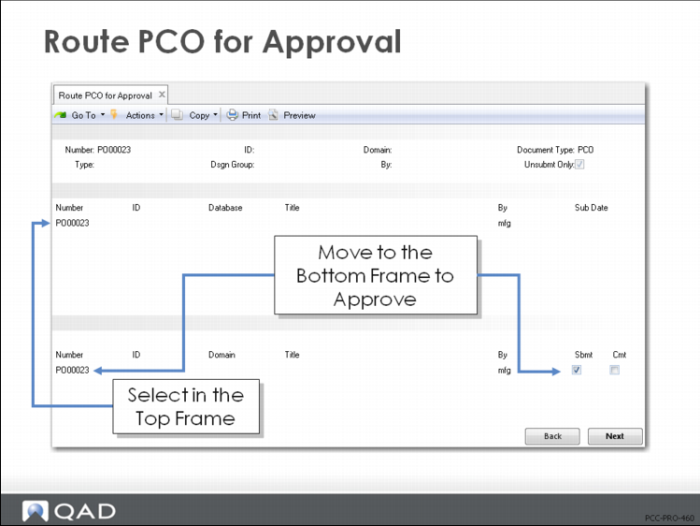
Route PCO for Approval (1.9.2.16)
• Lists PCOs in order, beginning with the PCO you enter in the first frame
• Unsubmit Only = Yes selects all PCOs that have not been routed for approval yet
• When you select a PCO for submittal in the top frame, it copies to the bottom frame
• Submit = Yes submits the PCO for approval
Exercise: Route PCOs for Approval
Submit your first three PCOs to start the routing and approval process, using Route PCO for Approval (1.9.2.16).
1 Select the first three PCOs you created in these exercises (refer to the PCO numbers you recorded). Leave the number field blank and leave Unsubmit Only = Yes. This will filter for just the unsubmitted PCOs.
a Select a PCO in the first frame and click Next.
b When it appears in the second frame, verify Sbmt = Yes. Click Next to submit.
2 Use PCR/PCO Status Browse (1.9.11) to review your PCOs to verify that their status changed. You should see:
Three records with Status | Submit |
The remaining PCOs with Status | <blank> |
PCR/PCO Approval
• Assign approval, rejection, or reapproval
• Severity levels must be used to allow approval groups to reroute PCOs for reapproval
• When the PCO has been routed, the recipients enter their approval, comments, rejection, or reapproval
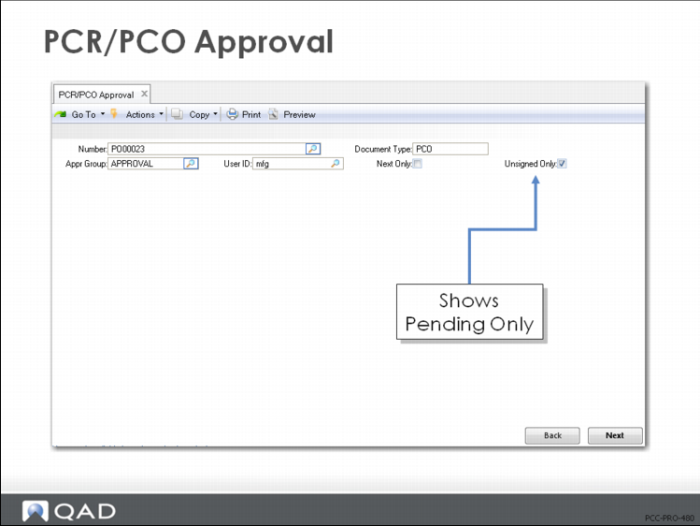
PCR/PCO Approval (1.9.6.1)
• When Unsigned Only = Yes, only pending approvals display (use = No to change prior approval)
• Select PCO for approval in top frame
• Set Appr = Yes in lower frame to approve
• If disapproved and routing slip allow for rerouting, a prompt display asks for the reroute level
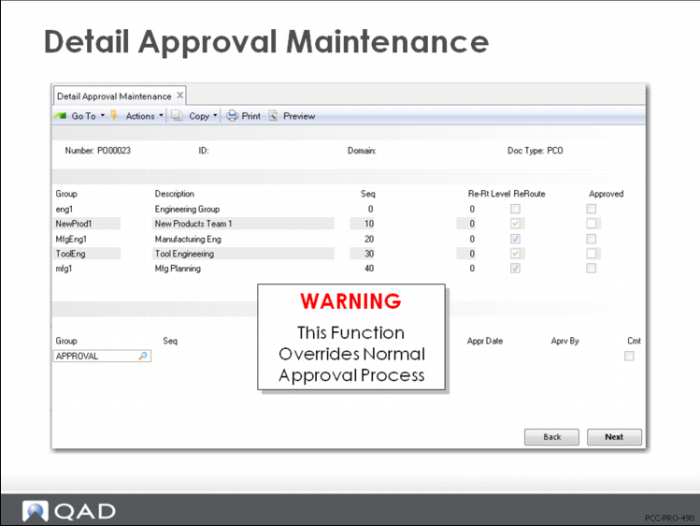
Detail Approval Maintenance (1.9.6.13)
• Allows override of the normal approval process
• Disapproved documents will not be rerouted
Important: Should be password controlled since it provides administrative override of normal approval process.
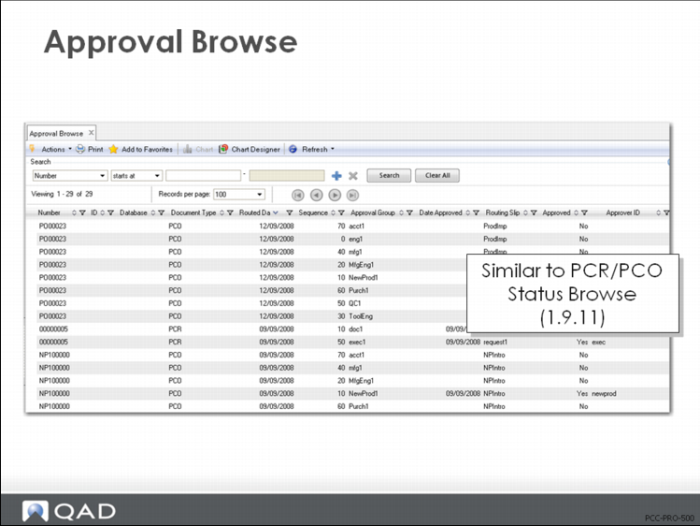
Approval Browse (1.9.6.2)
• Browse the approval status of various PCRs/PCOs
• Very similar to PCR/PCO Status Browse (1.9.11)
Release and Distribute PCO
When the approval process is complete and there are no more rerouting steps for reapproval, the PCO moves to Release and Distribution.
• Release signals a change in ownership
• Distribution is based on the routing slip
• Release is final and irrevocable once it is distributed
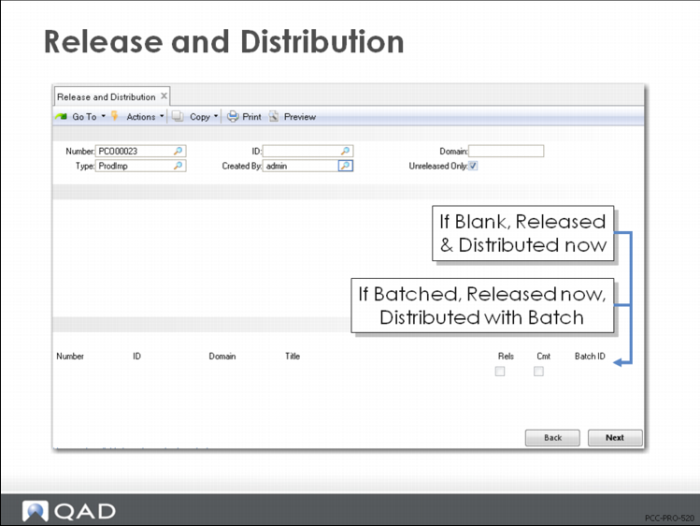
Release and Distribution (1.9.7.1)
• Select PCOs in the first frame, scroll through second frame, and select a PCO for release/distribution
• Set Rels = Yes and enter a valid Batch ID or leave blank
• Once you enter a Batch ID, the PCO is released; the PCO is distributed when the specified batch is executed
• If Batch ID is left blank, then the PCO is released and distributed immediately
• Released PCOs can be unreleased if they have not been distributed
• Run Release and Distribution with Unreleased Only = No, select the PCO, and then set Rels = No
• Distributed PCOs cannot be unreleased or modified
• When a PCO is released and/or distributed, its status changes and the dates of release and distribution are recorded
• When the PCO is distributed, it is printed for all members of the distribution group and becomes visible to Incorporation Selection (1.9.7.4)
Exercise: Approve PCOs
Approve your first three PCOs, using PCR/PCO Approval (1.9.6.1).
1 Select the first three PCOs you created in these exercises (refer to the PCO numbers you recorded). Leave the number field blank and leave Unsigned Only = Yes.
Note: Be sure to enter your login as User ID.
This will filter for just the unsubmitted PCOs. Ensure the Document Type is set to PCO.
a Select a PCO in the first frame and click Next.
b When it appears in the second frame, verify Appr = Yes. Click Next to submit. Continue until all are approved.
2 Use PCR/PCO Status Browse (1.9.11) to review your PCOs to verify that their status changed from Submitted to Approved.
Incorporate PCO
• Incorporation specifies an effective date for PCO changes to move into the production files
• Makes the changes available for planning
• Moves the changes in the PCO that affect product structures, formulas, processes, routings, and item specifications into the planning files once there is an effectivity date
• Makes data available to MRP, DRP, and other pre-production QAD SE modules
• Until implemented, a PCO incorporation date can be changed and re-incorporated
Note: Incorporation of different revisions of the same parent item must be done in revision sequence.
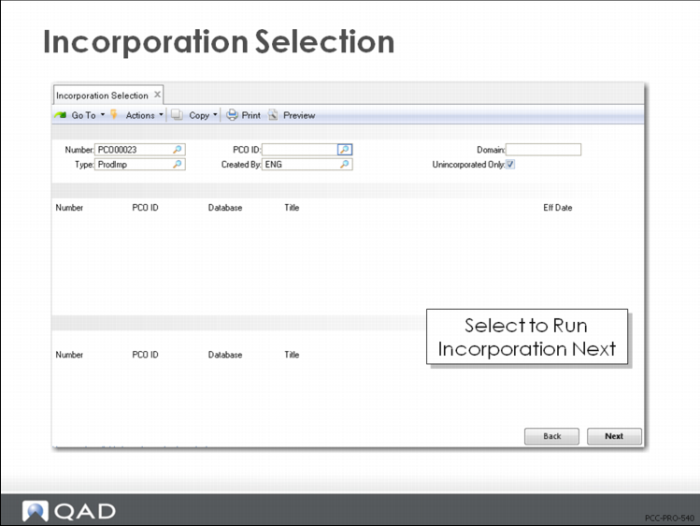
Incorporation Selection (1.9.7.4)
• Displays released and distributed PCOs, beginning with PCO specified in Number
• Unincorporated Only allows you to filter display to pending PCOs
• If two PCOs change data for the same item, they must be incorporated in revision level sequence
• Select PCOs for incorporation and specify incorporation date
• Incorporation does not happen until Incorporation (1.9.7.5) is run
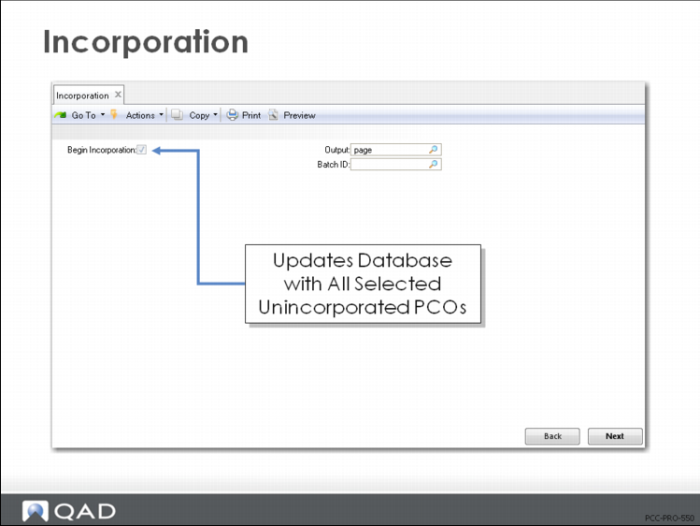
Incorporation (1.9.7.5)
• Updates the production database with all unincorporated PCOs that have effectivity dates
• Normally run as a batch process
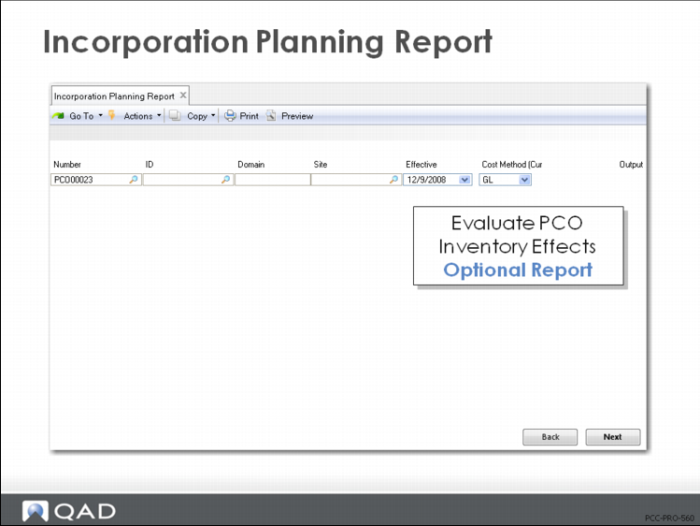
Incorporation Planning Report (1.9.7.3)
• Incorporation makes PCO information available to planning
• Use this optional report to evaluate the effects of the PCO on inventory
Exercise: Release and Distribute PCO
Use Release and Distribution (1.9.7.1) to release and distribute your first PCO. Incorporate these changes into QAD SE for planning consideration.
1 Select your first PCO for release.
a Leave the Number field blank.
b Type = PCO
c Unreleased Only = Yes
2 Then select the first PCO in the top frame to copy to the bottom frame. Verify Rels = Yes and click Next to release (leave Batch ID blank). You should see a message that the PCO was distributed successfully.
3 Use PCR/PCO Status Browse (1.9.11) to review your PCOs and verify the PCO that was released and distributed. You should now see Status = Released for your first PCO.
Exercise: Incorporate PCO
4 Use Incorporation Selection (1.9.7.4) to select your released PCO for incorporation. Leave the Number field blank, Type = PCO, and Unincorporated Only = Yes.
a Select the PCO in the first frame to bring it into the bottom frame. Assign the Eff Date = today.
5 Use Incorporation (1.9.7.5) to incorporate all PCOs with effective dates for today.
6 Use PCR/PCO Status Browse (1.9.11) to review your PCOs and verify the latest status change. You should now see Status = Incorp for your first PCO.
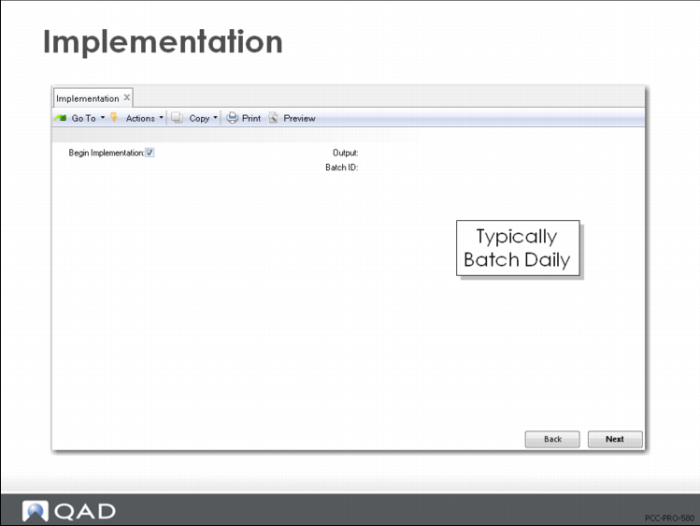
Implementation
Copies changes to item data records from incorporated PCOs when effective dates are reached.
• Dependent on the effectivity date of the Incorporated PCOs
• Usually run as a daily batch
Implementation (1.9.7.13)
• Begin Implementation = Yes, and then specify an output device
• Typically this function is run automatically every day
• Can specify a Batch ID to execute daily
Exercise: Implement PCOs
Use PCR/PCO Approval (1.9.7.1) to implement the PCOs incorporated in the last exercise.
1 Leave the number field blank, select DocType = PCO, and review Unsigned Only = Yes. Select just the first two PCOs submitted. Mark each APPROVED.
2 Use PCR/PCO Status Browse (1.9.11) to review your PCOs and verify that their status changed. You should see:
Two PCOs with Status | Approval |
One PCO with Status | Submit |
The remaining PCOs with Status | Unsubmit |
Use PCR/PCO Status Browse to verify the status.
Summary
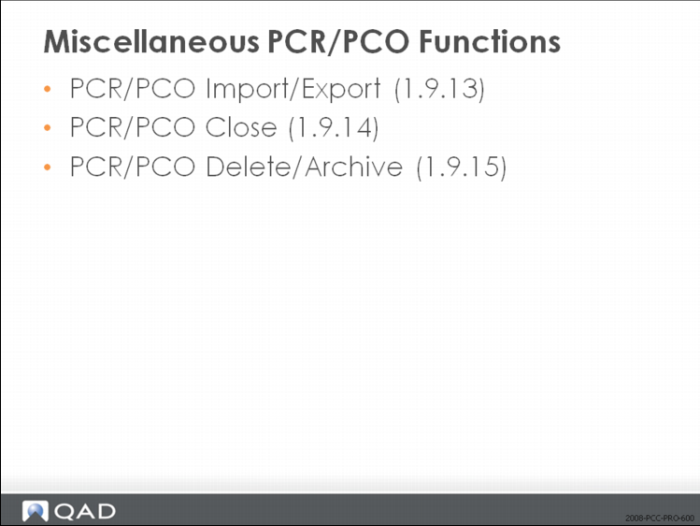
Miscellaneous PCR/PCO Functions
• PCR/PCO Import/Export (1.9.13)
• Export PCO data to an ASCII text file
• Import to restore archive files
• PCR/PCO Delete/Archive (1.9.15)
• Archive or delete closed records from the database
Course Overview
Exercise: Create a PCO with Process Changes (optional)
The plastic bottle molding process has a scrap factor that has never been figured into the process. Select the process operation for the mechanical pencil, 04-0005, and use PCO Maintenance (1.9.2.13) to create a PCO for a yield of only 98%.
1 Let QAD SE assign the PCO number.
Field | Data |
Assign Type | PCO |
Design Group | DESIGN |
Exercise: Implement PCO
Use Implementation (1.9.7.13) to implement your incorporated PCO fully into QAD SE.
1 Run the implementation process.
2 Use PCR/PCO Status Browse (1.9.11) to review your PCOs to verify the latest status change. You should now see Status = Closed for your first PCO since it has completed the full processing cycle: Created/Routed/Approved/ Distributed/Incorporated/Implemented (Closed).