Running the Migration Utility
The following sections describe the Fixed Assets Migration Utility. Use this information to map the legacy data model to the enhanced model and to resolve discrepancies. When ready, use the Create button on the Fixed Assets Migration Utility screen to load the data into the enhanced Fixed Assets module.
Fixed Assets Migration Utility (32.25.2) tracks milestones of the migration process. It also lets you map the individual migration data types—methods, books, locations, and classes—in stages and then save these intermediate stages to a migration file. After you have mapped all of the legacy data to the enhanced data model, use the Create button to load the data from the migration file into the enhanced Fixed Assets module.
Important: This update can only be done once.
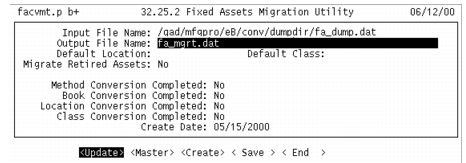
Fixed Assets Migration Utility (32.25.2)
Most of the fields in the Fixed Asset Migration Utility header cannot be updated. They display current mappings set in detail menus and screens. Use the buttons at the bottom to access the detail menus and screens. These are described in the following sections.
Buttons
Update
Use this button to update the Output File Name, Default Location, Default Class, and the Migrate Retired Assets field.
Master
Use this button to access the Master Files Migration screen.
Create
Use this button to load legacy data into the enhanced Fixed Assets module after all the data has been mapped to the enhanced model. This function can only be run once.
Save
Use this button to save the completed work to the file specified in the Output File Name field.
End
Use this button to end a migration utility session. All work is saved to the file specified in the Output File Name field.