Manually Installing the Data Warehouse
A Data Warehouse must be initialized properly before the installation of any QAD BI Analytical Modules.
Follow these steps to install and configure a new QAD BI Data Warehouse instance manually.
1 Create a database in SQL Server.
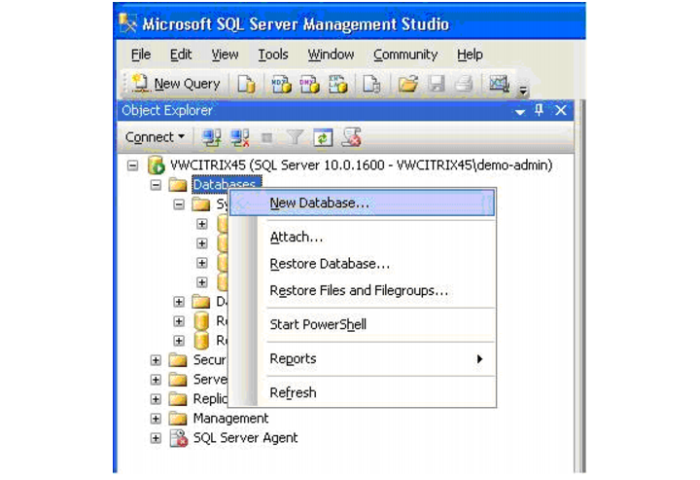
a From the Microsoft SQL Server Management Studio, right-click on Database, Create new database.
Create New Database
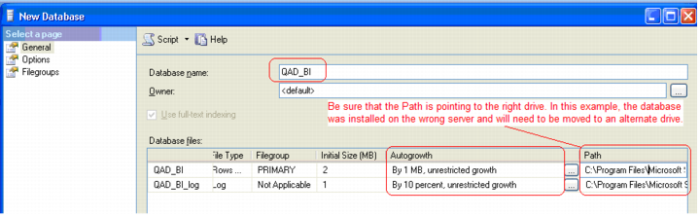
b Enter the new Database name. Make sure that the Path for the database is pointing to the correct server. Make a note for step
c.
Create New Database
Important: It is critical that you choose the Simple recovery mode from the Option tab.
Create New Database3
c If the Path from step
b is correct and it is pointing to the correct server, skip to step
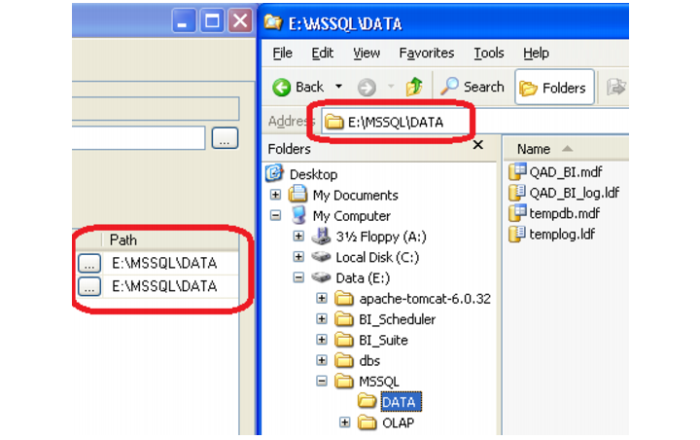
2. If the Path is incorrect, create a folder on the correct server. Once created, enter that directory as the Path for the database.
Create New Database 4
d Following up on step
c, if the Path was wrong for the database, check the temp database to confirm that it is being accessed on the right server. Launch a SQL Server database query against your new database and run the following query:
USE tempdb
go
exec sp_helpfile
go
If the results point to the correct directory, go to step
2. Otherwise, set the tempdb folder using step
e.
e To set the tempdb to the correct directory, reset to appropriate directory (E drive in this example; set as appropriate):
USE master
GO
ALTER DATABASE TempDB MODIFY FILE
(NAME = tempdev, FILENAME = 'e:\mssql\data\tempdb.mdf')
GO
ALTER DATABASE TempDB MODIFY FILE
(NAME = templog, FILENAME = 'e:\mssql\data\templog.ldf')
GO
f To accept the setting changes, stop and start your SQL Server. In SQL Server, go to the server name, not the database, in the top of the left-hand pane. Right-click on the server name and select Restart. When the system prompts you to Restart your SQL Server session, click yes. Confirm that your new temp directories now contain files indicating that the database is writing to the correct directory.
2 Install QAD BI DWD (6.6.2 or above) if you have not already done so. In Setup Administrator|PC Setup, pick the QAD BI Data Warehouse Designer option and enter the customer and license key.
3 Launch the ODBC Data Source Administrator from the QAD BI Administrator so that ODBC connections to the Data Warehouse and to the Progress databases can be created. Using the BI Administrator in the PC Setup tab, select the Validate/Add Odbc Source option. In the resulting ODBC Source screen on the right, right-click and select Add Odbc entry to launch the ODBC Data Source Administrator.
Note: Data Warehouse Designer (QAD BI DWD) uses the ODBC to communicate with the Data Warehouse database. It also allows the DWD to communicate with the QAD Progress databases and extract data from them to be used in the data warehouse. Persons who are familiar with the ODBC Data Source Administrator can launch it through other means, but if this is on a 64-bit system, it is possible that the correct one is not being launched. Use the appropriate 32-bit ODBC driver, odbcad32.exe. By opening the ODBC Administrator via the QAD BI Administrator, you eliminate any uncertainty of which ODBC Administrator is correct.
4 Create the ODBC connection to the SQL Server Database. This is a System ODBC connection, using the SQL Server Native Client driver and Windows Authentication:
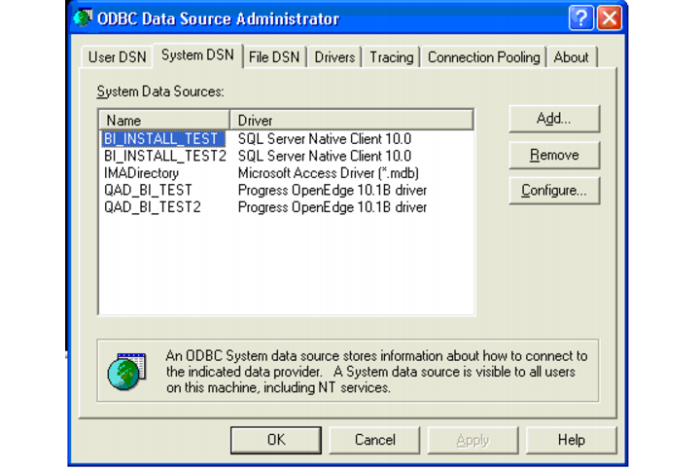
a Select the System DSN tab and click Add.
Create ODBC SQL1
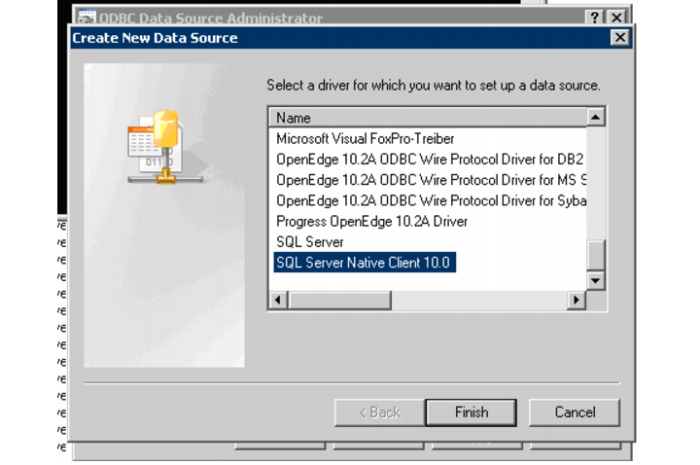
b When Create New Data Source is displayed, select SQL Server Native Client 10.0 and click Finish.
Create ODBC SQL 2
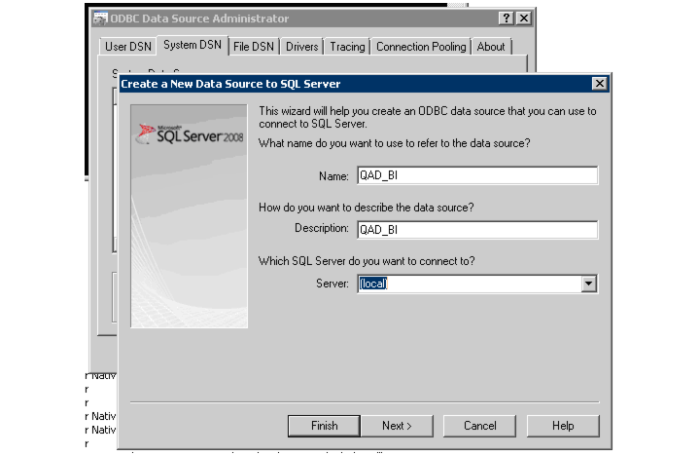
c Enter the Name, Description, and Server for the Data Warehouse and click Next.
Create ODBC SQL 3
d Choose the option With Integrated Windows authentication unless otherwise directed.
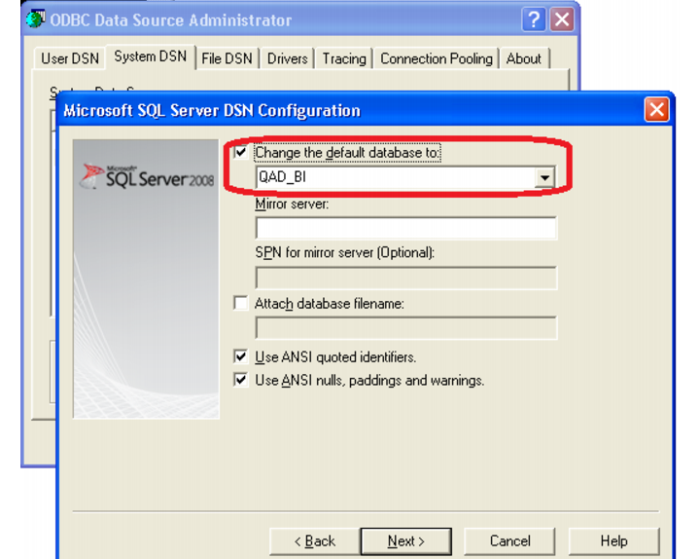
e Select the Change the default database to: check box and change the database from master to the data warehouse database. Click Next, then click Finish.
Create ODBC SQL 4
f Click Test Data Source.
g Confirm that the database connection works properly. If successful, click OK.
5 If they do not exist, use the Progress ODBC driver to create the ODBC connections to the Progress database that the data warehouse extracts from. The Data Warehouse Engine (QAD BI DWD) uses the ODBC to access each Data Source. You need the following information:
• If they have a preferred connection name
• Host name
• Port number
• Database name
• User ID
• Password
The port must be for a broker that accepts SQL connections. The user ID must have read permissions on the QAD tables.
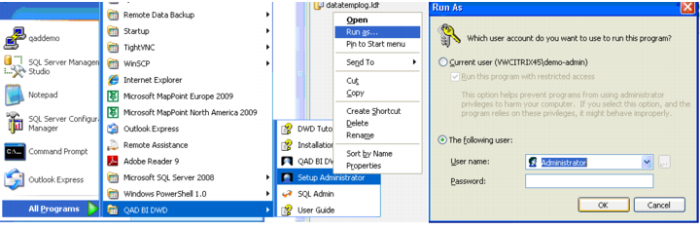
6 If you are using Windows 2008 Server, close the Setup Administrator. Relaunch the Setup Administrator as an Administrator, so that it is able to create the Scheduler as a Windows Service.
Setup Administrator
7 Choose Metadata Repository, and then Create Metadata Repository. Select the ODBC connection created in the previous step. Under Define FileGroups, leave them blank. The Repository Type must be All Licensed Objects.
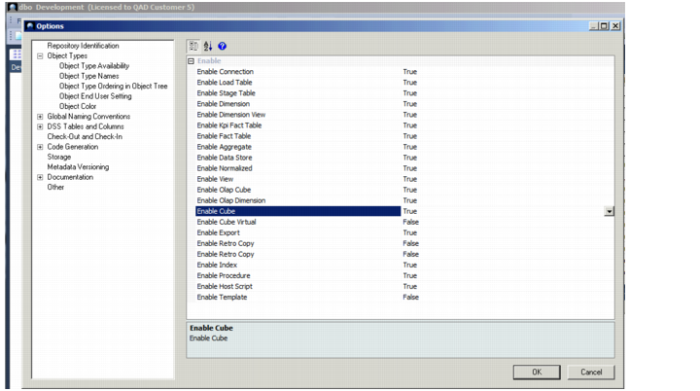
8 When QAD BI DWD is launched after the repository is created, activate Cube objects. From the Tools navigation menu, choose Options|Object Types|Object Type Availability. Click Enable Cube and select True from the drop-down list.
Cube
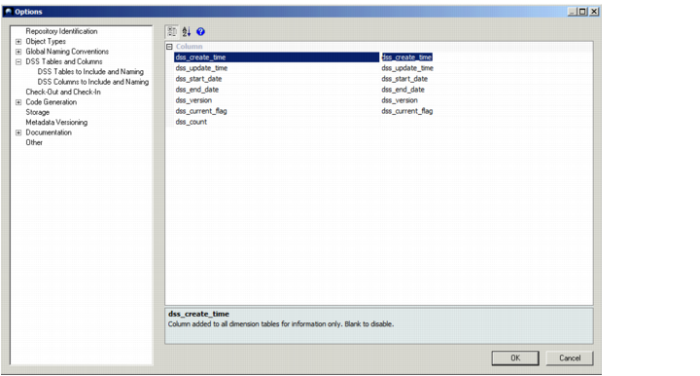
9 While in the Options window, choose DSS Tables and Columns|DSS Columns to Include and Naming. Enter dss_create_time in the dss_create_time field and then click OK to close the Options dialog box.
DSS Columns Setting
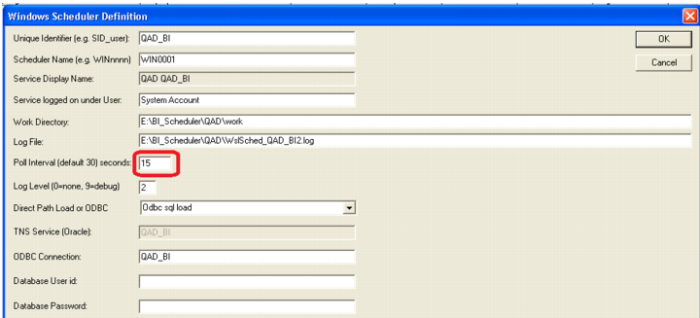
10 In the Setup Administrator, create a Scheduler for the Data Warehouse. This is the Windows service that runs scheduled jobs. Use the ODBC connection that was created for the Data Warehouse. Set the Poll Interval to 15 from the default of 30 seconds. If they do not gracefully close quickly after use, then any time less than 15 seconds raises the possibility of overloading the scheduler jobs. 30 seconds is acceptable, but due to the large number of scheduled jobs we have, reducing this is a significant time saver.
Poll Interval