Configuring the Menu
Use the Menu Configuration tab to define the menu hierarchy: the modules, submodules, and shortcuts in the menu and their arrangement.
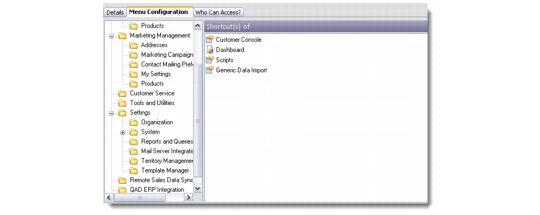
Menu Configuration Tab
The left-hand pane displays the menu tree hierarchy consisting of the modules and submodules. The right-hand pane displays the shortcuts associated with the module or submodule that is currently selected in the left-hand pane.
The process of defining a menu consists of:
• Adding a module or submodule
• Adding shortcuts to modules or submodules
Adding Modules or Submodules
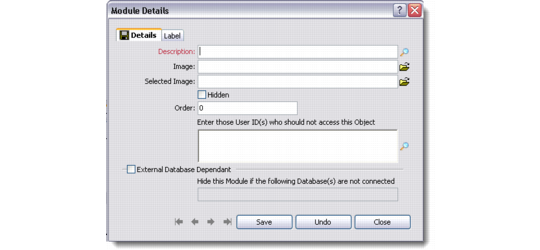
Select a module or submodule in the left-hand pane, and then right-click the pane and choose Add Module. The Module Details dialog box displays.
Note: When maintaining menus, only executable programs and objects that are registered with the Program Manager can be used.
Module Details
1 In the Description field, enter a name for the module.
2 In the Image field, enter the image you want to display before the module label on the application menu; for example, images\browse.bmp.
Note: Images are stored in the /images directory in the QAD CRM installation directory. Images must be .bmp or .ico format.
3 In the Selected Image field, enter the image you want to display when the user selects the module. For example, you might use an image of an open folder to indicate the item is selected.
4 Select the Hidden check box to hide the module on the menu.
5 In the Order field, enter the order in which the module must appear in the menu. For example, to have the module display as the second module from the top, enter 20.
6 Enter the IDs of any users who should not have access to this object.
7 Select the External Database Dependant check box if the module depends on the availability of one or more databases. In the Hide the Module if the following database(s) are not connected field, enter the name of the relevant databases. When these databases are not available, the system does not display the module in the menu.
Adding Shortcuts to Modules or Submodules
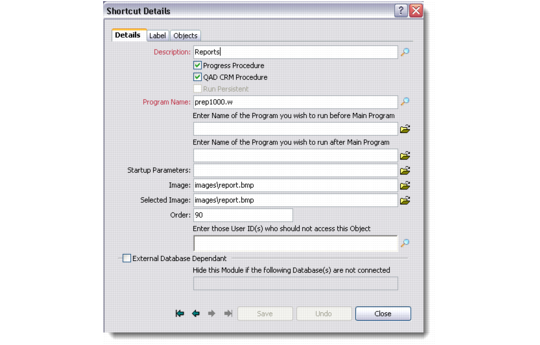
Select the module or submodule in the left-hand pane to which you want to add a shortcut. Existing shortcuts associated with the selected module display in the Shortcuts pane. Right-click the Shortcuts pane and choose Add Shortcut. The Shortcut Details dialog box displays. The dialog box has three tabs, used for the following:
• Defining shortcut details (Details)
• Defining labels for the shortcut (Label)
• Defining objects for the shortcut (Objects)
Defining Shortcut Details
Shortcut Details
1 In the Description field, enter a brief description of the shortcut.
2 Select the Progress Procedure check box if the program whose shortcut you are creating is a Progress procedure. Shortcut can also execute a non-Progress program; for example, Microsoft Word or Internet Explorer. If you want to attach a non-Progress program to the shortcut clear the Progress Procedure check box. When you clear the Progress procedure check box, the system changes the label of the Program Name field to Application Name.
3 Select the QAD CRM Procedure check box if the program is a QAD CRM system procedure.
4 Select the Run Persistent check box if you want to run the program persistently.
5 In the Program Name field, enter the name of the main program (*.w file) for the shortcut to call. For a non-Progress program, enter the name of the application with the full path name. If you want the application to open a file when you select the shortcut, enter the name of the file only. For example, if you want to open a Word document called qadcrm.doc, enter c:\qadcrm\prod\notes\qadcrm.doc only. QAD CRM finds the correct application name from the Windows registry using the file extension.
6 In the Enter Name of Program to Run before Main Program field and the Enter Name of Program to Run after Main Program field, enter the name of the programs you want to run before and after the main program, respectively.
7 In the Startup Parameters field, enter the parameters that the program must use while starting.
8 In the Image field, enter the image you want to display before the module label on the application menu. Images are stored in the /images directory in the QAD CRM installation directory.
Note: Images must be .bmp or .ico format.
9 In the Selected Image field, enter the image you want to display when the user selects the module. For example, you might use an image of an open folder to indicate the item is selected.
10 In the Order field, enter the order in which the module must appear in the menu. For example, to have the module display as the second module from the top, enter 20.
11 Enter the IDs of any users who should not have access to this object.
12 Select the External Database Dependant check box if the module depends on the availability of one or more databases. In the Hide the Module if the following database(s) are not connected field, enter the name of the relevant databases. If these databases are not available, the system does not display the module in the menu.
Defining Shortcut Labels
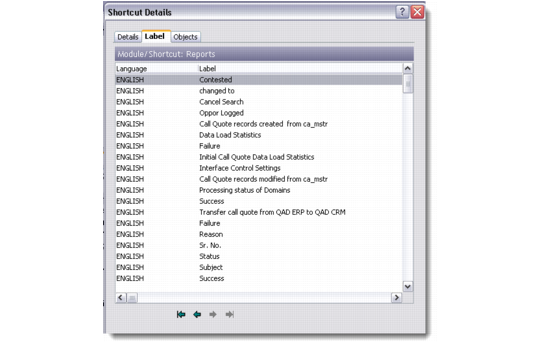
Shortcut Details - Labels Tab
Right-click the list box and choose Add Label from the menu. A blank row opens up in the list box. Enter the language of the label (for example, ENGLISH) and the text of the label.
Note: You can enter labels in different languages if your system is configured for multi-language support. The system will display the label using the language selected for the current session using the Application Language drop-down list on the Logon screen.
Defining Shortcuts
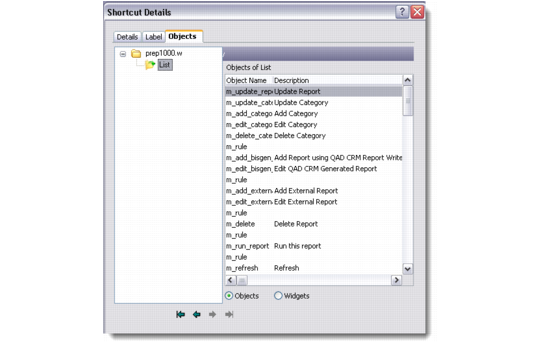
Shortcut Details - Objects Tab
If the program you specified in the details tab is a QAD CRM program, the system displays the tab and its object in the Objects tab.
Use the Shortcut Details – Objects tab to configure the menu shortcuts by either modifying an object or tab to a shortcut, or adding a procedure to an object.
1 Do one of the following:
• To add an object or a tab to a shortcut, select the shortcut in the left-hand pane to display its associated objects in the right-hand pane.
• To add a procedure to an object, select an object (folder) in the left-hand pane to display its associated procedures in the right-hand pane.
2 Select the Objects option or the Widgets option.
3 Right-click the right-hand pane and choose Add from the menu.