Field Object Manager
Use the Field Object Manager to maintain the database table fields that display on the system dialog boxes and screens. You can manage identifying information, field colors, label characteristics, hyperlink behavior, and audit status.
You can also define permissions for individual fields on screens and dialog boxes to control the permission groups and users that can view and update fields in a database record.
For example, access to information about product cost price or customer credit limits may be appropriate for some systems users, but not others. You can restrict access to these fields as appropriate by using field security. In addition, organizations can hide unwanted fields from screens to reflect their business requirements—for example, some organizations choose to remove customer turnover from their system implementations.
To access the Field Object Manager, choose Main Menu|Settings|System|Field Object Manager.
Field Object Manager
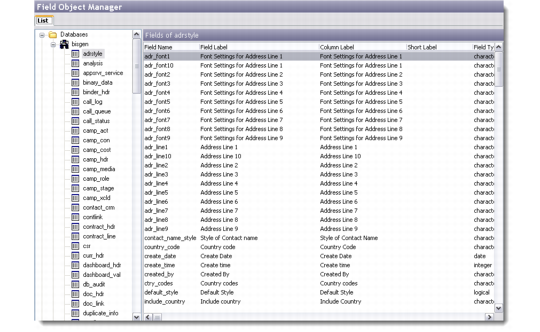
The Field Object Manager screen has two panes. The left-hand pane shows the system databases arranged in a tree hierarchy and the Mandatory Field Settings link. The right-hand pane shows the fields within the selected database table.
Expand a database to view the database table names. When a database table name is selected, the right-hand area displays the field names, associated field label, type, and format.
To specify characteristics for a field, right-click the field and choose Edit.
Note: The right-click menu also contains options for adding and deleting.
Details
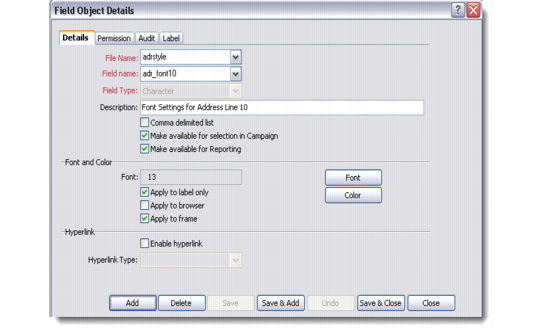
Use the Details tab to specify basic characteristics of the field, such as associated database table and field name, description, availability in other modules, font and color, and so on.
Field Object Details - Details Tab
File Name
Enter the name of the database table for the field. The drop-down list contains the table names contained within the selected database.
Field Name
Enter the name of the field.
Description
Enter a description for the field.
Comma Delimited List
Select the check box to allow comma delimited values to be entered into the field.
Make available for selection in Campaign
Select this check box to make this field available for building campaigns.
Make available for Reporting
Select this check box to make this field available in user-defined queries and reports.
Specify font and color settings as required using the Select Font and Select Color dialog boxes. Click Font and Color, respectively, to access these boxes.
Apply to label only
Select the check box to apply the specified font and color settings to the field label only.
Apply to browser
Select the check box to apply the specified font and color settings to the field as it displays in a column in a browser.
Apply to frame
Select the check box to apply the specified font and color settings to the field as it displays in a frame.
Specify Hyperlink settings as required.
Enable Hyperlinks
Select the check box to enable hyperlinks for this field. Selecting this field enables the Hyperlink Type drop-down list.
Hyperlink Type
Select a hyperlink type to use for the field.
Email. Launches the mail client.
Web Access. Launches the web browser and navigates to the Web address specified.
File. Executes the specified file.
Run Program. Executes the specified program.
When you configure a field with hyperlinks enabled, QAD CRM Report Viewer uses the hyperlink type to invoke the appropriate application.
For example, if you configure Profile Web Address field as Web Access hyperlink, when you select the Web Address field in a user-defined report and click the field in the QAD CRM Report Viewer, the system launches the default Web browser and passes the field value to the browser as the Web address.
Currently you can use hyperlink functionality only from QAD CRM Report Viewer.
Permission
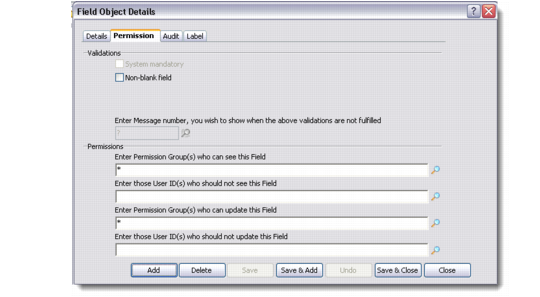
Use the Permission tab to maintain permissions for permission groups and users. For example, you can specify that only the Sales team can see a field, update the field, or both. Or you can specify individual users that do not have access or modification privileges for a field. By default, all groups have access and modify permissions for all fields.
Field Object Details - Permission Tab
System mandatory
Displays if the selected field is defined as system mandatory. System mandatory fields are used by the business logic in the system and require a value. System mandatory fields must be populated before the information on the screen or box on which they are located can be saved. You cannot change the value of this field.
You also can set colors and fonts for mandatory fields. For details, see
Mandatory Field Settings.
Non blank field
Select the check box to indicate that the field must contain a value. The business logic used by the system does not stipulate that non-blank fields must contain a value—this is up to the system user. Selecting the check box enables the Enter Message Number field.
Validation conditions depend upon the field data type; for example, a value in the date field should not be earlier than Jan/01/2011.
Enter Message Number
Enter the number of the system message to display if the Non Blank Field validation is not fulfilled when the screen or dialog box containing the field is saved.
Specify Permissions as required.
Changing Field Permissions
To change permissions for a field:
1 Determine the database table that the field belongs to by clicking the field and then pressing Ctrl+F5. The Object Details box displays.
Object Details
2 Determine the table name and field name of the field you want to specify permissions for.
3 Select Main Menu|Settings|System|Field Object Manager and locate the table in the database listing.
4 Select the table name, and then right-click the field name and choose Edit. The Field Object Details dialog appears.
5 Click the Permissions tab and specify permissions as appropriate.
Audit
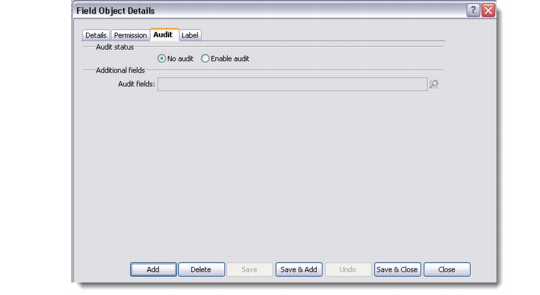
Use the Audit tab to specify auditing behavior for fields in the system. Auditing a field permits changes to a field to be tracked for various purposes. For example, you can audit how frequently an activity start date is changed; or how long it takes for an opportunity to move from the inquiry stage to the quote stage.
Field Object Details - Audit Tab
Audit Status
Select the audit options as required.
No audit. Select this option to indicate auditing is not enabled for this field.
Enable audit. Select this option to enable auditing for this field. Selecting this option enables the Audit Fields field. Enter any additional fields to be audited.
Label
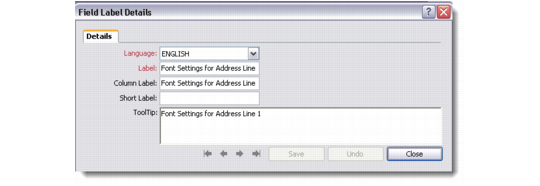
Use the Label tab to specify label and Tooltip settings for the field.
Field Object Details - Field Label Details
Language
Specify a language for the field label.
Label
Enter the field label.
Column Label
Enter the column label. The column label is used in the system browsers.
Short Label
Enter a short label. The short label is used when space restrictions prevent the full label from being used; for example, if the label is translated.
Tooltip
Enter the Tooltip text for the field. The Tooltip displays when the mouse cursor is on the field. Users can enable or disable the display of Tooltips if they have permission.