QAD Customer Relationship Management 6.7.2
>
Administration Guide
>
Organization Setup
>
Setting Up Users
Setting Up Users
The system administrator is responsible for creating and maintaining user profiles in the system. A user can have multiple user profiles; each user profile has a unique user ID and password. A user can only use one profile at a time when logged in to the system.
A user can be a member of a permission group with access to specific system menus. The system administrator creates permission groups, and defines access permissions to the system according to user profiles.
Users who share areas of responsibility are typically members of the same team; team membership determines access to database records (row-level security). For example, a user cannot view a profile if that profile is associated with a different team.
Permission groups and teams are important considerations when implementing system security. For details, see
System Security.
Use the features in the Users component to maintain user profile information. The Users component has several tabs to maintain different parts of the user profile, such as basic user profile information; permission group, business unit and menu associations, team affiliations, holidays, and so on.
To access the Users component, choose Main Menu|Settings|Organization|Users. The Users browse lists the users defined in the system.
Note: You can copy details of an existing user and edit it to create a new user profile. To copy an existing user profile, right-click the user profile you want to copy and choose Copy (or click Copy on the toolbar). The Details tab displays with the copied user details.
Details
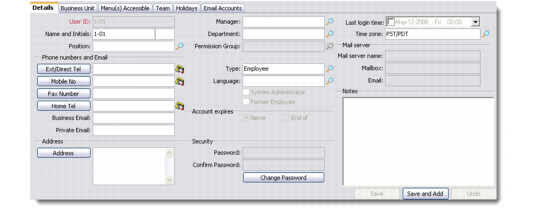
Use the Details tab to maintain basic identifying information for the user profile—name, position, manager, contact details, and so on. You also maintain the user password using this tab.
Users - Details Tab
User ID
Enter a unique user ID for the user. This ID is used by the users in conjunction with a password to access the system.
Name and Initials
Enter the first, middle, and last name of the user.
Position
Enter the position of the user.
Manager
Enter the manager to whom the user reports.
Department
Enter the department in which the user works.
Permission Group
Enter a permission group for the user. This determines the areas of the system the user can access. A user can belong to only one permission group. For details about security and permission groups, see
Permission Groups.
Last Login Time
Displays the time and date of the previous login of the user.
Time Zone
Enter the time zone for the user.
If a time zone has not been specified in My Settings|Preferences, the system uses the time zone defined here for user activities. If no time zone has been defined here, the system uses the time zone defined for the business unit that is active during the user’s current session. If a user is associated with multiple business units, the time zone of the business unit that is active during the current session is used for an activity. Tasks always use local time.
Mail server name
Displays the mail server name if your system is integrated with Microsoft Exchange Server.
Mailbox
Displays the user’s mailbox if your system is integrated with Microsoft Exchange Server.
Email
Displays the user’s email address if your system is integrated with Microsoft Exchange Server.
Ext/Direct Tel
Enter the direct work telephone or extension numbers of the user. Specify other contact details of the user in the Fax Number, Home Tel, and Mobile No text boxes.
Note: You can click the Telephone icon to use the dialout facility to make a phone call or send a fax to the user from your computer.
Business Email
Enter the business e-mail address of the user.
Private Email
Enter the private e-mail address of the user.
Note: You can click the e-mail icon next to the text box to directly send a mail to the user.
Address
Enter the user address.
Type
Enter the user type or skill level.
Language
Enter the language the system should automatically use when the user logs in.
System Administrator
Select this check box to assign system administrator rights to the user.
Former Employee
Select this check box to indicate that the user has left the company.
Account Expires
Indicate whether the user profile expires. If the End Of option is selected, you must enter an expiration date.
When a user account expires, that user is prevented from logging in to the system. To restore system access, the user account must be modified by selecting the Never option or providing a new expiration date.
Password
Enter a password for the user, and then enter the same password in Confirm Password. After entering passwords using this function, you must provide passwords to all users so that they can access the system.
Note: For an existing user, click Change Password to enable the Password and Confirm Password fields.
An administrator can give users the ability to change their passwords by providing access to the My Settings|Details screen.
Business Unit
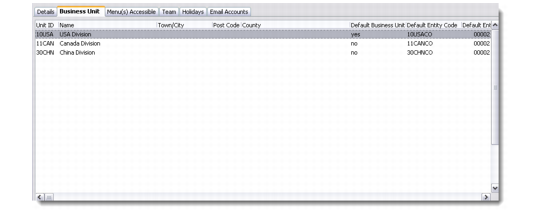
Use the Business Unit tab to maintain associations between a user profile and business units defined in the system. A user must be associated with a business unit in order to access data for that unit. A user profile can be associated with one or more business units, but can only work on data for one business unit at a time. At login, a user who is associated with multiple business units can choose which business unit to work on.
Note: You can also use the Business Unit component to maintain user profile/business unit associations.
Users - Business Unit
To attach a user profile to a business unit:
1 Choose Main Menu|Settings|Organization|Users.
2 Select a user in the Users listbox.
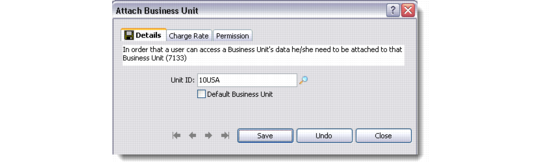
3 Right-click the Business Unit listbox and choose Add. The Attach Business Unit dialog box displays.
Note: The right-click menu also lets you edit or delete user profile/business unit associations.
Attach Business Unit
4 Provide information for the Details tab, as required.
Unit ID
Specify the business unit to associate with the user profile.
Default Business Unit
If the user profile is attached to multiple business units, select this check box to indicate that this is the default business unit for this user.
5 Provide information for the Charge Rate tab, as required.
Charge Rate 1
Enter the normal hourly charge rate that the business unit pays the user.
Charge Rate 2
Enter any other hourly charge rate—such as weekend charge rate—that a business unit pays the user.
6 Provide information for the Permission tab, as required. The Permissions tab lets you restrict actions for the specified user system wide when that user is working with the business unit:
• Add Records
• Edit Records
• Copy Records
• Delete Records
• Update Records
Menu(s) Accessible
Use the Menu(s) Accessible tab to define the menus the user can access. A user can be attached to multiple menus. A user that is attached to multiple menus can choose which menu to use at login.
For details about defining menus, see
Menu Manager.
Note: You can also use the Menu Manager to manage users and menus.
To assign a user to a menu:
1 Choose Main Menu|Settings|Organization|Users.
2 Select the user in the Users listbox you want to assign to a menu.
3 Click the Menu(s) Accessible tab. Any menus currently associated with the selected user display.
4 Right-click the Menu(s) Accessible listbox and choose Add.
Note: The right-click menu also provides options for editing and deleting existing menu assignments.
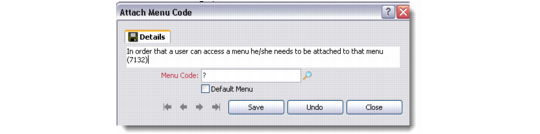
The Attach Menu Code dialog box displays.
Attach Menu Code
5 In the Menu Code field, specify a code for the menu to attach.
6 If this is the default menu for the user, select the Default Menu check box.
7 Click OK.
Team
Users with similar job profiles can be grouped into teams, such as Sales, Marketing, or Management. A user can be a member of multiple teams. Team affiliation determines a user’s record-level permissions in the system; for details, see
Setting Up Teams.
Holidays
To assign a user to a holiday schedule:
1 Choose Main Menu|Settings|Organization|Users.
2 Click the Holidays tab. Any holidays currently associated with the selected user display.
3 Right-click the Holidays listbox and choose Add.
Note: The right-click menu also provides options for editing and deleting existing holiday schedules.
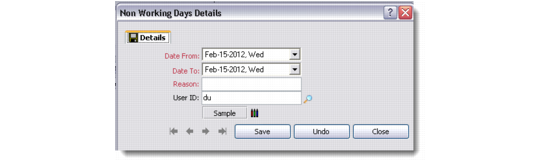
The Non-Working Days Details dialog box displays.
Non-Working Days Details
4 Enter the start and end dates, a reason for the non-working period, and a user ID.
5 Click OK.
E-mail Accounts
Use the Email Accounts tab to associate a user with an e-mail account and to maintain e-mail account details. A user can have multiple e-mail accounts, one of which is a default account.
If Microsoft Outlook is not installed on the client machine, system uses e-mail account information to send the mails. To associate a user to an e-mail account:
1 Choose Main Menu|Settings|Organization|Users.
2 Click the Email Accounts tab. Any accounts currently associated with the selected user are displayed.
3 Right-click the Email Accounts listbox and choose Add.
Note: The right-click menu also provides options for editing and deleting existing e-mail accounts.
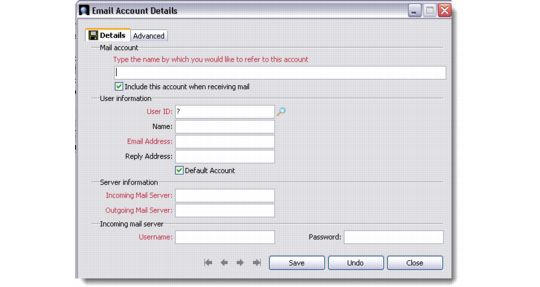
The dialog box has two tabs: Details and Advanced.
Details
Email Account Details
Account name
Enter a name by which this e-mail account should be called.
Include this account when receiving mail
Select this option to include the e-mail account when receiving mail for the system user.
User ID
Enter a user ID to associate with this e-mail account. The user must be defined in the system.
Name
Enter the name of the user to associate with this e-mail account.
Email Address
Enter the e-mail address for the user. The user will use this e-mail address for sending e-mail messages.
Reply Address
Enter the address on which the user will receive replies to e-mail messages.
Default Account
Select the check box if this is the default e-mail account for this user.
Incoming Mail Server
This field is for reference only.
Outgoing Mail Server
Enter the name of the outgoing mail server for the e-mail account.
Username
For the outgoing mail server, enter the user name that the system user must use for sending e-mail messages using the account.
Password
For the outgoing mail server, enter the password that the system user must use for sending e-mail messages using the account.
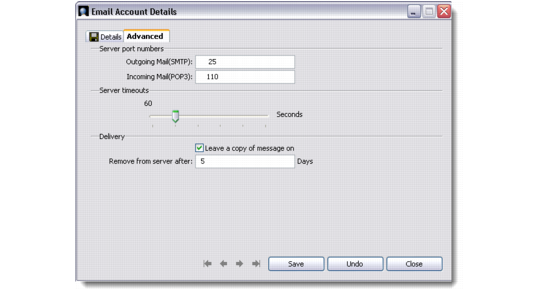
Advanced
Email Account Details - Advanced Tab
Outgoing Mail (SMTP)
Enter the port number of the outgoing mail server.
Incoming Mail (POP3)
This field is for reference only.
Server Timeouts
Using the slider, enter the number of seconds for server timeout. This time specifies how long to wait for a response from the server before ceasing attempts to send or receive e-mail messages.
Leave a Copy of Message on
Select the check box to leave a copy of the e-mail messages on the incoming mail server.
Remove from Server after
Enter the number of days after which to delete e-mail messages from the incoming mail server.