Integration Setup
To activate integration with QAD Enterprise Applications and maintain domain settings, go to Main Menu|QAD ERP Integration|ERP Management Control.
ERP Management Control
QAD ERP Management Control
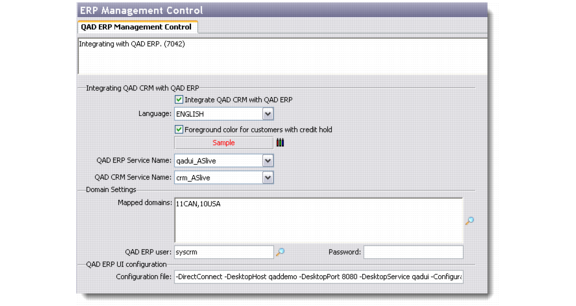
Use the QAD ERP Management Control option to configure settings that control the integration of QAD CRM and QAD Enterprise Applications.
Integrate QAD CRM with QAD ERP
Select this check box to activate the integration of the two applications.
Language
Select a language from the drop-down list. The language you select here is used in other integration programs. For example, initial data transfer uses this field to find translated text and export it to the log file.
Foreground color for customers with credit hold
Select this check box if you want the foreground color to show up as defined in the color scheme here. Choose a different foreground color by clicking on the color button.
Note: If a customer is on credit hold, then this foreground color will be used to distinguish that customer from the other customers who do not have any credit hold. The customers with credit hold will show up in the chosen color in browsers like All Profiles and the Customer Console.
QAD ERP Service Name
Select a service name for using Pricing tables and rules (best pricing) defined in QAD Enterprise Applications.
From CRM 6.4 onward, opportunity lines in CRM can make use of pricing tables and rules. These are not maintained within CRM. Using this service, CRM gets all the information from QAD Enterprise Applications.
You must first configure this service name in QAD CRM using QAD .NET UI AppServer parameters.
QAD CRM Service Name
Select a service name for QXtend Inbound and Customer Console. QAD CRM Service Name is mandatory for integration with QAD Enterprise Applications – Enterprise Edition.
You must first configure your application server (AppServer) settings in the QAD CRM system. To define these settings, go to Main Menu|Settings|System|AppServer Service Maintenance. For details, see
AppServer Service Maintenance.
Note: In case QAD Enterprise Applications databases are not connected in the current QAD CRM session, the settings defined for this service name in Main Menu|Settings|System|AppServer Service Maintenance are used to connect to the required QAD Enterprise Applications databases.
Mapped Domains
Select the QAD Enterprise Applications domains with which you want to integrate.
Note: Prior to QAD CRM 6.3, there was an indirect mapping between a single QAD CRM Business unit and a single Enterprise Application domain. In QAD CRM 6.3, QAD Enterprise Applications domains were implemented by extending the usage of QAD CRM Business units. When it is integrated to QAD Enterprise Applications, QAD CRM maps a domain to a Business unit in QAD CRM of the same name.
QAD ERP User
Enter a QAD Enterprise Applications user ID. QAD CRM uses this user ID when it sends any data to QAD Enterprise Applications. This user ID is used by the system in conjunction with the password.
Password
Enter the password of the above user ID. This password is used by the system in conjunction with the user ID.
Configuration File
The settings in the configuration file are used to call QAD Enterprise Applications .NET / Desktop screens. You can call QAD Enterprise Applications screens from Customer Console / Profile Summary Report.
There are two ways you can enter the settings in the Configuration File:
a QAD .NET UI configuration file.
Enter the path to the configuration file; for example:
http://coli45:8080/testsfm93ui/configurations/default/client-session.xml
Where:
• coli45: Name of the machine where QAD Enterprise Applications is installed
• 8080: Homeserver port
• testsfm93ui: WebApp name
• default: Configuration name
b DirectConnect option.
Enter all the parameters in a configuration file entry that begins with -DirectConnect; for example
-DirectConnect -DesktopHost coli45 -DesktopPort 8090 -DesktopService testdb -Configuration testdb -WebApp qadhome
• -DirectConnect: CRM reads settings directly from the configuration file fill-in, if it begins with -DirectConnect
• -DesktopHost: Name of the machine where QAD Enterprise Applications is installed
• -DesktopPort: Homeserver port
• -DesktopService: Name of the Desktop Service
• -Configuration: .NET UI Configuration name. This is not mandatory; if not specified, system takes as ‘default’
• -WebApp: WebApp name
• -DesktopAPI: This is not mandatory; if not specified, system takes as ‘shell.jsp’
• -DesktopProtocol: This is not mandatory; if not specified, system takes as ‘http’
The parameters may vary based on your configuration.
Note: The settings in the configuration file are used to connect to the QAD Enterprise Applications desktop session whenever you click a related hyperlink in Customer Console, or in system-generated reports that display QAD Enterprise Applications data.
After you save the general integration settings on this tab, if you are using QAD Enterprise Applications – Enterprise Edition, see
QXtend Configuration to specify QXtend parameters. Otherwise see
Settings and Switches to specify control settings for each module that you want to integrate.