Configuring QAD CRM on Deployment Server
Compiling Encrypted Files
QAD CRM supports the following three scenarios:
• QAD CRM Without Integration with QAD Enterprise Applications
• QAD CRM Integrated with QAD Enterprise Applications (Standard Edition)
• QAD CRM Integrated with QAD Enterprise Applications (Enterprise Edition)
QAD CRM Without Integration with QAD Enterprise Applications
Compiled programs with ISO databases (
.r code) are shipped with the product. If you are using QAD CRM with OE11.3.1 and an ISO database in a stand-alone configuration, then you can skip directly to the section
Configuring the Delivery Server. Otherwise, go to the section
Compilation Procedure and implement the steps.
QAD CRM Integrated with QAD Enterprise Applications (Standard Edition)
1 Rename the file QADCRMInstallDir\system\psys0101.i; for example, you can rename the file to psys0101.i.org.
2 Copy psys0101.i from QADCRMInstallDir\integration\eb21 to the folder QADCRMInstallDir\system.
3 Create a folder called xrc under QADCRMInstallDir and then copy all programs and subdirectories from QADERPInstallDir/xrc to QADCRMInstallDir\xrc.
QAD CRM Integrated with QAD Enterprise Applications (Enterprise Edition)
1 Rename the file QADCRMInstallDir\system\psys0101.i; for example, you can rename the file to psys0101.i.org.
2 Copy psys0101.i from QADCRMInstallDir\integration\eb3 to the folder QADCRMInstallDir\system.
3 Create a folder called xrc under QADCRMInstallDir and then copy all programs and subfolders from QADERPInstallDir/xrc to QADCRMInstallDir\xrc.
4 Copy the 32-bit version of proxy.pl from QADERPInstallDir/fin to QADCRMInstallDir\mfgsrv.
The Progress 32-bit version of the proxy.pl file can be acquired from the QAD Enterprise Applications (EE) installation media. From the installation media, extract the mfgproap32/mfgproap32.zip file, which contains 32-bit proxy.pl, to QADCRMInstallDir\mfgsrv.
5 Open cbserver.xml under QADCRMInstallDir\integration\mfgpro in Notepad and modify appServiceURL with QAD Enterprise Applications Financials AppServer details. In the following example, col45 is the AppServer host name, 42398 is the NameServer port number, and QADFdevsfm93app is the QAD EE Financial AppServer broker name.
Compilation Procedure
1 Create a word break rule file for the CRM Unicode databases (Unicode Environment only).
a Start a command window (cmd.exe) and set the DLC and PATH variables.
set DLC=ProgressInstallDir
set PATH=%PATH%;%DLC%;%DLC%\bin
b Change the current directory to the Progress installation directory.
cd %DLC%
c Compile the new word break rule file using the following command.
proutil -C wbreak-compiler %DLC%\prolang\convmap\utf8-bas.wbt 1
d Double check that the file created in the previous step named proword.1 now exists in the %DLC% folder.
2 Modify the parameter file.
In case QAD CRM is integrated with QAD Enterprise Applications, modify QADCRMInstallDir\qadsfamaupgrade.pf to additionally connect all QAD Enterprise Applications databases.
Note: Make sure that you have included the parameter -ld qaddb to set the logical database name of the main QAD Enterprise Applications database as qaddb.
For a Unicode environment, you must perform the following additional steps:
a Update or add the following parameter values in QADCRMInstallDir\qadsfamaupgrade.pf:
-cpinternal UTF-8
-cpstream UTF-8
-cpcoll ICU-UCA
-cpcase Basic
b For Unicode compilation, modify qadsfamaupgrade.pf to connect to the Unicode databases in the QADCRMInstallDir\db\demo\unicode folder; for example:
-db db\demo\unicode\bisgmenu -1
-db db\demo\unicode\bisgen -1
-db db\demo\unicode\dataexch -1
3 Compile QAD CRM programs.
A full compile of the server code is required after installation. Compiling a source file creates an object file with the same name and .r extension.
a Choose Start|All Programs|QAD CRM 6.6.1|QAD CRM Deployment Utility. The following screen appears.
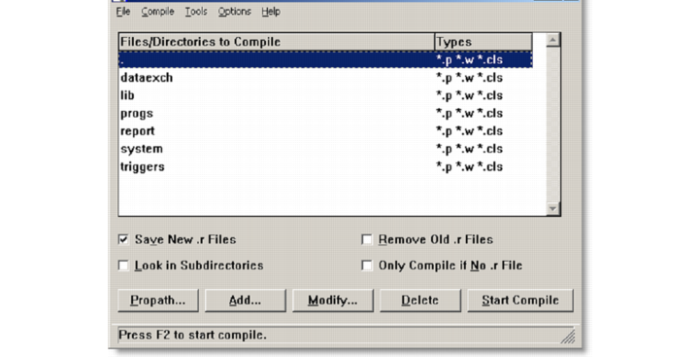
b Compile all the programs (*.p, *.w, *.cls) in the following directories:
• QADCRMInstallDir\dataexch
• QADCRMInstallDir\lib
• QADCRMInstallDir\progs
• QADCRMInstallDir\report
• QADCRMInstallDir\system
• QADCRMInstallDir\triggers
To do this, click on the QAD CRM Application Compiler button in the QAD CRM Deployment utility screen. The following application compiler screen appears.
Note: If you are using QAD CRM integrated with QAD Enterprise Applications, click Add to include the folder QADCRMInstallDir\integration\mfgpro. If you want to add the integration\mfgpro folder to the Application Compiler Screen, click Add, enter the folder name in the pop-up window, and click OK.
c Clear the Look in Subdirectories check box.
d Click Start Compile to start the compilation.
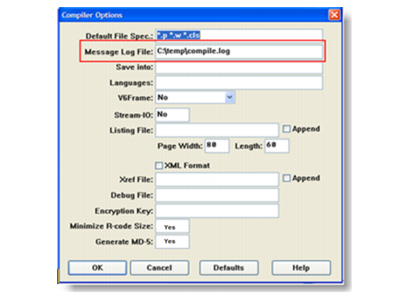
e The application compiler generates a log file during compilation. Check the log file to ensure that there are no errors. Errors begin with two asterisk characters (**). Contact QAD Support in case of any errors.
Note: If you are unsure about the location of the log file, check Options|Compiler and view the log file to check for errors.