Loading Language Files into QAD CRM
If you need to load any language files after QAD CRM is installed, you must perform the tasks described below.
Perform the following general steps if you want to load language files after QAD CRM is installed:
1 Set up a new language record in the lookup table for lookup no = 10 and update the correct code page.
2 Run the QAD CRM Deployment Utility and then click the CRM Upgrade Utility button to launch the Upgrade Utility.
3 Specify the name of the parameter file to connect to the required databases you want to update with the language file. Then click the tick button to launch the Upgrade Utility to select and load the language file.
Setting Up a New Language Record
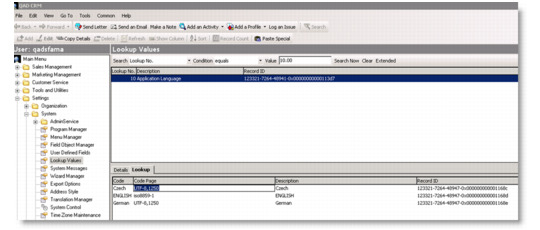
1 From the QAD CRM Main Menu, choose Settings|System|Lookup Values.
2 Set Lookup No. equals 10.00 as the search criteria and click Search Now.
3 Under the Lookup tab in the lower frame, right-click and select Add to add a new language code.
4 Enter the code, code page, and description in the corresponding fields and save the record.
Setting Up a New Language Record
Code
Enter the language code as supplied in the below language table; for example, if you want to load Castilian Spanish, enter code as ‘CastSpaní’. The system will validate the language file name against the code identifier during file load and will not load if it does not match.
Code Page
Enter the language code page as supplied in the below language table corresponding to the language code. For example, if you want to load Castilian Spanish, enter “UTF-8, ISO8859-1” as code page. System validates the code page against the Progress session code page. It will not load if the system code page does not match the language code page.
Description
Enter the language description as supplied in the below language table corresponding to the language code.
Language Table
Code | Code Page | Description |
CastSpan | UTF-8, ISO8859-1 | Castilian Spanish |
Czech | UTF-8 | Czech |
Dutch | UTF-8, ISO8859-1 | Dutch |
French | UTF-8, ISO8859-1 | French |
German | UTF-8, ISO8859-1 | German |
Italian | UTF-8 | Italian |
Japanese | UTF-8 | Japanese |
Korean | UTF-8 | Korean |
LatiSpan | UTF-8, ISO8859-1 | Latin Spanish |
Polish | UTF-8 | Polish |
Portug | UTF-8, ISO8859-1 | Portuguese |
SimpChin | UTF-8 | Simplified Chinese |
TradChin | UTF-8 | Traditional Chinese |
Loading Language File
QAD CRM supports the following code pages:
• Unicode (UTF-8)
• ISO (ISO8859-1)
For non-iso languages, CRM databases should be configured to run in Unicode.
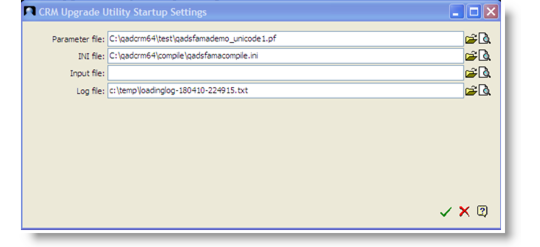
1 Make sure that the databases are running in multi-user mode. Modify the Upgrade utility parameter file (.pf) and connect to the same databases where you created the language records.
2 Launch the QAD CRM Deployment Utility and then click the QAD CRM Upgrade Utility button.
3 In the QAD CRM upgrade startup screen, specify the parameter file and the .ini file located under QADCRMInstallDir\Environment to connect to your CRM environment, then click the OK icon (green check mark).
The parameter file (.pf) file should connect to the same databases where you created the language record.
CRM Upgrade Utility Startup Settings
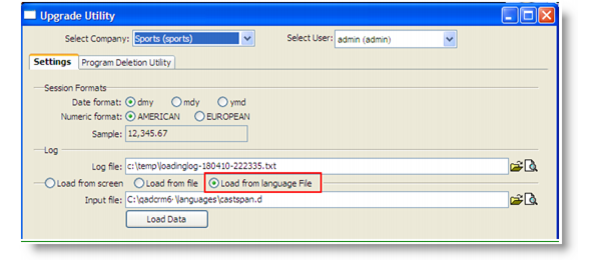
4 Under the Settings tab on the Upgrade Utility screen, select Load From Language File and specify the language file to load from the QADCRMInstallDir\languages directory, where all CRM language files are located. If the QADCRMInstallDir\languages directory was not created during installation or if new language files are provided, manually create the languages directory under QADCRMInstallDir and copy the language files you want to load to it.
5 Click Load Data. The data load process begins.
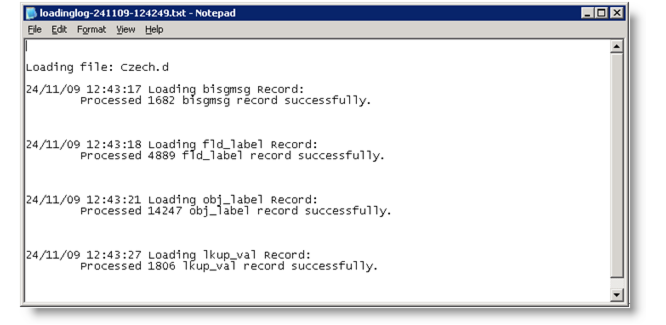
6 After the language file load is complete, a message prompts you to view the log file. Click Yes to open the log file. The following illustration shows how the log file will look after loading the Czech.d file. Four tables get loaded as a result of loading a language file. They are as follows:
• bisgmsg
• fld_label
• obj_label
• lkup_val
7 If the system fails to load them successfully, contact QAD Support.
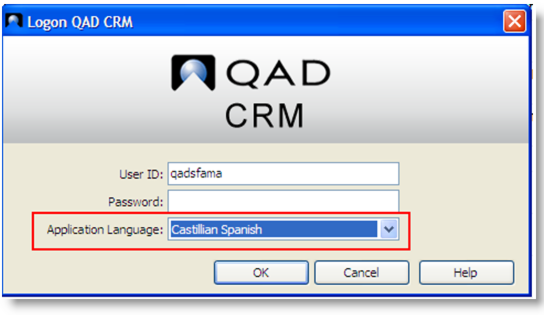
8 Log out and log in to CRM again. In the log-in screen, select the language you just loaded the language file for from the Application Language field. After you log in, you will see the CRM user interface in the new language.