Profiles
This chapter provides an overview of profiles and information on using profiles.
Overview
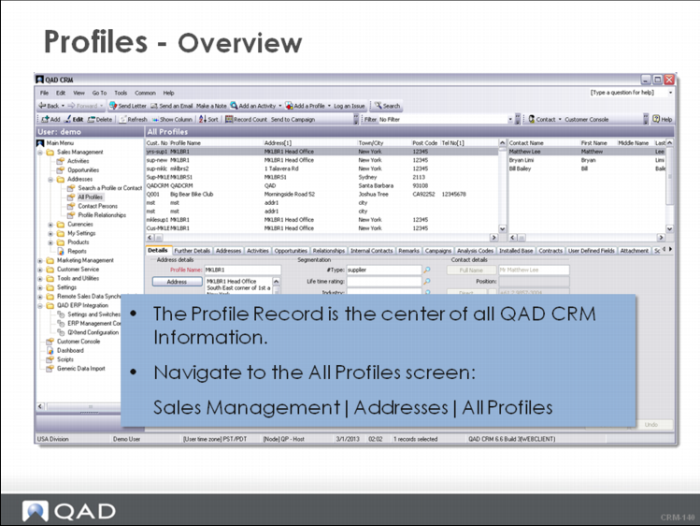
In this chapter, you gain an understanding of the Profile Record and how to manage your profiles effectively. The Profiles record forms the core of the QAD CRM system as all contact and opportunity information is associated with a Profile.
• Profiles either contain or are associated with all the information you need for a 360-degree view of your business relationship. The information includes addresses, contacts, opportunities, installed base products, contracts, and more.
• Information is displayed on-line in the following tabs: Details, Further Details, Addresses, Activities, Opportunities, Relationships, Internal Contacts, Campaigns, Analysis Codes, Installed Base, Contracts, User-Defined Fields, Attachment, Script, and Issues.
Learning Objectives
• Describe the Profile Record.
• List the data that is contained in a Profile.
• Search for a Profile
• Add a Profile
Profile Types
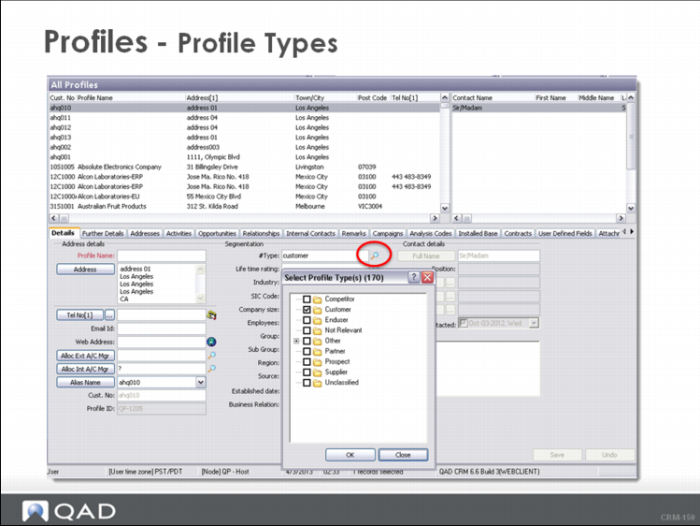
• A profile is a business or business relationship that has an association with your organization.
• A profile can be a Customer, Competitor, Partner, Supplier, or any other business or business relationship that your organization needs to track.
• QAD CRM also tracks complex business relationships. If your Customer is also a Supplier, you would designate both types for this profile. QAD CRM supports the ability for a Profile to contain multiple Profile Types.
• Your organization defines the types of business relationships by providing the look-up values for the Profile Type field.
Searching Profiles
How many customers, prospects, suppliers, competitors, partners, or other business relationships are you tracking on QAD CRM? You can track an unlimited number of profiles, however, you need to access your profiles quickly and efficiently.
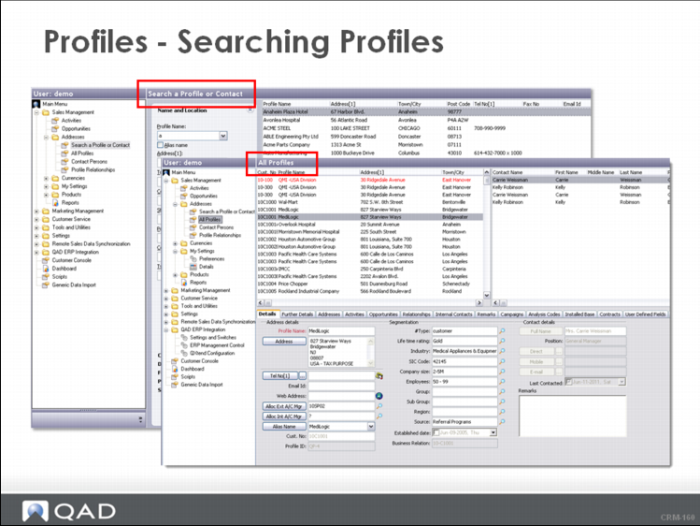
QAD CRM provides powerful search facilities to help you locate specific profiles. You can search for specific profiles/contacts using search criteria or you can display all your organizations profiles or profiles based on the first letter of the profile name. The two screens that you use to locate your profiles are:
• Search a Profile or Contact screen
• All Profiles screen.
The navigation and search capabilities of each screen are a little different, but certain QAD features apply to most searches in QAD CRM. For instance, you can generate a report of your search results, send information to QAD ERP, or export your search from most screens.
Creating a Favorite
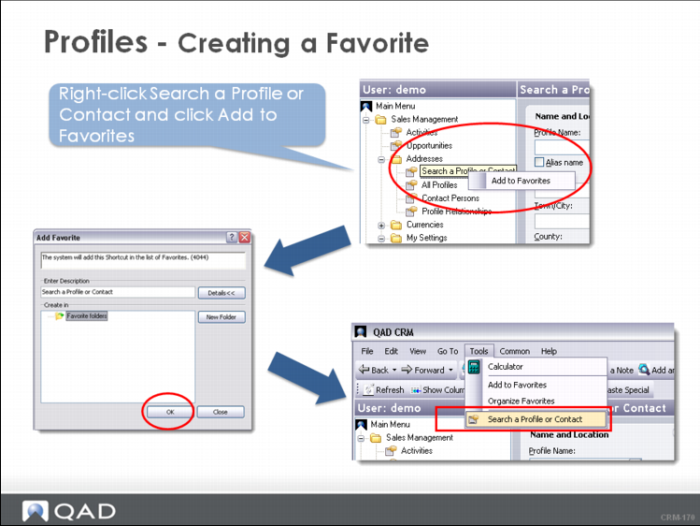
You can access the screens from the CRM Menu or you can create a favorite for the screens that you frequently use. Favorites appear under Tools in the Application Menu Bar and also in the QAD CRM Bar (at the bottom of the QAD Menu Bar).
To create a favorite:
1 Navigate to CRM Menu|Sales Management|Addresses|Search a Profile or Contact.
2 Right-click Search a Profile or Contact and click Add to Favorites.
The Add Favorite dialogue box is displayed.
3 Click OK to save.
The Favorite displays:
• Under Tools in Application Menu Bar
• On QAD CRM Bar
Search Criteria
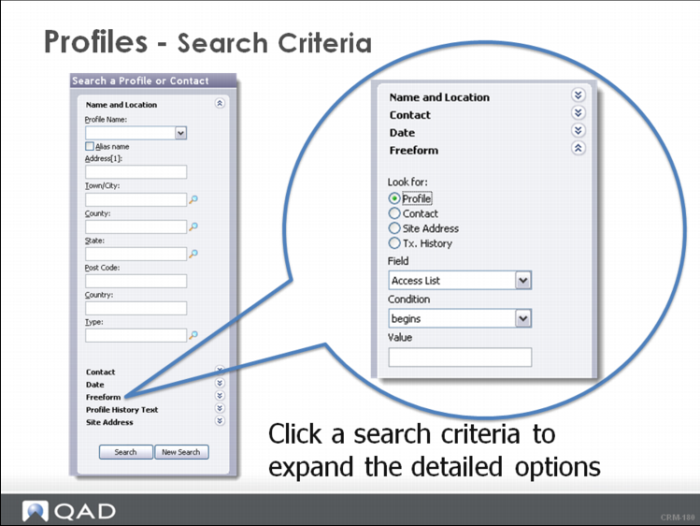
You can perform a search based on any of the available criterias. Click a Search Criteria to display the detailed options. The system searches based on information entered in the expanded or selected Search Criteria Tab. Information entered into other tabs is not taken into account.
Search Criteria
Search Criteria | Search by |
Name and Location | Profile or alias, name, address, town/city, county, state, post code, country, profile type |
Contact | Name details, position description, mail groups |
Date | Date range will display all records created or modified during the selected period. You can choose profiles or contacts and search by creation or modification dates. |
Freeform | Profile, Contact, Site Address, or Transaction History Fields using a condition |
Profile History Text | Keyword or phrase |
Site Address | Any or all of the following fields: Profile Name, site address, town/city, county, state, post code, and country |
All Profiles Screen
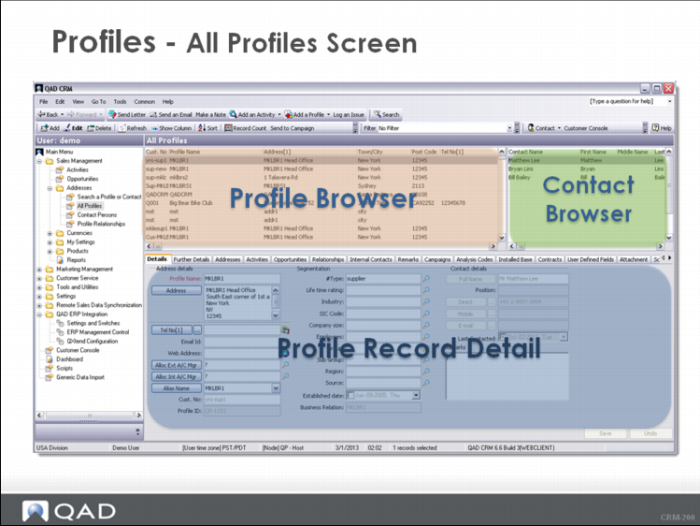
The All Profiles Screen accesses all the Profiles and Contacts in the database. The screen has three parts: Profile Browser, Contact Browser, and Profile Record Detail.
Profile Browser
Contact Browser
• Displays all Contacts for the selected Profile in the Profile Browser.
Profile Record Detail
• Displays the details for the selected Profile in the Profile Browser in edit mode.
Filtering Profile Records
Using Profile Filter
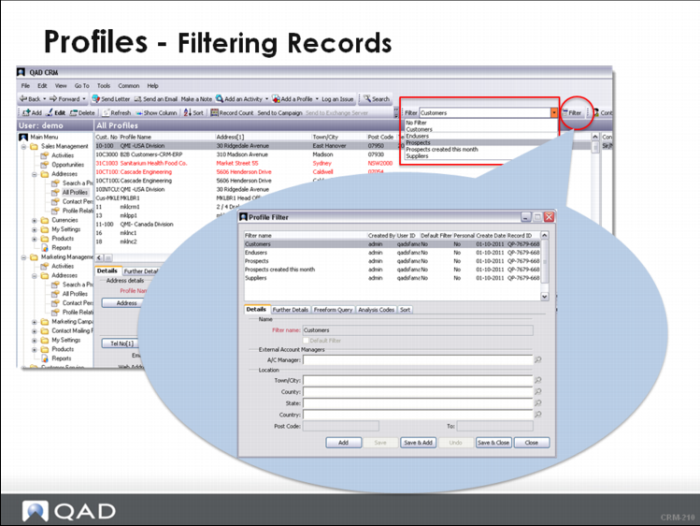
By default, the All Profiles Screen displays all the profile records in the system. You can customize the display using the filters.
To filter the profile records:
1 Locate the Filter on the Application Toolbar.
2 Expand the filter list and select the filter you need.
Maintaining Filters
You can create and edit the filters as you need in the Profile Filter window.
1 Click the Filter icon (

) on the Application Toolbar.
The Profile Filter window displays.
2 Do one of the following:
• To create a filter, Click Add and enter the filter name and other details.
• To edit an existing filter, select a filter and change the details as you need on the bottom part of the Profile Filter window.
3 Click Save to save your changes and then click Close to close the window.
Adding a Profile
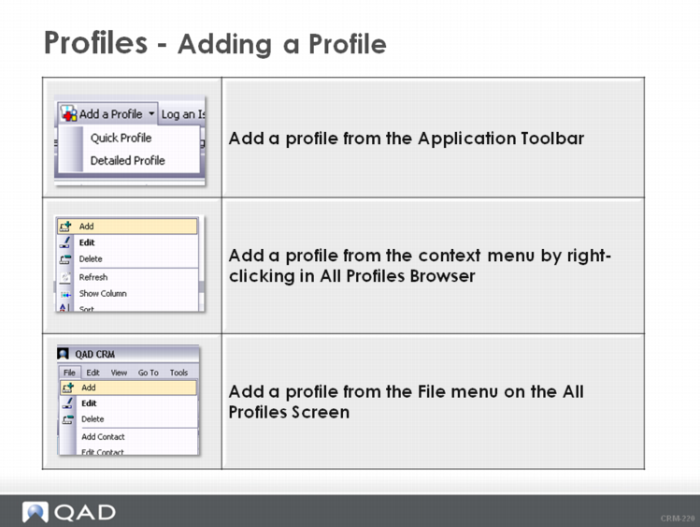
There are multiple ways to add a profile:
• The Add a Profile option on the Application Toolbar
• Quick Profile: displays the Add Profile screen where you can record some basic details for a new profile.
• Detailed Profile: displays the Profile Add Wizard.
• The Add option in the context menu on Profile Browser
• The Add option in the File menu
Warning
• Do not add duplicate Profiles. Search first! Always Search to ensure that you are not adding duplicate data.
• QAD CRM issues a warning message if the Profile has the same Name and Postal Code. Profiles with the same Name and a different Postal Code are not considered duplicates.
• QAD CRM does not stop you from adding duplicate data - be careful.
• QAD CRM is not case-sensitive. enter data that can be used in letters and memos.
Master Questions
1 QAD CRM is Profile Centric which means that all information in QAD CRM must be associated with a Profile. (True or False?)
2 List four Profile Tabs and two data elements in each tab:
Example: Opportunity Tab - Stage Date, Sales Person
_________________________________________________________________
_________________________________________________________________
_________________________________________________________________
_________________________________________________________________
3 Profile Name and _________________ make a Profile unique.
4 If you do not locate a Profile using the Search a Profile or Contact Screen you are prompted to:
a Add a New Profile
b Try again with different search criteria
c The Profile closest to your search criteria is returned
5 Your system administrator can help you enter fields in the correct format by defining the field style. You can choose the button to the left of the field and a dialogue box will open in the correct style for you to enter the field information. Name a field that is set up this way in the QAD CRM Training environment:________________________.
6 When you add a Profile, QAD CRM will also add a generic Contact if you do not add a Contact. (True or False?)
7 Favorites are created in two places: Application Tool Bar and the ___________________.
8 QAD CRM is not case-sensitive. Why is it important to be case consistent and have data entry standards when entering Profiles in QAD CRM?__________________________________
9 Filters can be created and stored for future use. (True or False?)
10 The All Profiles Screen displays the following windows: Profile Browser, Contact Browser and the __________________.
Wrap-up
• The Profile Record is the center of QAD CRM. All data in QAD CRM is associated with a Profile.
• There are two search screens:
• Search a Profile or Contact
• All Profiles Screen
• Always Search for a Profile BEFORE adding!
• Do not add duplicate data.
• QAD CRM gives you a duplicate Profile message when you try to add a Profile/Postal Code combination that exists.
• The Profile Name is the only required field in the Profile Record.
• A Profile can be a Supplier and a Customer - complex business relationships are maintained using multiple profile types.
• You can send new Profiles to QAD ERP.
Exercise
Task 1. Add Search a Profile or Contact Screen to your Favorite list.
1 Navigate to Sale Management|Addresses.
2 Right-click Search a Profile or Contact and choose Add to Favorites.
3 In the Add Favorite box, keep the default description and the default folder where the Favorite item is stored.
4 Click OK.
5 Check whether it appears on QAD CRM Bar and in the Tools menu on Application Menu Bar.
Task 2. Search for all customer profiles based in Sydney.
1 Use the Favorite you created in Task 1 to open the Search a Profile or Contact Screen.
2 Use the Name and Location search criteria to define your search options.
3 In the Town/City field, enter Sydney or use the look-up icon.
4 In the Type field, click the look-up icon and review the types and select Customer. Note that you could select more than one Profile Type.
5 Click the Search Button at the bottom of the Search Criteria Tab.
6 All Customer Profiles located in Sydney are returned to the workspace.
7 You can review the details of a specific profile by highlighting the profile, right-clicking, and choosing Profile from the context menu.
If the search does not return any records, you are prompted to create a Profile.
Task 3. Create a Profile Filter and use it as the default filter to display all profiles in the State of California.
1 Navigate to Sales Management|Addresses|All Profiles.
2 Go to View|Toolbars and check whether the Filter option is selected. If not, select it.
The Filter Toolbar displays two objects - the Filter Drop-down list with previously created filters and the Profile Filter Screen Button that displays a dialogue box where you can create, edit, or delete filters.
3 Click the Filter Drop-down list and set it to No Filter.
The Profile Browser displays all Profiles.
Notice that the Profiles are not sorted in any particular order. To sort by Profile Name, Click the Profile Name Label. The Profile Browser sorts all Profiles by Profile Name.
4 Click the Filter button to display the Profile Filter screen.
5 To create a Filter, click the Add Button in the lower right-hand corner of the screen.
6 Enter California in the Filter Name field.
7 Select the Default Filter Check Box to make it the default view of the All Profiles Screen.
8 In the State field, use the look-up icon to put CA-California, US into the Selected States column and click OK.
9 When you return to the Profile Filter Screen, Click Save & Close to close the screen and save your work.
10 The California Filter is triggered when you saved your work. The Profile Browser displays all Profiles from California.
Note: To learn more about the Profile Filter Screen go to Help|Working with Profiles and Contacts|Filtering Profile Records.
Task 4. Create a Profile using the given information.
• Company Name: Boulder Industries
• Address: 1500 28th Street, Boulder CO 80303
• Contact: None Given
• Company Size: Around 400 Employees Worldwide - 2 million in revenues
• Business: Distribution
1 Search First! Navigate to the Search a Profile or Contact Screen.
2 Profile Name = Boulder Industries.
3 Click the Search Button.
4 Boulder Industries profile is not in QAD CRM. You are prompted to add a profile.
5 Click Yes.
6 Profile Add Wizard -Details Tab is displayed. The Profile Name field is auto filled based on your search criteria. The label is in red indicating a required field.
7 Details Information: If there is a button next to the field label, select the button rather than entering free-form information. If your system administrator has defined a field style, clicking the button opens a dialog box which reflects the defined style. If there is a look-up icon, use the look-up to get the exact spelling of a value.
Enter the Details Information that you know.
• Address = 1500 28th Street, Boulder CO 80303
• Type = Prospect
• Company Size = 2-5 Million
• Employees = 100-499
• Region = US
• Source = Seminar/Conference
8 Further Details: Select Further Details from the sidebar or use the green arrow in the lower right-hand corner to move to the next tab.
Enter the Further Details Information that you know.
• Ext. Account Manger = Demo (yourself)
• Time Zone = MST/MDT (Mountain Time)
The Ext/Int Account Manager fields can be pre-populated through the Territory Management Module or you can use the Alloc Buttons or Lookup. The Alloc Buttons display the account managers based on Territory Management assignments. The Lookup Button displays the names of all Account Managers.
9 You do not have enough information for the Contacts, Addresses, Analysis Codes, or User-Defined Codes Tabs at this time. Leave these tabs empty.
10 Save your new Profile by clicking OK.
11 Click Yes when you are prompted to send this new Profile to QAD ERP.
12 Click OK when QAD CRM notifies you that record is successfully transferred to QAD ERP. The Profile displays showing all associated tabs such as Campaigns, Opportunities, Installed Base, Contracts, and Script.
13 Review the new Profile. A Contact has been added with a Last Name = Sir/Madam as you did not add a Contact Record for this Profile.
Note: Profiles must have at least one Contact. If you do not enter a Contact, the system adds a generic contact for you.
14 Click Close to close the window.