Activities
This chapter provides an overview of managing activities. It then covers the management of business-related Activities, Tasks, Emails, and Letters.
Overview
In this chapter you learn how to communicate with your Profiles, Contacts and Internal Contacts using Exercise – Managing Opportunities Activities, Tasks, Emails, and Letters in QAD CRM.
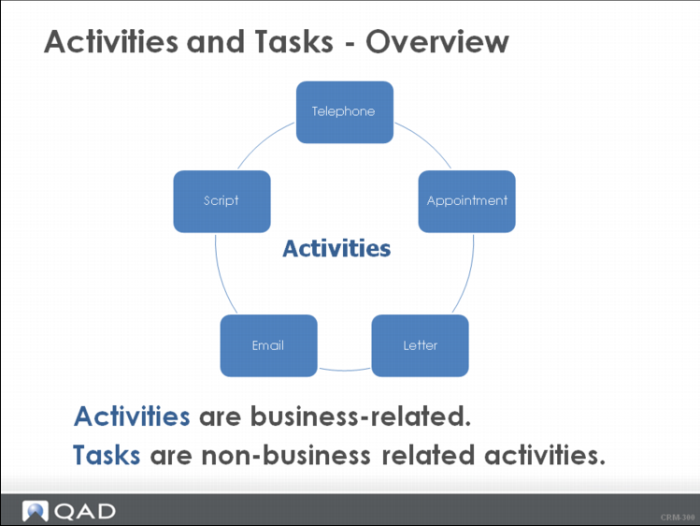
The QAD Customer Relationship Management (QAD CRM) Application describes Activities as business-related activities and Tasks as “to-do’s” that you can assign to yourself or others. You can schedule both for a particular date, but Activities such as Appointment and Telephone also have due time. Tasks have a due date but not a time.
Learning Objectives
By the end of this chapter, you will be able to do the following
• Describe Activities and Tasks.
• List the Activity Types.
• Add and process an Activity.
• Add a Task.
• Synchronize Activities and Tasks
• Describe a Contact Note.
• Explain how to send Email.
• Synchronize Emails.
• Explain how to send a Letter.
Activity Calendar
Accessing Activities and Tasks
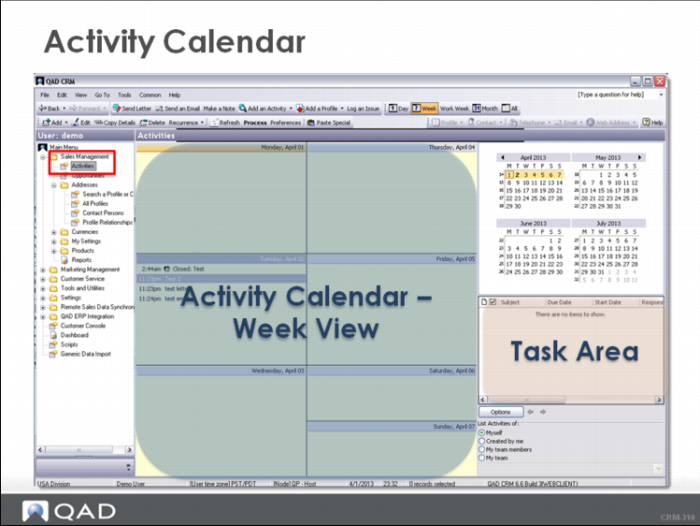
The Activities Module ensures that your sales and marketing teams always have the relevant customer, market, and sales information at their fingertips. This module is available in both Sales Management and Marketing Management: Main Menu|Sales Management|Activities or Main Menu|Marketing Management|Activities.
When you choose Activities from the application menu, the Activities calendar displays in the left portion of the workspace. The calendar display is defined by the view you select - Day, Week, Work Week, Month, or All.
The Task Area is not displayed in the All View. The All View displays all activity records, irrespective of the day, week, and month in a list that can be filtered as there can be a great many records.
To further clarify your results, the All View also utilizes a strike through format for those activities that have already been processed and activities are color coded according to the default settings. For instance, red color indicates overdue activities. Blue color is for high-priority activities.
Note: The All View does not display the Task Area or the calendar.
You can integrate the QAD CRM Calendar with Microsoft Outlook. Integration with Lotus Notes is scheduled for a future release.
Adding Activities
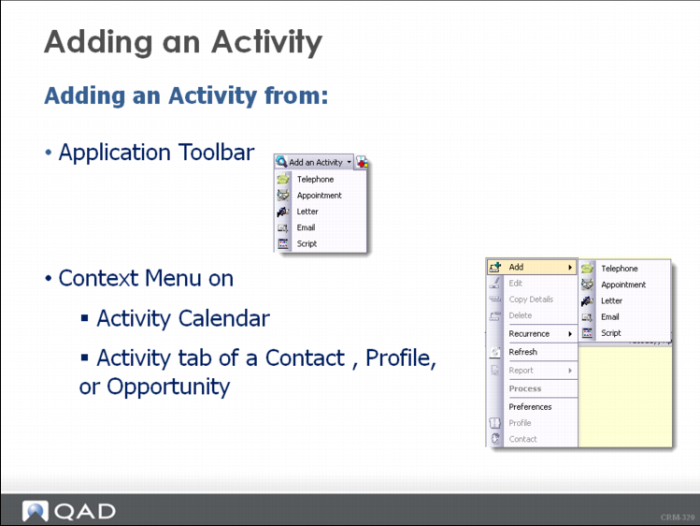
There are many ways to add an activity including:
• Right-click in the Activity Tab Window from the Profile, Contact, or Opportunity Records.
• Right-click in the Calendar from the Activity Module.
• Use the Add an Activity from the QAD CRM Toolbar.
The Activity Type Dropdown displays a list of activity types: Telephone, Appointment, Letter, Email, or Script.
The Telephone and Appointment types appear in all of the Calendar Views and the Activity Tab on the Profile, Contact, and Opportunity Records. The Letter and Email types appear on the All View in the Calendar and the Activity Tab for the Profile, Contact, and Opportunity Records. Scripts have their own tab on the Profile and Contacts Records.
Note: We discuss Scripts in a later chapter.
Processing an Activity
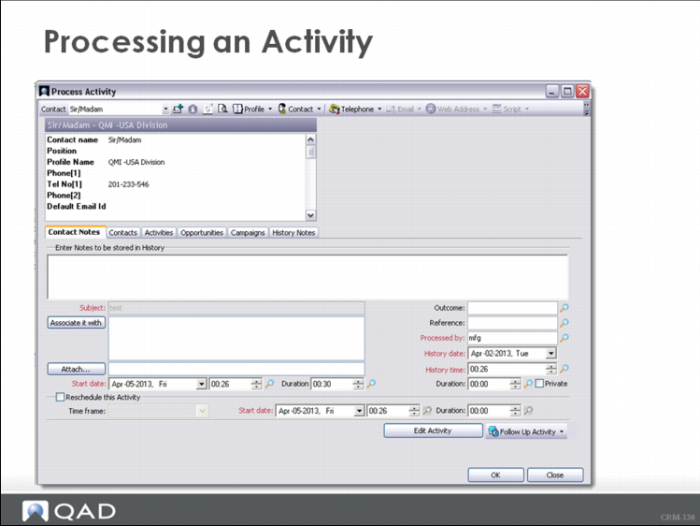
After creating a telephone or appointment activity, you are required to process it either on or before the scheduled date. When you process an activity, you document what happened and next steps. You can even create a follow-up activity. When you process activities, you create transaction history records.
Task Management
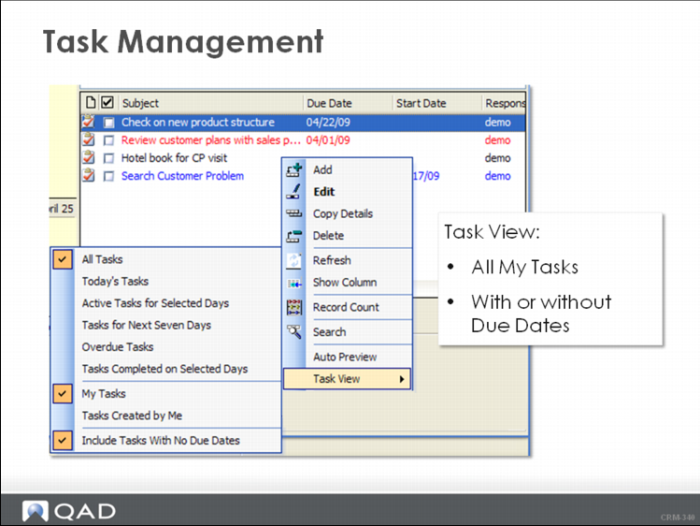
Tasks are “to-do’s” that you can assign to yourself or to others in your team through the Activities Module. Tasks assigned to you display in the Task Area on the Activities Calendar. Tasks assigned to others display on their Activities Calendar. You can view all Tasks you created by selecting the correct Task View.
Tasks records have different views. Right-click the Task Area to select the required view from the options.
You can select the number of Tasks you want to display using the Options button available just below the Tasks area in the workspace.
You close a Task by selecting the check box next to it. Closed Tasks are displayed with strike-through text.
You can associate a Task with a Profile, Contact, Opportunity, Campaign, Installed Base, or Issue. When you associate a Task to a record, you are allowed to open the associated record from the Task. The Task does not appear on the record.
Note: Task Email Reminders functionality is disabled in the training environment. But you can use it if your production environment is integrated with Microsoft Outlook.
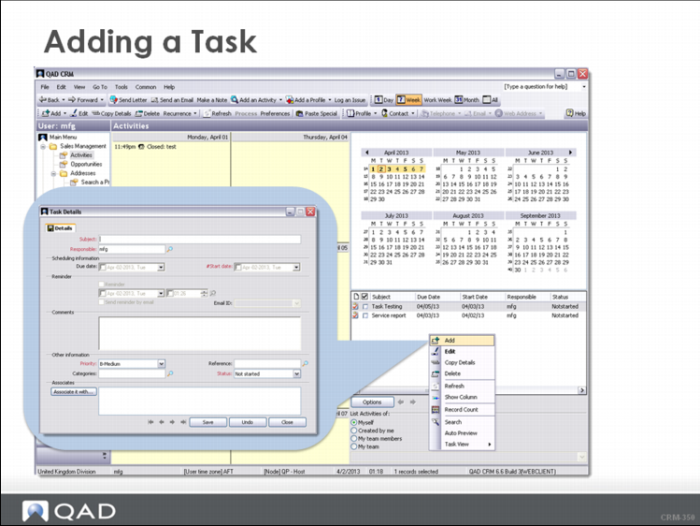
Adding a Task
To add a task:
1 Open the Activities Screen.
2 Right-click in the Task Area and choose Add from the context menu.
The Task Details window displays.
3 Enter the task information. You can add associated profiles, contacts, or events using the Associate with button.
4 Click Save and then close the window.
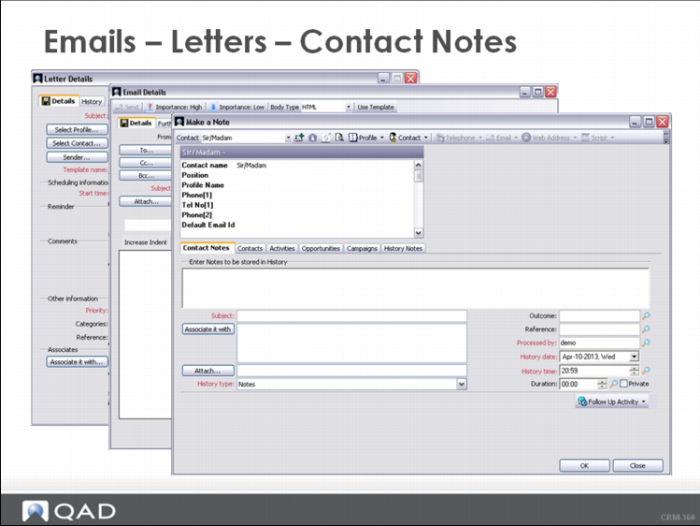
Emails - Letters - Contact Notes
QAD CRM support many different methods of communication. We have learned how to add activities to our calendars and create tasks for ourselves and other team members. We can also send emails and letters using templates or attach a note to a Profile/Contact to add information that might not be associated with a communication event.
Sending Email from QAD CRM
You can compose and send emails in QAD CRM system when the Exchange Server is enabled and the email preferences are configured properly in your system.
When you send email through the Activities module, it automatically gets included in the Profile Transaction History. When you send email using the Send Email button, you request that the email is saved in the selected Profile transaction history.
To send email from QAD CRM:
1 Do any of the following:
• Click the Send Email button on the toolbar.
• Choose Email from the Add an Activity drop-down list.
2 If the Select Compose Screen pops up, select your email client and click OK.
3 Compose and send your email.
Either you use QAD CRM or MS Outlook as an email composer, you can choose a pre-defined template to compose your email.
Synchronizing Emails
You can synchronize emails in QAD CRM system if the integration with exchange server is enabled by the system administrator. The synchronization could be performed in either of the two ways:
• Automatically. If the automatic email synchronization is enabled, the emails will be synchronized automatically when the Admin Service checks for new emails.
Note: The emails from Microsoft Outlook are reconciled by the email address in QAD CRM. If the email address matches that of a contact in QAD CRM, the email details are created as a history record in QAD CRM against that profile and contact.
• Manually. If the automatic email synchronization is not enabled, you need to do it manually.
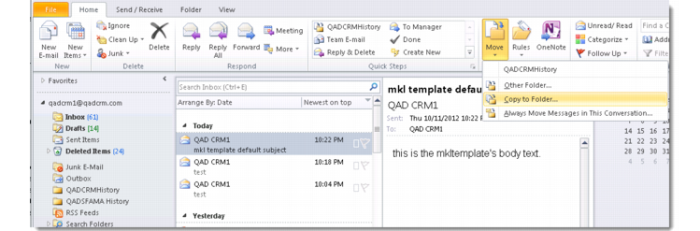
If you use Microsoft Outlook and Outlook Access, copy the email from a CRM contact to the QAD CRM History folder using the Copy to Folder option. The email will be brought into QAD CRM when the Admin Service checks for new emails.
You can also synchronize an email from any mobile clients by forwarding the email from a CRM contact to the QAD Mail Room Address. In the Subject filed of the forwarded email, include the email address of the original email sender and the original subject. Use a pipe character (|) to separate the email address and the subject.
Example:
Original Subject: Re: Quotation
Subject in the forwarded email:
[email protected]| Re: Quotation
Note: You can get QAD Mail Room Address at the Emails tab in Settings|Mail Server Integration|Settings and Switches.
Sending a Letter
Similar to email communications you can generate a letter as an Activity or by using the Send a Letter button in the toolbar. When you create a letter in QAD CRM, you create a Microsoft Word document (.doc) based on a template. The template includes the required format and fields that are merged with the information from the selected CRM record.
Letters created through the Send a Letter button are generated immediately. Letters created as Activities are generated only when they are processed based on their scheduled dates.
Making a Note
The Make a Note button from the tool bar gives you the ability to add information to the Transaction History for a Profile/Contact. Once you make a note and save it, you can view it from the Profiles module in Activities/History.
Notes can include comments, imported files, or attachments.
Note: Refer to QAD Online Help or the QAD Customer Relationship User Guide for more information on Notes.
Synchronizing Activities
Appointments and tasks can be synchronized between QAD CRM and Microsoft Outlook in both directions depending on the synchronizing policies by the system administrator.
To create an activity (appointment, meeting, or task) in Microsoft Outlook and synchronize it to QAD CRM:
1 In Microsoft Outlook, create an activity (appointment or task) as you normally do in Outlook.
2 Categorize the activity as QADCRM. It depends on the system settings by the system administrator.
3 The activity will be synchronized to QAD CRM the next time the activity synchronization job is run.
Note: You can view the job status in the AdminService job history in QAD CRM.
Managing Customer Visit Reports
You can compose and submit visit reports from any email client and do not need to log on to the QAD CRM system.
To submit a report using email:
1 From your email client, create an email.
2 In the recipient field, enter the QAD CRM Mail Room Address.
The system administrator maintains QAD CRM Mail Room Address on the Email tab in Settings|Mail Server Integration|Settings And Switches.
3 Include the title of your report followed by the email address of the contact who you visited. Use a hyphen to connect the title and the email address.
4 In the email body, compose your report content.
5 Send the email when you finish.
When the email is sent, the visit report details will be attached to the Profile. The authorized users can access the report details from the Activities tab in the All Profiles module.
Master Questions
1 How do you add a Task?
a Right-click in the Task Area located in the CRM Calendar.
b Select a Profile and right-click the Profile.
c All of the above.
2 List two types of Activities that appear on your Calendar.
____________________________________________________________________
____________________________________________________________________
3 When you Process an Activity (telephone or appointment), you indicate that the activity is closed or completed. (True or False?).
4 The value in the _______________ Field for both Tasks and Activities can change the display color.
5 When you associate an Activity or Task to a Profile, Contact or Opportunity, the Activity/Task appear in the associated record. (True or False?)
Wrap-Up
• The following Activity Types are available in QAD CRM:
• Telephone
• Appointment
• Letter
• Email
• Script
• Tasks are “to-do’s” that assign to yourself or to others.
• Some Activities appear on the internal QAD CRM Calendar and can be integrated with Microsoft Outlook
• You can associate most activities and tasks to records within QAD CRM for easy navigation and follow-up.
• Activities become part of the Profile/Contact Transaction History.
• You can add Notes to the Transaction History without adding an Activity.
Exercise
Task 1. Use the following scenario to review your knowledge on how to handle activities and tasks.
Your customer Donald Schneider at Heron Surgical Supply would like a demonstration of the new product line. Donald is free next Tuesday from 1:00 p.m. until 3:00 p.m.. Create an appointment and invite your colleague Tim Michaels to attend.
1 Navigate to the Heron Surgical Supply Profile and select the Activity Tab.
2 Right-click in the Activities Tab and select Add |Appointment.
The Appointment Screen opens to the Appointment Detail Tab.
3 Enter a subject for the appointment.
The Profile, Contact, and Responsible fields are filled. The Contact field contains the default contact - Donald Schneider. If you wanted another contact, click Select Contact button.
4 Although the Location Field has a drop-down list associated with it, you can also type in a value. Type in Heron Surgical Supply.
5 Set the scheduling information for this appointment as given in the scenario.
6 Organizer and Priority are filled in. If necessary, you can also change them.
7 Add the Categories of Key Customer and Strategies for reporting purposes.
8 You could mark this appointment a Private Meeting by selecting the Private checkbox, but for this meeting that would not be appropriate.
9 Click the Further Details Tab and add Tim Michaels to the attendee list.
10 Click Associate it with button and select Electronic Services Ltd as its associate.
11 Save the appointment. Do NOT notify the attendees now as we are not integrated to a mail server in this environment. When appointment notification is sent out to internal users, it is reflected in their activity calendar.
12 View the new appointment in the Activities Calendar, Profile, and Contact. Select the All Activities View (if the appointment does not appear, select File|Refresh, and try again).
13 Right-click the Appointment in the All View and choose edit to change the priority to A-High.
14 Save your work. Notice that the Appointment changes color to blue based on its priority.
Task 2. Use the following scenario to process the appointment activity.
You just returned from the Demonstration with Donald and his team. They were impressed with the new products and would like you to return next week for another presentation. this time to Donald’s manager. Let us set up the new presentation and record our results.
1 Navigate to the Appointment and double-Click to open.
2 Update the Contact Notes and Outcome. Then, select Follow-up Activity to create another demo.
3 Edit the appointment information and save it.
4 Open the appointment and check the appointment history.
Note: You can also Process the appointment by right-clicking the appointment, and selecting Process from the menu. Opening the appointment or right-clicking on the appointment takes you to the Process Activity Screen.
Task 2. Use the following scenario to create and manage a task.
In reviewing the new product features, you believe some of your customers can benefit from the new release. There are benefits in giving one presentation vs. many. Create a Task to review your accounts and associate the Task with those Customers that should attend the presentation.
1 Main Menu|Sales Management|Activities.
2 Choose the Calendar Day View from the Application Toolbar.
3 The Task Area displays in the lower right-hand corner. Right-click and choose Add from the menu.
4 The Task Detail Screen displays. There are five (5) required fields: Subject, Responsible, Start Date, Priority, and Status. Responsible, Start Date, Priority, and Status are pre-populated with default values. Enter the following:
• Subject = New Feature Release Review
• Responsible = Default (Your User ID). You can assign to another User in this field
• Due Date = Choose a Future Date
• Start Date = Default Today’s Date (click the checkbox)
• Comments = New Feature - Customer List
• Priority = Change to A-High
• Status = Change to Open
• Associate it With = Heron Surgical Supply
5 Save the Task. The Task displays in the color blue as it has a Priority of A-High.