Getting Started
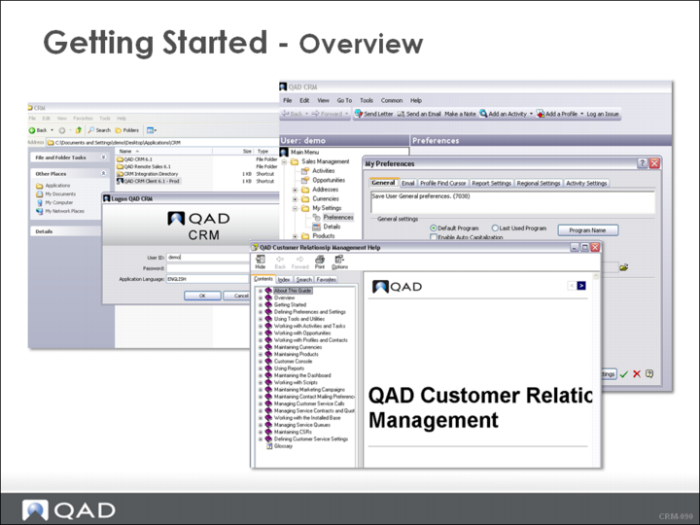
This chapter provides information on the features of the QAD CRM user interface and how to navigate in the system.
Overview
In this chapter, you learn how to access, navigate, and use help in QAD CRM. You can review and change your QAD CRM settings and gain an understanding of QAD CRM data security.
Learning Objectives
By the end of this chapter, you are able to do the following
• Log in and out of QAD CRM.
• Navigate QAD CRM.
• Use QAD CRM help.
• Review your settings
Access and Exit
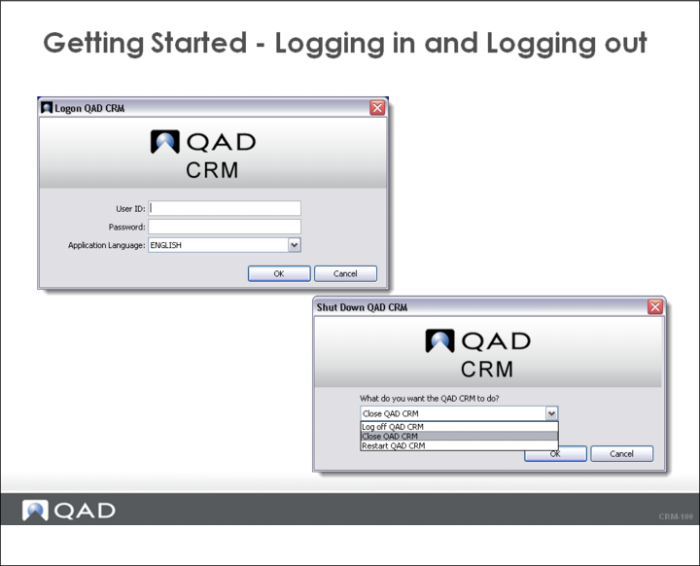
Logging in to CRM
Depending on the version, QAD CRM can be accessed as a stand-alone database (no QAD ERP integration), integrated with QAD ERP Standard or Enterprise Edition using the QAD client, or QAD Remote Sales.
To log in to CRM:
1 Follow your instructor’s direction to access the CRM login screen
2 In the QAD CRM login screen, enter the User ID and Password.
• User ID: demo
• Password: qad
3 Choose an application language.
In the training environment, the Application Language field is set to English, by default. However, QAD CRM does support multiple languages.
4 Select USA Division (10USA) as the workspace to log on and click OK.
Note: The succeeding exercises in this Training Guide are basing on the data of USA Division (10USA) workspace.
Logging out of CRM
1 Select the File|Exit option from the Main Menu.
The Shut Down dialogue box displays.
2 Select Close, Log off, or Restart from the drop-down list and click OK.
User Interface
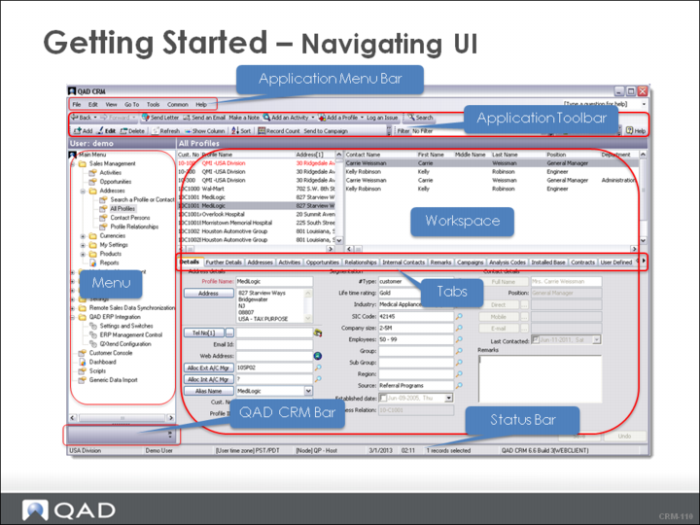
The screen has a user-friendly interface that includes the following components:
• Application Menu Bar
The menus provide options for you to perform tasks on CRM, customize the view display, and access help.
• Application Toolbar
The toolbar contains shortcuts to tasks, which are module-specific. You can customize the buttons to display using the context menu or the View menu on Application Menu Bar.
• Workspace
Typically the workspace has two parts. The top half is a browser displaying data records for the selected module. The bottom half displays the selected record details in edit mode.
• Sidebar menu
All system menus are listed here in functional modules. You can hide or display the menu pane using View menu on Application Menu bar.
• QAD CRM Bar
QAD CRM Bar contains shortcuts of menus that you add to favorites. You can hide or display this bar using View menu on Application Menu Bar.
• Status Bar
The status bar at the bottom of the screen displays the company, user, user time zone, node name and type, client type, date, time, number of selected records, and software version.
Help System
Accessing Help System
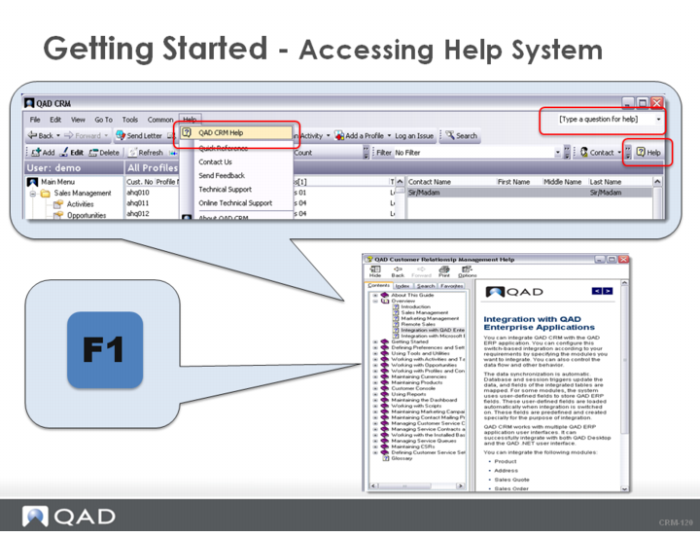
To access the help system, do any of the following:
• Press F1 on your keyboard.
• From the Application Menu Bar, click Help|QAD CRM Help.
• In the text box at the upper-right corner of the window, enter a specific question and press Enter. The relevant help file for your question opens in a separate window.
• If available, click Help on the Application Toolbar.
Printing Help Topics
You can print help topics. Here is an example of printing all information about Profiles and Contacts:
1 From the Application Menu Bar, click Help|QAD CRM Help.
The Help system displays.
2 Click Working with Profiles and Contacts in the sidebar menu.
The Help content displays in the workspace.
3 Click Print at the top of the page.
The Print Topics dialog box displays.
4 Select the option you need and click OK.
Reviewing Settings
A QAD CRM System Administrator is responsible for setting up CRM users. This setup includes associating a user with a business unit, permission groups, mail server, language, initial password, holidays, teams, and other information.
As a user, you have access to view your settings and also to change some of your details. The extent of your access varies depending on your organization.
For the purposes of this class, we review the system and detail settings Demo. The changes that we make will be used in exercises later in this class.
Reviewing My Preferences Settings
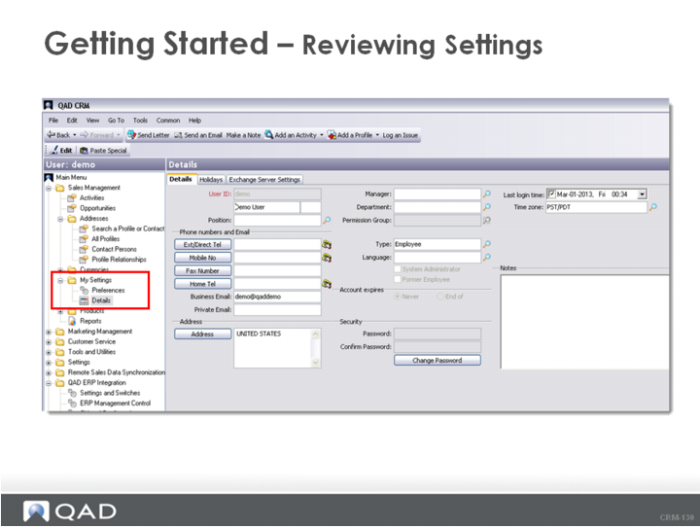
1 Navigate to Sales Management|My Settings|Preferences.
The Preferences Dialogue Box displays. There are a number of tabs: General, Email, Profile Find Cursor, Report Settings, Regional Settings, and Exercise Settings.
2 Click “?” in the right-hand corner to access Help.
3 In Help from the Contents Tab, navigate to Defining Preferences and Settings|Setting General Preferences and review the description about the settings. Your System Administrator will set these settings for you.
4 Do not save any changes and click Close to exit.
Reviewing My Details Settings
1 Navigate to Sales Management|My Settings|Details. The Details screen displays your personal details. Always check this screen to make sure that the information is accurate.
2 Click ? in the right-hand corner to access Help.
3 In Help from the Contents tab, navigate to Defining Preferences and Settings|Maintaining Personal Details and review the description about the settings.
4 Click the Ext/Direct Tel Field. The Phone/Fax dialogue displays. Enter your phone number and click OK.
5 Click Save to save and exit.
Important: Do not change your password.
Master Questions
1 QAD CRM supports multiple languages. (True or False?)
2 After selecting a record, the QAD CRM workspace contains one or more browser windows in the upper half of the screen. What is contained in the lower half of the screen?
______________________________________________________________________
3 The menu items that you add to favorites appear as shortcuts on QAD CRM Bar. (True or False?)
4 You can customize which toolbars to display using View menu. (True or False?)
5 QAD CRM Help can be accessed online and can also be printed. (True or False?)
Wrap-Up
• QAD CRM and QAD product suite do not share navigation. QAD CRM does not use .NET UI or process maps.
• QAD CRM supports multiple languages. You are prompted for a language during login when your organization uses more than one language.
• QAD CRM UI contains Menu, Workspace, and toolbars. The details information of a record that you select in the top part of the Workspace is displayed in edit mode in the bottom part. You can customize the display of toolbars.
• Help in QAD CRM is easy to access online. You can print online help by topic or topic and all subtopics.
• You are able to review and change your personal details.
Exercise
Complete the following hands-on exercise to test your knowledge on changing your personal details.
1 Go to Sales Management|My Settings|Details.
2 Enter a mobile phone number.
3 Enter your work email.
4 Enter your address.
5 Save your work.
6 Log off QAD CRM.