Common Buttons in Data Screens
The following buttons are available from all data screens within the system:
|
Search
|
Filter
|
Undo
|
|
Replace
|
Record Count
|
Add
|
|
Refresh
|
Report View
|
Edit
|
|
Show Column
|
Export
|
Delete
|
|
Sort
|
Save
|
|
You can access these options by right-clicking a data screen.
Search
Lets you search and replace field values for browser records. Click this button to open a search toolbar below the QAD CRM toolbar.
Replace
You can also do a conditional search and replace. To do so, you need to select the Replace If check box and specify a condition. Values are replaced only in records that match the condition.
Refresh
Lets you refresh the screen with recent changes that you made to the database.
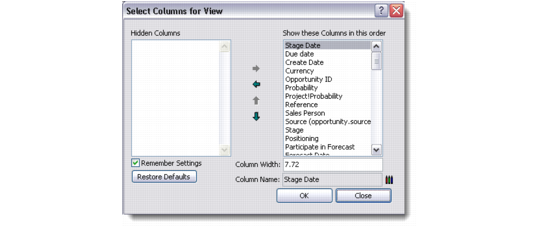
Show Column
Lets you select the column labels you want displayed when you open a particular menu. You can use the left and right arrow keys to navigate between the browser columns that are hidden or displayed. The up and down arrow keys let you define a sequence for column display.
Select Columns for View
Sort
You can also sort the displayed records in ascending or descending order based on a certain field. For sorting records, click the field name on top of the browser. The system sorts the records in ascending or descending order of the field.
You can also perform multi-level sorting through the Sort window. To use this option, right-click and choose Sort from the menu.
Sort
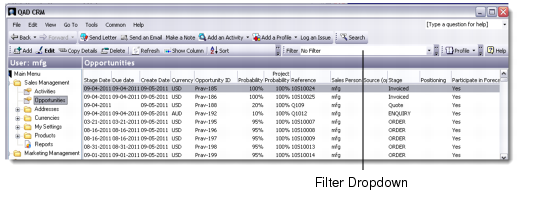
Filter
Use the Filter drop-down list on the top pane to select a filter for the records displayed in a screen. This facility is available for most modules that display a list of records.
Filter Dropdown
To specify conditions for filtering records, select the Filter option from the File menu. A new screen appears, based on the module you are using, letting you customize filter conditions. As an example, the Profile Filter screen is explained in detail later in this guide (see
Filtering Profile Records). Filter options for other modules function on similar lines.
Record Count
Lets you see the total number of records displayed in the current filter.
Report View
Lets you transfer selected or all records into a browser report layout. This option picks up report data from the browser directly.
Note: If you select one record and choose this option, the report is generated for all the records in the browser. However, if you select multiple records, the report generated will reflect only the selected records.
For details on reports, see
Using Reports.
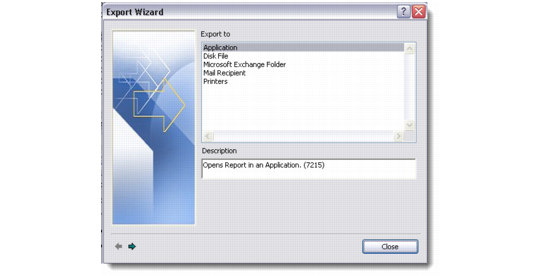
Export
Lets you control the output format of your generated report through the Export Wizard. You can export to an application, disk file, Microsoft Exchange folder, mail recipient, or a printer.
Export Wizard
For details on data export, see
Managing Output Channels.
Add
You can add a record to the existing database through this option. A blank screen displays with default values filled in. You are required to fill in the relevant fields here. For more details on performing the Add function for each menu, see the related section in this guide.
Edit
You can edit a selected record displayed on your screen through this option. On clicking this option, the cursor automatically moves to the first editable field in the primary tab.
Delete
You can delete a selected record displayed on your screen through this option.The system displays a confirmation prompt before deleting the record.
Save or Undo
When you add or edit data in a record, the system displays a Save icon on the corresponding screen or tab, indicating that you must save the record or undo it before you can perform other tasks in the current module.