Creating a Stock Replenishment Run
Create a Stock Replenishment Header
Follow these steps to create the header for a stock replenishment run:
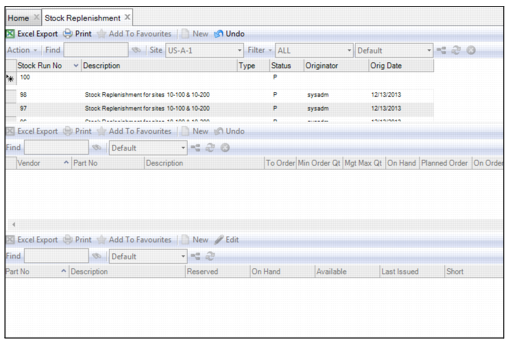
1 Open the Stock Replenishment browse.
2 Click New in the upper browse. Enter the relevant information in the following fields:
Description
Enter a short description of the stock replenishment run.
Type
Use the lookup to select the stock replenishment type.
Status
Displays the status of the stock replenishment run. By default, when a stock replenishment is created, the status is Planned (P).
Originator
Use the lookup to select the originator of the stock replenishment run.
Original Date
When the stock replenishment run is saved, the system populates today’s date into this field.
Stock Replenishment Run
3 Press Enter to save the stock replenishment header.
Adding Parts to a Stock Replenishment Run–Manually
Follow these steps to manually add parts to a stock replenishment run:
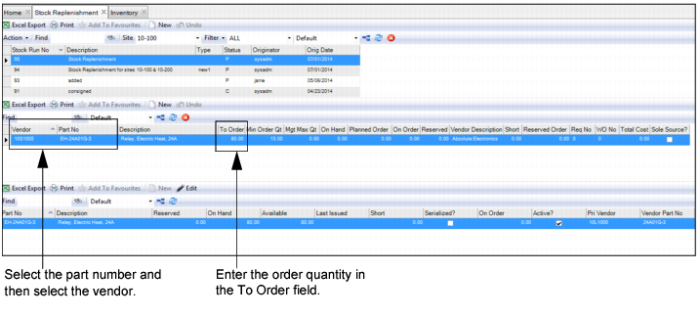
1 To add a single part to a stock replenishment run, highlight the stock replenishment run and click New in the middle browse.
2 Select the part by using the lookup in the Part No field.
Note: The parts lookup does not display inactive parts.
3 The system automatically pulls in the vendor information for the part. If the Vendor field is blank, use the lookup to select the vendor.
4 The system also calculates the order quantity and populates it into the To Order field. The calculation in the To Order field is based on the management maximum quantity, minus on-hand, minus planned and ordered requisitions. If necessary, you can edit the order quantity by entering a new value in the field.
5 Press Enter to save. Repeat these steps to add additional parts.
Stock Replenishment Run
Adding Multiple Parts to a Stock Replenishment Run–Global Add
Follow these steps to add multiple parts to a stock replenishment run:
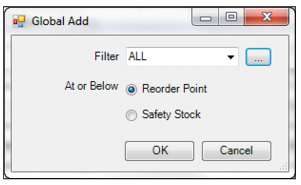
1 To add multiple parts to a stock replenishment run, highlight the stock replenishment run and select Global Add from Stock Replenishment Action menu.
2 The Global Add window opens, which allows you to add any parts that are at or below their reorder point or safety stock levels. This window also allows you to filter for critical items, specific commodities, or selected vendors. For example, you can filter for all items from a specific vendor that are at or below the safety stock level. Any parts that meet that criteria are added to the stock replenishment list.
You have the following options when adding parts:
Filter
Click the drop-down list and select one of the available filters. Click the search button to open the Filter Manager, which allows you to edit an existing filter or create a new filter.
Reorder Point
Select this radio button to add all parts that are at or below their reorder point.
Safety Stock
Select this radio button to add all parts that are at or below their safety stock point.
Stock Replenishment Run
3 Click OK to add the parts. The system automatically adds the parts to the stock replenishment run based on the settings you selected in the Global Add window.
4 The system automatically pulls in the vendor information for each part. If any of the Vendor fields are blank, use the lookup to select the vendor.
5 The system also calculates the order quantities and populates them into the To Order fields. The calculation in the To Order field is based on the management maximum quantity, minus on-hand, minus planned and ordered requisitions. If necessary, you can edit the order quantity by entering a new value in the field.
Printing Stock Replenishment Document
To print a stock replenishment document, open the Stock Replenishment browse and highlight the stock replenishment header. Select Print Document from the Stock Replenishment Action menu.