WIP Adjustments
Adjusting WIP
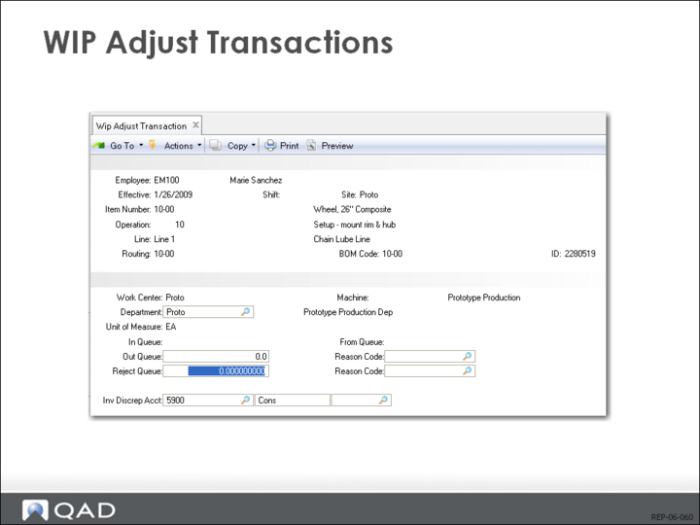
You can reconcile actual WIP quantities with those stated in they system using the WIP Status Browse/Inquiry (18.22.12) or WIP Status Report (18.22.4.11). Where quantities do not match, you can use WIP Adjust Transaction (18.22.21).
WIP Adjust Transaction can be used to adjust an input, output, or rejected queue for any operation. The current queue balances display when you run the program. When you adjust the output or reject queues, you change their balances at the current operation. When you adjust the input queue, the net change is made to the prior operation’s output queue as well as to the current operation’s input queue.
Each adjustment creates operation history records and generates general ledger transactions. A queue increase debits WIP and credits the inventory discrepancy account. Negative adjustments credit WIP and debit the inventory discrepancy account. You can designate a GL account and cost center for the transaction. The default is the inventory discrepancy account.
Open schedule quantities are also updated. Increases in the queue balances of the final operation’s output queue, increase scheduled completions. Decreased queue balances, decrease completions.
Defining Milestone and Non-Milestone Operations
Use Milestones to Report Labor and Completions
Milestone operations are normally used to report all labor and completions. However, you can also use non-milestone operations to report labor and completions (usually only those that are over or under standard).
Decide to Recognize Standard Labor or Actual Labor
You can also control whether you automatically recognize standard labor (and therefore do not report it) or only actual labor (and therefore report everything) at any operation.
Definition Critical
The definition of milestone and non-milestone operations is critical to the successful implementation of the Advance Repetitive module.
How Non-Milestone Operations are Maintained
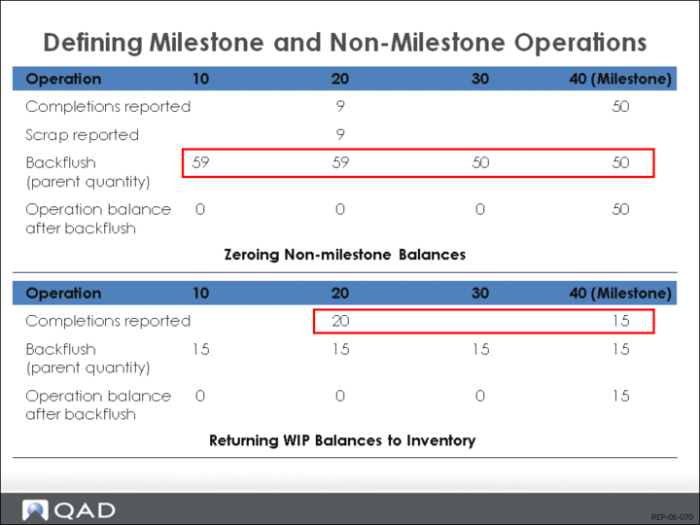
In this module, if you use a non-milestone operation to report scrap, rejects, rework, or discrepant labor, you create WIP balances at non-milestones. This allows for more accurate tracking of WIP costs and quantities.
Normally, however, non-milestones are maintained at zero inventory. Therefore, QAD Enterprise Applications will consume all WIP balances at non-milestone operations when reporting completion’s at subsequent milestone operations.
For example, you have four operations. Operation 10 is a milestone, Operation 20 is a non-milestone, Operation 30 is a non-milestone, and Operation 40 is a milestone. Operation 20 output queue equals 30 complete. Operation 30 output queue equals 25 complete. If you report production at Operation 40 for 50 parts complete, the system will first consume WIP at Operation 30, then it will consume WIP at Operation 20. The resulting values in Operation 20 equal 5, and Operation 30 equal 0. This process prevents the duplication of consuming component parts and labor costs.
Always Report Completions at Milestone Operations
You should always report completions at a milestone operation. The reason for this is you can temporarily lose portions of your reported completions at non-milestone operations. For example, in the second example shown above, reporting 20 completions at non-milestone operation 20 and then reporting 15 completions at the subsequent milestone operation, backflushed components for only 15 items and sends the value of 5 items from operation 20 back into inventory.
Correct Use of the Auto Labor Report Field
Auto Labor Report Set in Routing Maintenance (14.13.1)
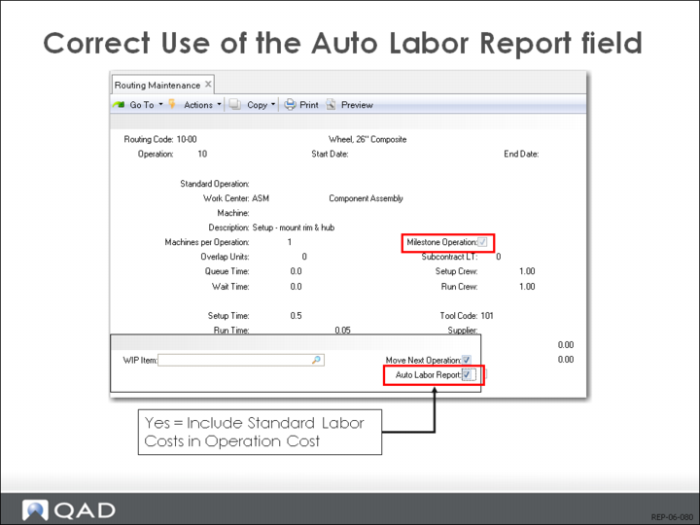
The Auto Labor Report field appears in Routing Maintenance (14.13.1). When Auto Labor Report is set to Yes, a backflush at any milestone automatically includes standard labor costs in the operation cost. Any actual labor reported is in addition to (or, if a negative number, a subtraction from) standard.
When Auto Labor Report is set to No, no standard costs are included. Only actual labor entered is used to cost the operation.
Gives Control Over Tracking Costs
The Auto Labor Report field provides control over what costs you want to track at actual versus standard for each operation. However, greater care must be used in reporting labor correctly. Reporting run labor at operations where Auto Labor Report is set to Yes will result in incorrect, unfavorable variances. Just as not reporting run labor at operations where Auto Labor Report is set to No will result in incorrect, favorable variances.
WIP and MRP
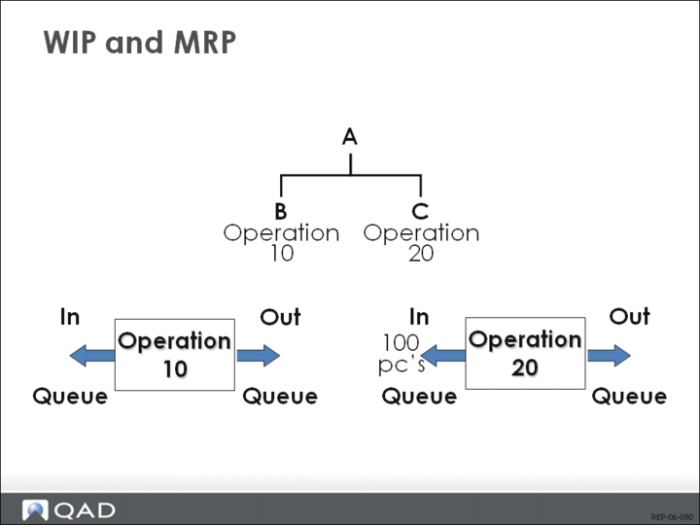
You do not need a repetitive schedule to report production in QAD Enterprise Applications. The system uses the exploded schedule to net WIP and determine correct component requirements.
In the example shown above, there is demand for 100 pieces of item A and a repetitive schedule is in place for 100 pieces. The system determines there are 100 pieces of item A in the in queue of operation 10. Therefore, only 100 pieces of component C are required to complete the order. (Component B has already been consumed at operation 10.) If there is no repetitive schedule in place, the system will not net WIP, and order both components B and C.
WIP Write-Off
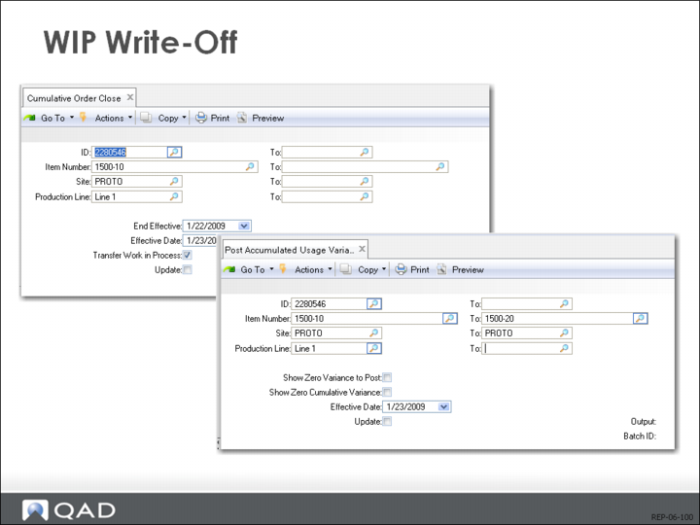
Choices for Cum Orders.
In Advanced Repetitive, you can choose whether to:
• Close a cumulative order and write everything to variances
• Close a cumulative order and transfer everything to the new order
• Leave the order open and post only the variances
Cumulative Order Close (18.22.10)
If you choose to write off any WIP and start a new cumulative order with a clean slate, set the Transfer WIP field to No and Update to Yes in Cumulative Order Close (18.22.10).
Accumulated Usage Variances (18.22.9)
If your WIP values are relatively small and stable, you can leave the cumulative order open, and post only the variances at fixed period end using Post Accumulated Usage Variances (18.22.9).
Transferring WIP
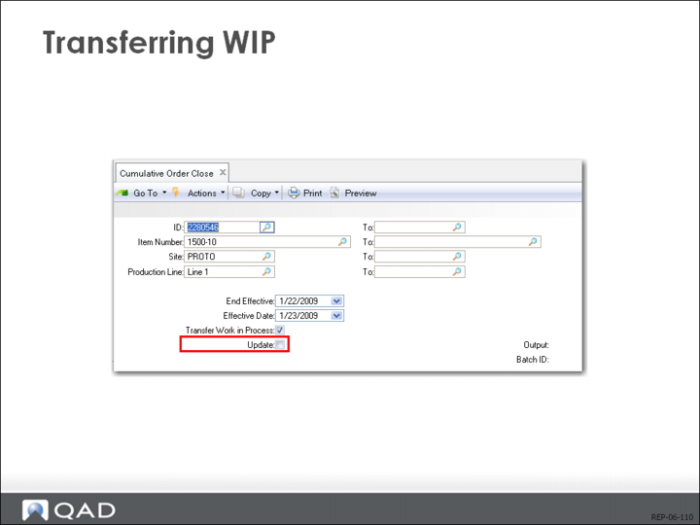
The following table shows the process the system follows to transfer WIP. You enter the data in Cumulative Order Close (18.22.10). The system finds a cumulative order for the site, immediately following the end effective data entered.
If... | Then... |
There is a cumulative order, and it is not closed, | it receives the WIP quantities of the cumulative order being closed. |
There is a cumulative order, but it is closed, | it does not transfer. |
There is no cumulative order, | it creates a new one to which WIP will be transferred. |
Here are the steps for each operation in the cumulative order being closed:
1 The system posts the value of the WIP queue inventory to scrap or the WIP transfer account specified in Repetitive Control (18.22.24).
2 The system records the posting event by creating an operation history record of type Close.
3 The cumulative order is flagged closed. If the Transfer WIP field is set to Yes (in Repetitive Control), the system transfers WIP balances.
4 The system looks for an operation in the receiving order with the same number as this operation. If there is one, it proceeds with the transfer. Otherwise, it ignores this operation, and does not transfer the WIP.
5 If this operation is not the first operation, and the same operation in the receiving order is the first operation, the system ignores this operation, and does not transfer WIP.
6 The system adds the WIP queue quantities in this operation to the WIP begin queue balance quantities in the receiving order operation.
7 The system records the transfer by creating an operation history record of type Transfer.
8 The system reinstates the WIP value by debiting the new cumulative order WIP account, and crediting the old cumulative order scrap account, or the WIP transfer account (specified in Repetitive Control).
9 If the cost of the WIP queue inventory at this operation is different from the cost of the receiving operation, the system calculates and posts the differences to Method Change Variance.
At the end of the report, the remaining amount in the WIP value accumulator field displays as Residual WIP Value. Residual WIP Value at this point should be close to zero, if it is the result of a rounding error.
You can run Cumulative Order close in non-update mode to generate a report without updating the database (set Update to No).