Container Workbench
Use Container Workbench (7.7.1) to containerize the shipment by creating or maintaining item/container records. First create the containers, then add the items to the containers
Since containers can be nested, start the setup with those containers that hold the shipped items—those at the bottom of the structure.
Note: Container item numbers need to be set up before you can create a item/container record. You set up the container item numbers in Item Master Maintenance (1.4.1).
You start by entering the identifying information in the header frame. What displays next depends on if you are adding a new item/container record or if you are modifying an existing item/container record.
• If you are adding a new item/container record, there are three additional frames
• If you are modifying an existing item/container record, the next frame to display is the Container Workbench frame
Field Definitions
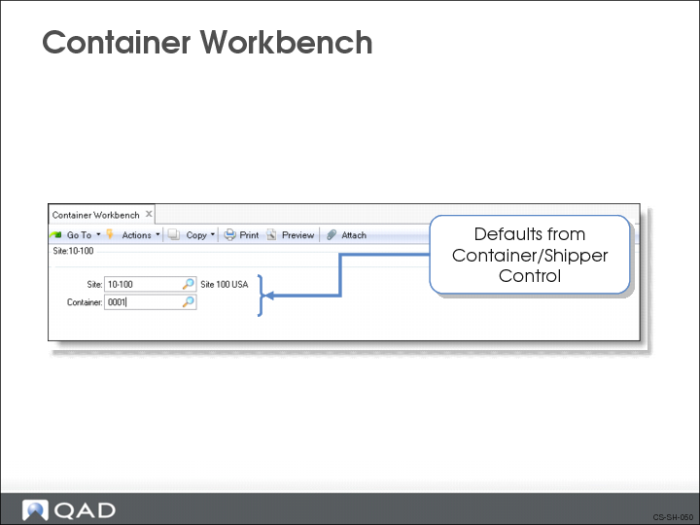
Site, Container
These fields uniquely identify a container. The Site is the ship-from site code. Container is the container ID number. If you are creating a new container, leave the Container field blank. If you are modifying an existing container, enter the container ID number.
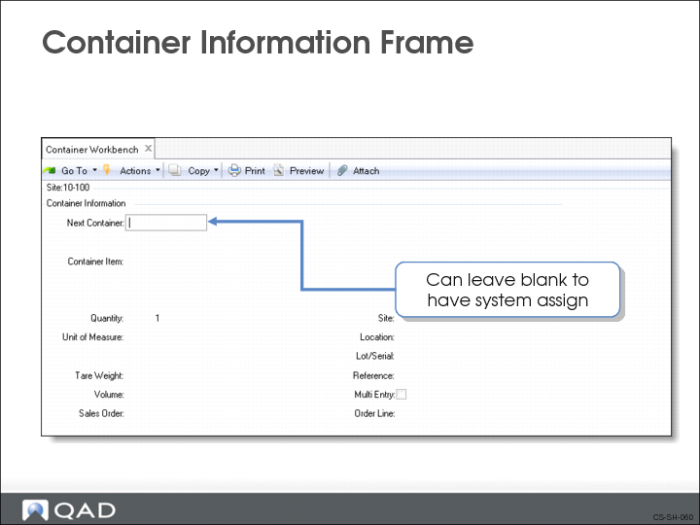
Container Information Frame
This frame contains information about the container you are using. The quantity you enter here is distributed equally over all containers. For example, if you enter 6 containers in this frame and you enter 120 items in the Item Information frame, the system creates a container structure of 6 containers holding 20 items each.
Any remainder is added to the first container.
Field Definitions
Next Container
The container number to be assigned to the first container in the set of containers you are creating. You cannot use a container number that is already being used. If you leave this field blank, the next container number defaults from Container/Shipper Control.
Note: Each container in the shipment must have a unique ID.
Container Item
The item number of the container you are using for this shipment.
Quantity
The number of containers you are using. Defaults to one. The system creates as many container records as you specify here and assigns sequential container numbers to each
Note: Each container record you create shares the same values that you enter in the container information field. If you set Multi Entry to Yes, you can assign different site, location, lot/serial, and reference codes for each record.
UM
The volume unit of measure of this container.
Tare Weight
The weight of the container deducted from the gross weight to obtain the net weight.
UM Tare Weight
The tare weight unit of measure for this container.
Volume
The volume of the container before packing or loading. Defaults from the Item Master
UM Volume
The volume unit of measure. Defaults from the Item Master
Site
Site code for the container. Defaults to the site entered in the header. You can assign a different site by setting Multi Entry to Yes
Location
Location code for the container. Defaults to the location associated with the item number entered in the Container Item field. You can assign a different location by setting Multi Entry to Yes
Lot/Serial
The lot/serial number for the container. You can assign a different lot/serial number by setting Multi Entry to Yes
Note: If Lot/Serial is Yes in the item master record of this container item, you must set Multi Entry to Yes and enter each lot/serial number separately.
Ref
The lot reference number for the container. You can assign a different lot reference number by setting Multi Entry to Yes
Multi Entry
Indicates if the container records being created reference multiple sites, locations, lot/serial, nd/or lot reference numbers.
• If Yes, the Issue Detail frame displays allowing you to add the additional information
• If No, the information you enter on this screen is used
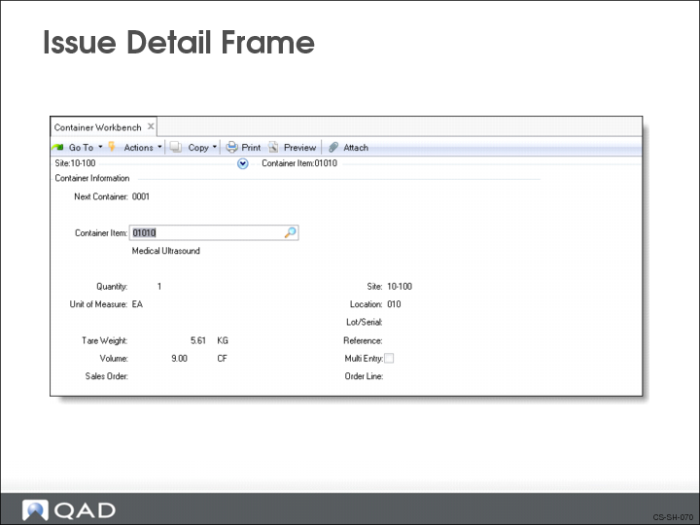
Issue Detail Frame
Use the Issue Detail frame to assign for each container item different:
• Sites
• Locations
• Lot/serial numbers
• Lot reference numbers
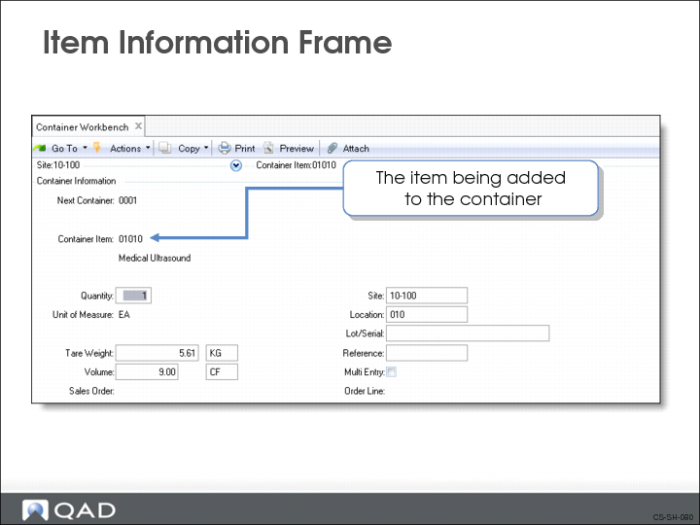
Item Information Frame
You use this frame to enter information about the items being placed in the container.
Item Number
The item number of the item you are adding to the container.
Quantity
The number of items being added to the container.
UM
The unit of measure of the item. Defaults from the Item Master
Conversion
The conversion factor for the system to use if you specify an alternate unit of measure.
Net Weight
The net weight per unit of the item. Defaults from the Item Master
UM Net Weight
The net weight unit of measure of the item. Defaults from the Item Master
Volume
The volume of the item. Defaults from the Item Master
UM Volume
The volume unit of measure of the item. Defaults from the Item Master
Site
The site code for the item.
Location
The location of the item.
Lot/Serial
The lot/serial number of the item.
Ref
The reference number of the item.
Multi Entry
Indicates if the items being added reference multiple sites, locations, lot/serial, and/or lot reference numbers.
• If Yes, the Issue Detail frame displays allowing you to add the additional information
• If No, the information you enter on this screen is used
Comments
Comments or remarks associated with the item.
• If Yes, you can enter new comments or edit existing comments
• If No, you cannot enter or edit comments
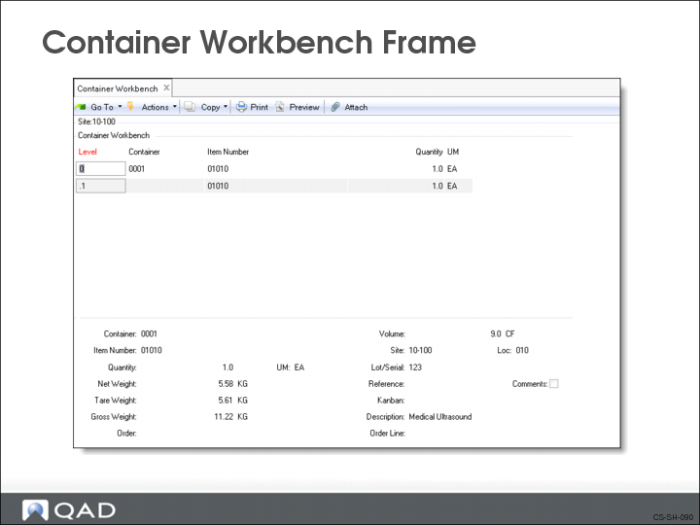
Container Workbench Frame
There are two frames. The Container Workbench frame displays the containers in a hierarchical level, showing each container and the items contained in each container. The container detail frame displays detailed item/container information. Using these frames, you can:
• Modify detail for a container
• Add another container to the master container
• Add an item to a container
• Delete an item from a container
To select a container or item, position your cursor at the line (use the arrow keys to move up and down), then press Enter. Your cursor moves to the lower frame that displays detail information for the selected item or container.
Field Definitions
Container
The container number of this container item.
Item Number
The item number of the container or item.
Quantity
The number of items (Item Number) being added to the container.
UM
The unit of measure of the item.
Net Weight
The net weight per unit of the item or container
UM Net Weight
The net weight unit of measure of the item or container.
Gross Weight
The gross weight of the item or container.
• If a container item number, it is the sum of the net weight of the container item number plus the net weight of the item numbers added to the container
• If an item number, it is the net weight of the item
UM Gross Weight
The gross weight unit of measure of the item or container.
Volume
The volume of the item or container.
UM Volume
The volume unit of measure of the item or container.
Site
The site code for the item or container.
Lot/Serial
The lot/serial number of the item or container.
Ref
The reference number of the item or container.
Kanban
The kanban number of the container. Reference only
Description
The description of the item or container.
Comments
Comments or remarks associated with the item.
• If Yes, you can enter new comments or edit existing comments
• If No, you cannot enter or edit comments
Adding a New Item/Container Record
To add a container:
1 From the container detail frame, select from the actions menu insert. You can also right-click to get the same menu. The Add Options pop-up box appears.
2 Choose option 2, Add Container. The Container Information frame appears.
3 Enter the container item number you are adding and complete the remaining container information.
To add an item to an existing container:
1 In the Container Workbench frame, using your cursor, select the container to which you are adding the item.
2 From the actions menu select insert, or right mouse click.
The Add Options pop-up box appears.
3 Choose option 1, Add Item.
The Item Information frame appears.
4 Enter the item number you are adding and complete the remaining item information.
When all item/container information has been entered, the Container Workbench frame displays all item/container information in hierarchical order. It shows all the containers and the items contained in each container. If you want to modify any of the information, move your cursor to the record you want and press Enter. The item/container information displays in the lower frame where you can make the modifications.
Deleting an Existing Item/Container Record
1 In the Container Workbench frame, select the item or container.
2 From the actions menu select delete
3 From the delete options pop up window choose one of the following options:
a Delete Pre-Shipper/Shipper
Delete the entire container from the database.
b Delete Item/Container Line
Delete a container or item line from the database. Any container or item belonging to the deleted container or item line is moved up one level. You cannot delete a container line if it results in an item that does not have a container item.
c Delete Container (plus contents)
Delete a container and all containers or items belonging to it.
d Remove Container
Remove a next level container from a container. The container can still be accessed under its own container number.
e Remove Container (plus contents)
Remove a next level container and all containers or items belonging to it from a container. The container can still be accessed under its own container number.
4 The system prompts you to confirm the deletion. Choose one of the following:
Yes to confirm the deletion
No to cancel the deletion