Invoicing: Sources of Customer Invoices
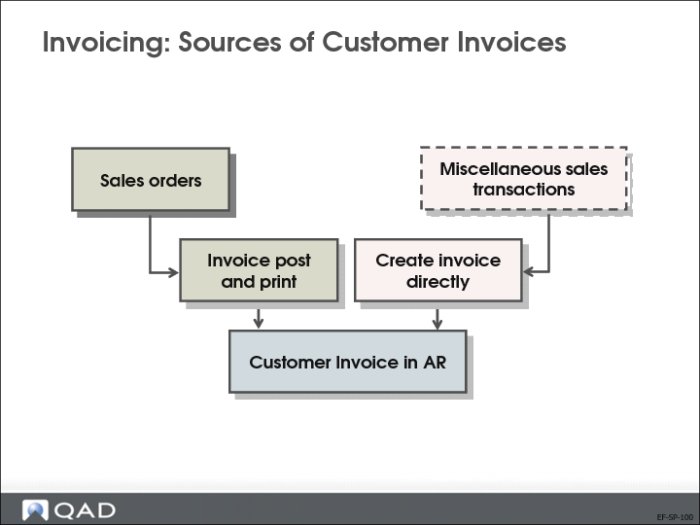
Sources of Customer Invoices
Customer invoices can either originate from sales orders, or can be created in Financials.
In the first instance, invoices are created using Invoice Post and Print (7.13.4).
In the second instance, invoices are created using Customer Invoice Create (27.1.1.1). Financial invoices can be created to process additional charges or price adjustments.
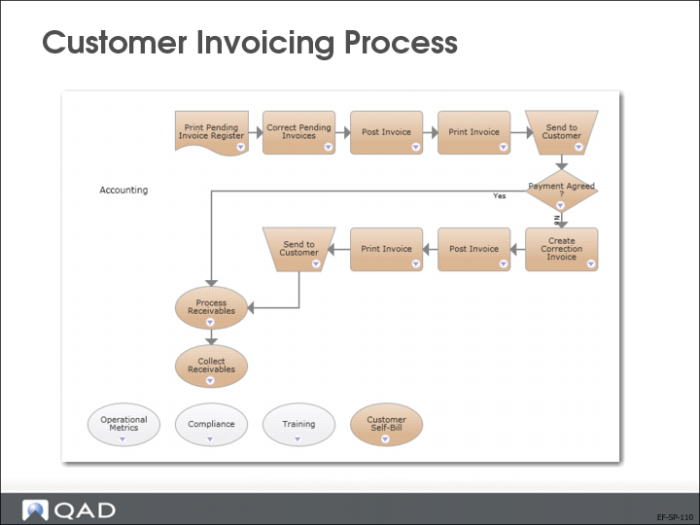
Customer Invoicing Process
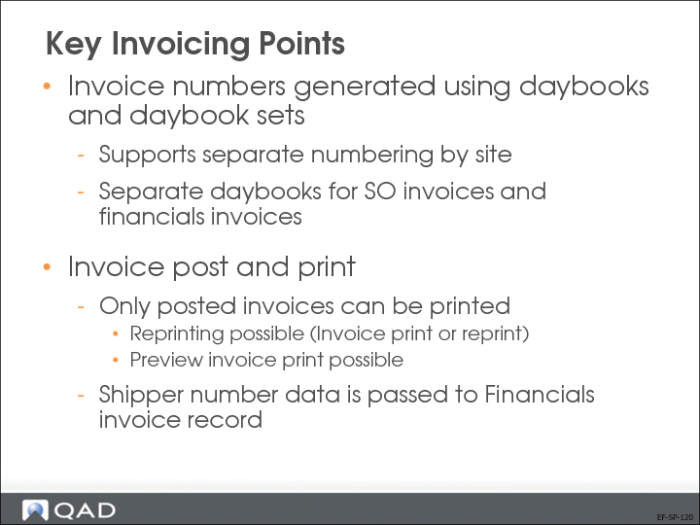
Key Invoicing Points
Invoice numbers are generated using daybooks. If the daybooks are set up by site, the invoice numbering is also site specific. This setting is a legal requirement in some European countries.
Invoice posting and printing are combined in QAD Enterprise Financials. Before posting, you can preview invoices. You can also reprint invoices after posting.
When the enhanced shipping functionality is used, the shipping data is passed to Financials for invoice creation.
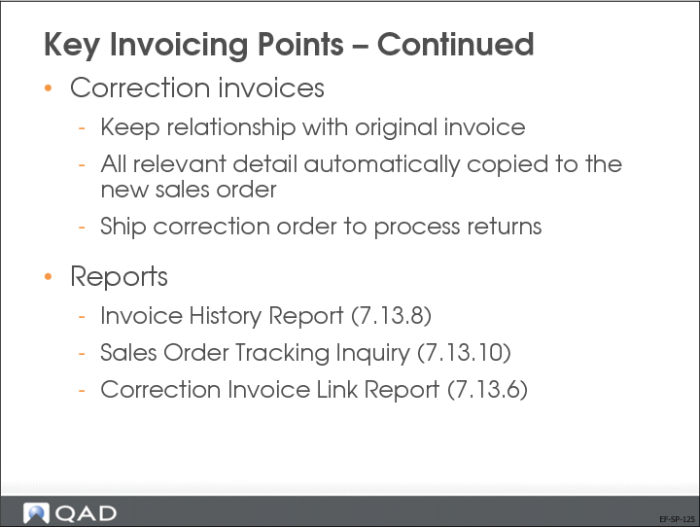
The correction invoice functionality lets you maintain a link between original invoices and corrections. This function streamlines order entry because all details from the original invoice are copied to the new sales order, ready to be updated.
US Exercise: Sales Process
In this exercise, you will create and post customer invoices based on sales orders.
Use the following parameters where needed:
Parameter | Value |
Entity | 10USACO |
Sub-account | Elec |
Cost Center | default or Adm |
Intercompany | USACO |
Site | 10-100 |
Location | 010 |
Printer | PAGE |
For all other fields, use the default or choose data from a lookup.
1 Use Sales Order Maintenance (7.1.1) to create a sales order.
a Press Enter on the Order field. Note the order number (needed for the next step)_______________.
Field | Value |
Sales Oder Header | |
Sold-To | 10C1005 (Rockland Industrial Company) |
Bill-To | 10C1005 (Rockland Industrial Company) |
Ship-To | 10C1005 (Rockland Industrial Company) |
| |
Details | |
Taxable | No |
b Specify the line details:
Field | Value |
Ln | 1 |
Item Number | 02003 |
Site | 10-100 |
Qty Ordered | 100 |
List Price | USD 2.34 |
Note: On the sales order line, enter the List Price in the field. Do not use the Price List popup window.
c Press Enter to confirm the line. At line 2, click End Lines and then click Trailer to go to the trailer.
d Press Next twice to confirm the order.
2 Use Sales Order Shipments (7.9.15) to ship all 100 units.
Field | Value |
Order | Insert the order number created at step 1 |
Site | 10-100 |
a Click Next until you reach the lines frame. Enter the data for line 1.
b Press Enter, then Next twice.
“Display sales order lines being shipped”: Yes.
“Is all information correct?”: Yes
c Review the trailer and press Next twice to save.
3 Review the ready to invoice sales order in Pending Invoice Register (7.13.2).
Field | Value |
Sales Order | Enter the sales order number from step 1. |
4 Review the created transactions using Unposted Transaction Register (25.13.14).
Field | Value |
Entered Date | Today |
To | Today |
5 Use Operational Transaction Post (25.13.7) to post the sales order shipment. Limit postings by using the daybook ISS-SO and the current date.
Field | Value |
Daybook | ISS-SO |
To | ISS-SO |
6 Review the GL transaction in Journal Entry View (25.13.1.3). Select transactions for daybook ISS-SO only.
Field | Value |
Daybook Code | ISS-SO |
Double-click your transaction to review the posting details.
7 Use Preview Invoice Print (7.13.3) to print a draft invoice for your sales order.
Field | Value |
Sales Order | Enter the sales order number created at Step 1. |
To | Re-enter the SO number. |
8 Use Invoice Post and Print (7.13.4) to post the customer invoice.
a Enter the sales order number to post.
b Click Next.
c In the Invoice Post Output and Invoice Print Output fields, specify Page.
d Click Next.
A new window opens with the posting details.
e After reviewing the posting details, close the window.
9 View the customer invoice using Customer Invoice View (27.1.1.3).
Look for the customer number (10C1005 Rockland Industrial Company) in the browse and double-click it to select it. Click Search to display the invoices for this customer. You can use the browse filters to further target your search.
10 Review the invoice posting on the CI Posting tab.
11 Run the following reports with the current date as the posting date:
• GL Transaction Report (25.15.1.1)
• GL Transactions Audit Log (25.15.1.9)
• GL Transactions by Daybook (25.15.1.4)
Use the filter criteria to make your search easier (for example, daybook, customer, date).
Note: If unposted transactions prevent the report from running, select Tools | Manage Filter Fields in the menu. Select to display the Check for Unposted Transactions filter criteria. Set Check for Unposted Transactions to No when running the report.
EMEA Exercise: Sales Process
In this exercise, you will create and post customer invoices based on sales orders.
Use the following parameters where needed:
Field | Value |
Entity | 22UKCO |
Sub-Account | Elec |
Cost Center | default, or Adm |
Site | 22-100 |
Location | 10 |
Printer | PAGE |
For all other fields, choose data from the lookups
1 Use Sales Order Maintenance (7.1.1) to create a sales order.
a Press Enter on the Order field. Note the order number (needed for the next step)_______________.
Field | Value |
Sales Oder Header | |
Sold-To | 22C1001 (Teasdale Hospital) |
Bill-To | 22C1001 (Teasdale Hospital) |
Ship-To | 22C1001 (Teasdale Hospital) |
| |
Details | |
Taxable | No |
b Specify the line details:
Field | Value |
Ln | 1 |
Item Number | 02003 |
Site | 22-100 |
Qty Ordered | 100 |
List Price | GBP 2.34 |
Note: On the sales order line, enter the List Price in the field. Do not use the Price List popup window.
c Press Enter to confirm the line. At line 2, click End Lines and then click Trailer to go to the trailer.
d Press Next twice to confirm the order.
2 Use Sales Order Shipments (7.9.15) to ship all 100 units.
Field | Value |
Order | Enter the order number created at Step 1. |
Site | 22-100 |
Lot/Serial | Select from lookup |
a Click Next until you reach the lines frame. Enter the data for line 1.
b Press Enter, then Next twice.
“Display sales order lines being shipped”: Yes.
“Is all information correct?”: Yes
c Review the trailer and press Next twice to save.
3 Review the ready to invoice sales order in Pending Invoice Register (7.13.2).
Field | Value |
Sales Order | Enter the sales order number from Step 1. |
4 Review the created transactions using Unposted Transaction Register (25.13.14).
Field | Value |
Entered Date | Today |
To | Today |
5 Use Operational Transaction Post (25.13.7) to post the sales order shipment. Limit postings by using the daybook ISS-SO and specify the current date.
Field | Value |
Daybook | ISS-SO |
To | ISS-SO |
6 Review the GL transaction in Journal Entry View (25.13.1.3). Select transactions of daybook ISS-SO only.
Field | Value |
Daybook Code | ISS-SO |
Double-click your transaction to review the posting details.
7 Use Preview Invoice Print (7.13.3) to print a draft invoice for your sales order.
Field | Value |
Sales Order | Enter the sales order number created at step 1 |
To | Re-enter the SO number |
Click Next to confirm.
8 Use Invoice Post and Print (7.13.4) to post the customer invoice.
a Enter the sales order number to post.
b Click Next.
c In the Invoice Post Output and Invoice Print Output fields, specify Page.
d Click Next.
A new window opens with the posting details.
e After reviewing the posting details, close the window.
9 View the customer invoice in Customer Invoice View (27.1.1.3).
Look for your customer number (22C1001 (Teasdale Hospital)) in the browse and double-click to select it. Click Search to display the invoices for this customer. You can use other browse filters to further target your search.
Review the invoice posting on the CI Posting tab.
10 Run the following reports with the current date as the posting date:
• GL Transaction Report (25.15.1.1)
• GL Transactions Audit Log (25.15.1.9)
• GL Transactions By Daybook (25.15.1.4)
Use the filter criteria to make your search easier (for example, daybook, customer, date).
Note: If unposted transactions prevent the report from running, select Tools | Manage Filter Fields in the menu. Select to display the Check for Unposted Transactions filter criteria. Set Check for Unposted Transactions to No when running the report.