Maintaining Work Orders
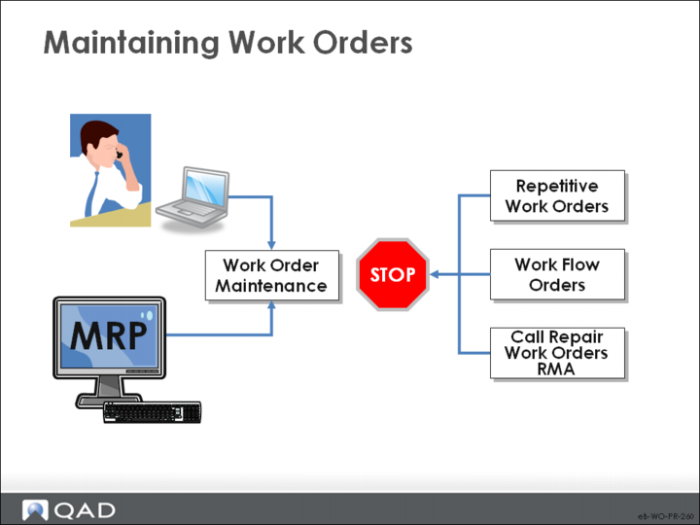
We now look at Work Order Maintenance. You use it to create and maintain work orders. There are several exceptions including:
• Work orders created by entering repetitive schedules are managed in the Repetitive module
• Work Orders created by entering flow schedules are maintained in the Flow module
• Work orders created to manage call repairs are managed with Call Activity Recording in the Service/Support Management module
Work Order Maintenance
Use this function to create and to maintain work orders.
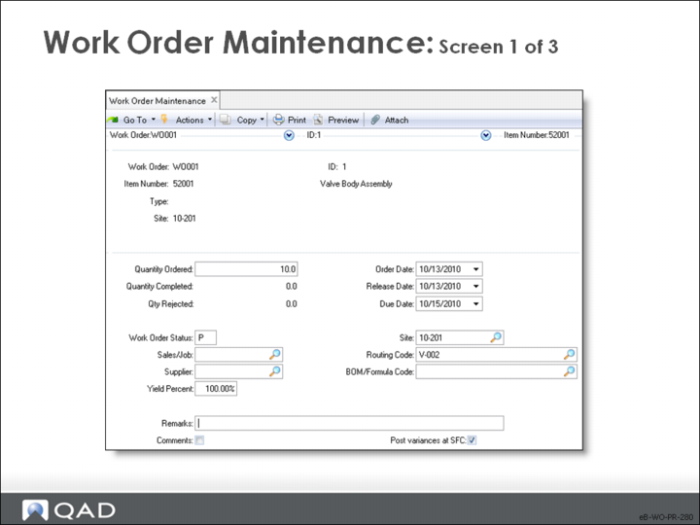
Work Order / ID
Enter the number and ID of the work order
• For new work orders, you can let the system assign numbers by leaving these fields blank
• Some people enter the lot number in ID
Item Number
The number of the item manufactured
Type
The work order type code: blank for Standard, E for Expense, R for Rework, S for Scheduled, C for Cumulative, F for Final Assembly
Site
The site where the item is manufactured
Qty Ordered
The quantity produced on this work order, expressed in the item unit of measure
• If the expected yield is less than 100%, this quantity can be greater than the quantity of usable product you actually expect to receive complete. MRP automatically adjusts planned order quantity to reflect expected yield losses
• Order quantity is used in calculating run time
Qty Completed / Qty Reject
Display-only fields
Order Date
Identifies the date this work order was entered. The default is the system date
Release Date
The date this work order is scheduled to be released to production; default is the system date
• Your initial entry here automatically changes to the actual release date when you release and print the work order
• Most reports and inquiries can be selected for ranges of release dates
• Orders not released on or before this date are flagged on the MRP reports
• Release date determines the date components are required
• Normally components are picked when an order is released, so the component need date defaults to the work order release date
• Some components can be needed before or after production begins, as defined on the product structure in the lead time offset field
• If lead time offset is positive, it is added to the release date
• If it is negative, it is subtracted
• MRP uses component need dates and prints them on the picklist
• The system calculates either release or due date, creating in effect, forward or backward order scheduling
• Enter? to have the system calculate the date using operation times from the item routing
• Enter a Release Date and a question mark in the Due Date to have the system calculate the Due Date. This calculation starts at the beginning of the Release Date and forward schedules starting with the queue time for the first operation
• Enter a Due Date and enter a question mark in the Release Date to have the system calculate it. The calculation starts at the end of the Due Date and backward schedules starting with the last move time for the last operation
• Leave both dates blank to set the Release Date to today and establish forward scheduling
Note: You can get different release and due dates using forward versus backward scheduling. This difference is because some lead time components are scheduled in shop days and some in calendar days. A shop day lead time component is possibly in effect over a weekend in one direction, whereas in the opposite direction, a calendar day component is in effect.
Due Date
The date this work order is due to be completed
• Defaults to today’s date plus the manufacturing lead time for the item
• Enter ? here and a date in Release Date to have QAD Enterprise Applications calculate the Due Date. The calculation starts at the beginning of the Release Date and forward schedules starting with the queue time for the first operation
• This date is the date you plan to have product available for shipment to a customer or to issue to another manufacturing order
• All MRP plans are based on this due date and most reports and inquiries can be selected for ranges of due dates
Status
The current state of the work order
• P for Planned by MRP (not set manually)
• F for Firm Planned, approved orders
• B for Firm planned orders entered in batch
• E for Exploded
• A for Allocated
• R for Released
Note: You can release orders in Work Order Maintenance by changing their status to R. This method does not let you print a picklist or routing, but it still explodes phantom components and creates work orders for routable components.
• C for Closed
Sales/Job
An optional code associating this manufacturing order with a specific sales/job
• Most reports and inquiries can be selected with sales/job number
• Sales/job numbers can be referenced on purchase orders, work orders, and intersite requisitions, allowing you to review the progress of all activities associated with a particular sales order, contract, or job number
• Sales/job numbers are not validated
Supplier
The supplier associated with this work order, if any
• When a work order is entirely subcontracted, the supplier can be recorded on the work order and on the work order routing operation
• This field is for reference only. It appears on some reports and inquiries
Yield
The percentage of this work order expected to be in usable condition
• The order quantity is the number of units of the item you plan to produce
• If the expected yield is less than 100%, the order quantity can be greater than the quantity of usable product you actually expect to receive complete
• MRP automatically adjusts planned order quantity to reflect expected yield losses
• Line items on MRP reports contain Scrap Requirement and reference the work order number and lot ID
Note: Since the order quantity has effects in many areas, select an order size that meets the production, marketing, and customer service goals of the company.
Site
Identifies the place where this work order is being processed
Routing Code
Identifies the routing for this work order
• It can identify an alternate routing
• Leave blank to use the routing stored with a code equal to the item number on the work order
• The routing code entered on the work order accesses the operation steps for the work order routing; these operations influence scheduling and variance calculations
BOM/Formula
Identifies the bill of material (product structure) or formula for this work order. Leave blank to use the product structure stored with a code equal to the item number on the work order
Remarks
General remarks pertaining to this work order. This field is for reference only and can appear on some selected reports and inquiries
Comments
Indicate whether to enter comments for this work order
• Yes to display another screen for entry or review of comments. The text can be entered manually or copied from existing master comments
• Work order comments print on the work order
Post Variances at SFC
Indicates whether variances are recalculated and posted only at the time of work order receipt
• Yes: Labor and burden variances are posted whenever shop floor labor feedback transactions are entered
• No: Variances are suppressed and not calculated or posted until the work order is received. This choice reduces the number of variance transactions posted to the general ledger, particularly if there are many shop floor labor transactions processed before material receipts are recorded
Note: If you have long run times, set this field to No, suppressing variance calculations until finished product is received. If you have short run times, set this field to Yes.
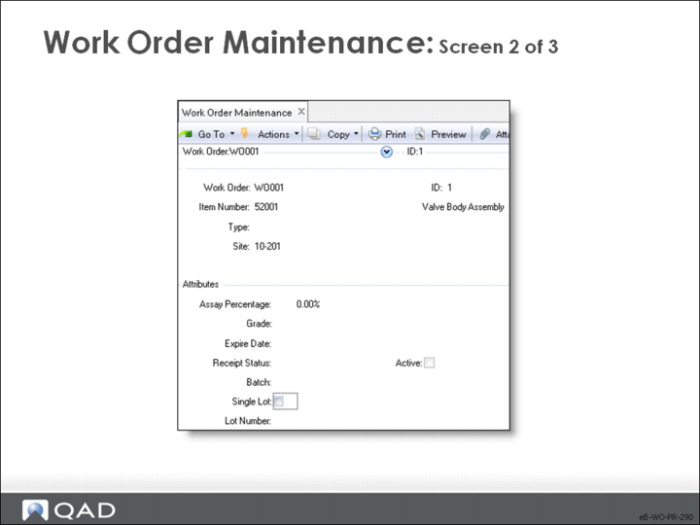
Work Order Attributes
This screen solicits various attributes of the work order. These attributes relate mainly to the Regulatory Attributes module (called the Compliance module in QAD SE). This module enables you to manage compliance with government regulations such as the FDA Current Good Manufacturing Practices and international agreements such as NAFTA and GATT.
With compliance active, these fields accept input as required. Attributes can also be assigned at work order receipt.
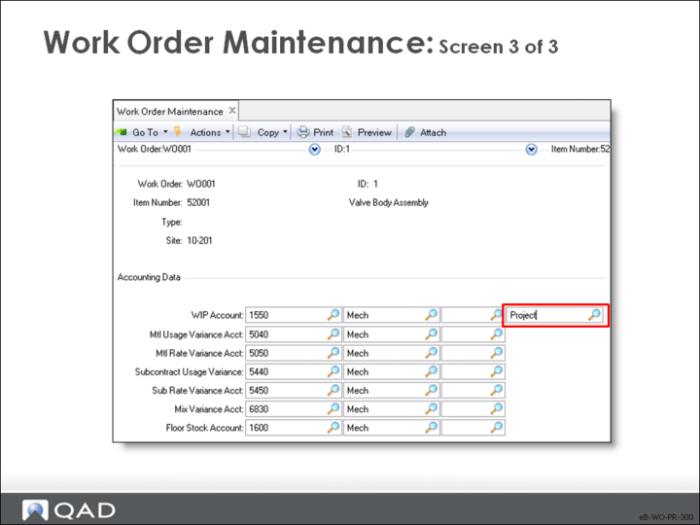
Accounting Data
This screen accepts input of the General Ledger accounts and sub-accounts for the work order.
WIP Account / Mtl Variance Account / Mtl Rate Variance Account / Sub Usage Variance Account / Sub Rate Variance Account / Mix Variance Account / Floor Stock Account
Enter the accounts as needed; defaults appear and can be overridden
Project
An optional code identifying the project this work order relates to
• Project codes identify specific activities towards which expenses are tracked
• For example, a project code can be used to represent engineering design work, production rework, or a new construction project
• The project code entered on the work order is used for all GL transactions material issues and receipts create for this work order. It also appears as the default during labor feedback transactions
• This code allows you to track the cost of the work order by project. It is useful on special orders, rework, and expense type orders
• Project details appear on several GL summary and detail reports
Note: Project codes can be used to track inventory value (but not physical inventory).