Creating Pre-Shippers Automatically
DO Picklist/Pre-Shipper–Auto creates pre-shippers for orders generated in Distribution Order Workbench (12.17.13) and Distribution Order Maintenance (12.17.14). Once you create a set of pre-shippers, you can merge them with other pre-shippers and shippers using DO Pre-Shipper/Shipper Maint (12.19.3).
When it creates the DO pre-shippers, DO Picklist/Pre-Shipper–Auto can create detail allocations and assign containers.
Before the system finishes creating a batch of pre-shippers, it prompts you to confirm each pre-shipper. You can verify that each pre-shipper printed correctly before recording detail allocation transactions.
Total shipping requirements can be broken down into multiple pre‑shippers based on shipping weight, address list types, or other criteria set up in DO Picklist/Pre-Shipper–Auto.
Allocating Inventory
When you create pre-shippers using DO Picklist/Pre-Shipper–Auto (12.19.1), the system can detail allocate inventory depending on how you set it up.
In general, the system performs two types of allocations:
• General allocations reserve some quantity of an item number at a specific site to fill a specific confirmed order. This can be done in Distribution Order Maintenance (12.17.14).
• Detail allocations reserve unexpired, on-hand inventory uniquely identified by site, location, lot/serial number, and reference number.
A detail allocation is often referred to as an item being picked, either for a manufacturing operation or a distribution order. Inventory can be allocated at several stages in the life cycle of a distribution order:
• You create these allocations by specifying an amount in the Allocated field in Distribution Order Maintenance.
• To set detail allocations in Distribution Order Maintenance, set Detail Allocations to Yes to display a pop-up window for specifying detail allocations.
• DO Picklist/Pre-Shipper–Auto (12.19.1) normally prints picked quantities only (set Print Only Lines to Pick to Yes). The DO pre-shipper details each item by quantity per location, lot, and reference number. The system converts general allocations to detail allocations at this time.
When you create a pre-shipper with DO Picklist/Pre-Shipper–Auto, the allocations made to the original distribution order are deleted and new allocations created for the pre-shipper. This is not true when you create a pre-shipper manually or add another distribution order line to a pre-shipper with DO Pre-Shipper/Shipper Maint. In this case, the pre-shipper allocations are consumed from the distribution order allocations, but the remaining allocated quantities, if any, are deleted.
You can select orders by range of due date, distribution order number or date, source and receiving sites, language, and item number. These selection criteria determine which orders are processed. They have no effect on the sequence in which distribution orders are picked and printed. The system always picks items for distribution orders in sequence by site and then distribution order number.
Running DO Picklist/Pre-Shipper–Auto can produce different results based on the setting of Stage Open Quantities and Print Only Lines to Pick.
• Stage Open Quantities. If Yes, pre-shippers are created based on open distribution order quantities, not allocated quantities. This lets you create pre-shippers for distribution order lines even when sufficient inventory is not available. This option is useful when you are sure that inventory will become available soon.
• Print Only Lines to Pick. If Yes, only lines with an allocated quantity print. If No, all distribution order line items with a non-zero open quantity are printed, regardless of the quantity allocated.
When Print Only Lines to Pick is No and an allocated quantity does not exist, a document still prints, but the pre-shipper number is blank. The document lists distribution order line items with a quantity open greater than zero.
Specifying Other Picklist Defaults
If Require Inventory Movement Codes is Yes in Distr Order Shipper Acct Control (36.9.8), the system looks for a default inventory movement code to assign to each picklist. An error is generated when:
• The system cannot find a default inventory movement code based on the shipping group.
• You are denied access to the code at the ship-from site of the picklist/pre-shipper.
If movement codes are not required, picklists are created without them.
The system assigns a picklist/pre-shipper ID based on the NRM sequence ID for the inventory movement code and shipping group, or from DO Container/Shipper Control. In order for the system to dispense the number, the NRM sequence must be an internal sequence (system-generated). If the assigned NRM sequence is an external sequence, the system displays an error message.
The document format and carriers used are also based on defaults defined for the inventory movement code and shipping group, or DO Container/Shipper Control.
Consolidation Requirements
Consolidation requirements are based on the shipping group used for the shipment.
• If either the source or receiving site of the shipment prohibits consolidation, the system generates a new picklist for each distribution order.
• If either the source or receiving site requires consolidation, and other consolidation criteria are met (such as weight and volume limitations), the system consolidates line items on a single picklist.
The Max Lines on a Pre-Shipper field in DO Container/Shipper Control limits the number of printed lines allowed on each picklist, which can limit the number of line items. This takes precedence over consolidation requirements.
Note: The Break on Maximum Weight and Break on Maximum Volume options can also affect consolidation.
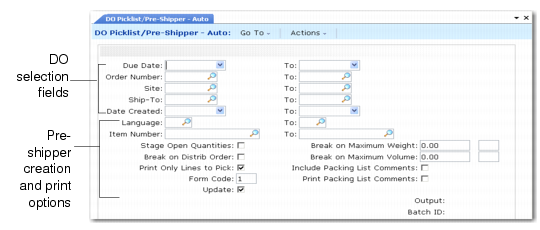
Selecting Distribution Orders for Pre-Shipper Creation
The range of values you enter in the distribution order selection fields of DO Picklist/Pre-Shipper–Auto (12.19.1) determines the distribution orders for which the system creates pre-shippers. Each of these fields includes a From and a To value. Leaving any of these fields blank results in the system considering all distribution orders; (see
DO Picklist/ Pre-Shipper– Auto (12.19.1)).
DO Picklist/
Pre-Shipper– Auto (12.19.1)
Selecting Pre-Shipper Creation Options
The following fields define the system’s level of automation when creating pre-shippers, based on the distribution order line items selected:
Stage Open Quantities
Enter Yes to create pre-shippers for distribution order requisition lines that cannot be detail allocated because inventory is not available. Picklists are created based on open distribution order line quantities. Enter No to ignore distribution order lines for items without available inventory.
Break on Distr Order
Enter Yes to have the system create separate pre-shippers for each distribution order with the same ship‑to address code or No to have the system combine all distribution orders with the same ship‑to address code for a single pre‑shipper.
Break on Maximum Weight
Indicate whether the system only creates picklists that do not exceed the weight you specify here. If the gross weight is zero, it has no effect on picklist creation. If non-zero, the system ensures that no picklists are created with a gross weight that exceeds the entered maximum weight.
The logic works as follows: before a new line item is added to a picklist, the system checks whether the gross weight of the picklist including the new line exceeds the specified weight. If it does not exceed the maximum weight, the system adds the line item to the picklist; otherwise, the system creates a new picklist and adds the line item to the new picklist.
Enter the UM associated with the maximum weight in the second field. When you set up UM here, you define the conversion factor between this UM and the one in Item Master Maintenance (1.4.1). If not found, the system assumes a 1:1 conversion factor.
Break on Maximum Volume
Indicate whether the system prevents the creation of picklists that exceed the maximum volume you specify here. If zero, volume has no effect on picklist creation. If non-zero, the system ensures that no picklists are created with a volume that exceeds the maximum volume entered.
The logic works as follows: before a new line item is added to a picklist, the system checks whether the volume of the picklist including the new line exceeds the specified volume. If it does not exceed the maximum volume, the system adds the line item to the picklist; otherwise, the system creates a new picklist and adds the line item to the new picklist.
Enter the UM associated with the volume in the second field. When you set up a UM here, you define the conversion factor between this UM and the one in Item Master Maintenance (1.4.1). If not found, the system assumes a 1:1 conversion factor.
Selecting Printer Options
Include Packing List Comments
Enter Yes to leave room on each pre-shipper page to print packing list comments or No to ignore the size of packing list comments in consideration of the number of lines on the pre-shipper. This setting works in relation to the Max Lines on a DO Pre-Shipper setting in Container/Shipper Control (12.19.24). If zero, the Include Packing List Comments setting has no effect. See
DO Picklist/ Pre-Shipper– Auto (12.19.1).
Print Only Lines to Pick
Indicate whether to print distribution order line item numbers that have been detail allocated on packing lists or No to print all distribution order line item numbers regardless of allocations.
Stage Open Quantities also affects how inventory items are selected for printing in this program, based on whether they are detail allocated. See
here.
Print Packing List Comments
Enter Yes to print packing list comments or No to not print packing list comments.
Form Code
Specify the form code of the document format on which you want these documents to print. You can customize forms to suit your business needs.
Running DO Picklist/Pre-Shipper–Auto
The following instructions give a generalized view of how to use DO Picklist/Pre-Shipper–Auto. The settings you use depend on the processes and methods employed in your operation. Review the previous sections carefully to make sure you understand how this program works and what settings you must make in this and other programs in order to get the results you want.
1 Choose DO Picklist/Pre-Shipper–Auto (12.19.1) and enter a range of values matching the numbers of the distribution orders for which you want to create pre-shippers.
3 Choose a device in Output and, optionally, enter a Batch ID. The system displays a message while the report is running.
When the report is complete, you are prompted to update the quantity picked.
4 Review the report to confirm that the correct distribution orders have been selected and that the Pre-Shipper List is satisfactory.
5 Choose Yes at the Update Quantity Picked? message to accept the update and continue processing the transactions or No to modify your distribution order selections or the update parameters.
6 If you chose No in step 5, repeat steps 2 through 5 until you are satisfied with the Pre-Shipper List.