Financial Report Run
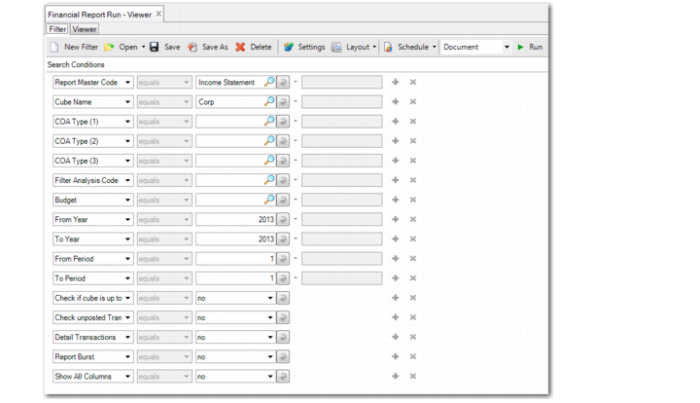
When you select Financial Report Run (25.16.20) from the menu, the following screen opens:
Financial Report Run
Report Master Code
Enter the report master code for the report. You can select the code from the lookup. This field is mandatory. The report master determines the layout of the report, such as columns, indents, and style.
Cube Name
Enter the report cube where the report data is stored. You can select the cube name from the lookup. This field is mandatory. The report cube determines where the report amounts are retrieved from and determines the presentation currency and the report calendar.
COA Type (1-3)
Specify up to three dimensions to explode analysis codes in the report. For example, you can choose to explode the report first by GL account, then by sub-account, and then by cost center. This field is optional. An exploded analysis code displays each of its components in a separate line. You can specify the dimensions for which the explosion applies. For example, the analysis code SALES is defined for a range of GL accounts. If you do not specify a COA type when running the report, the report displays the value amount of the GL accounts included in SALES. If you specify Entity as the COA type, the report displays the subtotals for each entity of SALES on a separate line.
The report cube must include the dimension. If the data for the dimension is not collected in the cube, the report cannot display details. Dimensions GL account, Entity, Layer and Intercompany are always available in a cube.
Filter Analysis Code
Specify a report analysis code. The code must be type A. The selection of the Filter Report Analysis code is applied to the whole report tree. This field is optional.
If you have configured a report analysis code to have a controlling dimension and want to generate reports for that dimension, specify the analysis code in this field. To create separate sub-reports for the controlling dimension, you must also set the Report Burst selection criteria to Yes.
Budget
When you run a report that includes a budget column, specify the FRW budget structure to use for the budget data.
From Year
Specify the first year for which to run the report.
To Year
Specify the last year for which to run the report.
From Period
Specify the first period for which to run the report.
To Period
Specify the last period for which to run the report. To indicate the time range of the report, specify at least one year and period in the From Year/Period or To Year/Period fields. If you only enter the From Year/Period or To Year/Period, the end of the range is automatically set to the same year and period.
Check If Cube Is Up To Date
When set to yes, the system checks whether there are unprocessed queue records for the history daemon and cube daemon. When a queue record is found, an error is raised and the report is not printed.
Check unposted Transactions
When set to yes, the system checks whether there are unposted transactions waiting to be processed by Operational Transaction Post (25.13.7). When any unposted transactions are found, an error is raised and the report is not printed.
To save the report run settings as a report variant, on the header, click the Save As field. Specify a name for your report filter. The next time you run the report, to find your filter in the drop-down list, on the header click the Open button. Click the variant you want to use. The filter fields are filled automatically with the previously saved settings.
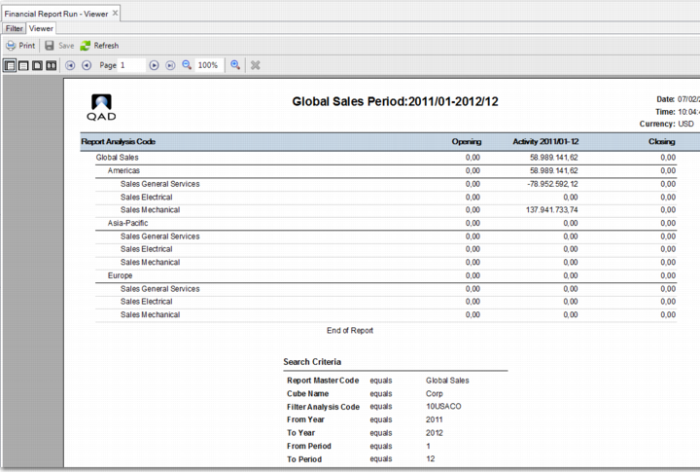
To run the report, on the header, click the Run button. The Viewer tab displays the report result.
Detail Transactions
Select Yes to print detailed GL transactions on the report. To use this option, you must also have selected All or Selected in the Print GL Transactions field on the report master.
If you set this field to Yes, but have not configured the required setup in Report Master Create or in Report Tree Maintenance, the report displays an error message.
Select No if you do not want to print detailed GL transactions on the report.
Report Burst
If you have set up controlling dimensions for report analysis codes, this setting allows you to create a separate report page for each controlling dimension.
Select Yes to create a separate report page for each controlling dimension. You must also specify the report analysis code with the controlling dimension in the Filter Analysis Code.
Select No to create a separate report page for each controlling dimension.
Show COA Columns
Select Yes to display additional columns on the report.
When you set Show COA Columns to Yes and Detail Transaction to Yes, the report displays additional COA columns and uses an Excel layout to allow the additional COA columns to display.
If you set Show COA Columns to Yes, but the COA Type fields are blank and the Detail Transactions field is set to No, an error message displays indicating that the Show COA Columns option requires a COA Type and that Detail Transactions must be set to Yes.
Layout Menu
The Layout menu at the top of the Financial Report Run screen contains two choices:
• Default. Use the Default layout to print a report with up to 16 columns. You can print the report on A4 or A3 paper, depending on the number of columns.
• Excel. The Excel layout can generate a report with up to 60 columns and is optimized for output to Excel. However, you can also view the report using the Document Viewer. If you are using the Show COA Columns option for a report, it is recommended that you use the Excel layout to accommodate the many columns that can result from this output.
Financial Report Run Result
To print the report, click the Print button. You can also export the report to different formats such as PDF and Excel. Click the drop-down list next to the Run button, select the format you want to export to, and click Run. The report is displayed in the selected format. To export the result to a file, click the Save button.